blog backbdrop

Tuesday 30 July 2019

Engagement Card

Today I thought I'd share my an engagement card I made for my daughter using my Tattered Lace dies.


For the card base I used the Tattered Lace Fine Filament Portifino die set with snow white centura pearl with a silver grey pearlescent lacy panel from the same die set. I also used the heart die from the dimensional heart handbag die set with some Hunkydory silver mirri card.

3D Decoupage Gardenia Diamond


Fine Filament Portifino


I chose the 3D decoupage Gardenia Diamond die set flowers for my card, printing the matching charisma paper onto white centura pearl paper. These charisma papers are available as a free download direct from the Tattered Lace website under the Raspberry Roses Collection.


I cut away the diamond frame to leave me with an arc of gardenias, which were decoupaged. The lacy edge large square die also makes a perfect matching insert for the card.  Finishing off with some organza ribbon, diamonte ribbon slidder and Tattered Lace word dies.


I think these dies work so well together and was really happy with how my card turned out.

Happy Crafting


.

Friday 26 July 2019

Tattered Lace - Even More Words DT samples

Following the launch of Tattered Lace Even More Words collection, I am sharing my DT samples made from some of the dies for the launch on Create and Craft TV  today.

I used the following dies for my samples: - King of  Everything, Top Hat, Expression of Lace Diamond Frames & Nested Pint Glass dies


For my first card I have used a mix of the King of Everything, Top Hat and the Expression of Lace Diamond Frame dies

I have printed the Diamond Frame onto a velour cardstock for that felt look and then decoupaged it.


I thought the Top Hat and monocle gave the lion a quirky gentry look and as you know I love quirky!


Using the same dies but taking away the Top Hat dies I have gone for a more Serengeti look, using paper from one of Tattered Lace's downloads.


Bringing his mane forward for a little more dimension.


For a very different look, I  die cut the lions face into the black cardstock, then used copier paper scrunched around the lions face. For this, I used a matt medium to stick it down and a thin coating over the top.  Let it dry before adding your choice of gilding wax. I have gone for bronze by Treasure Gold. A little goes a very long way as its really creamy.


I have then mounted it onto a combination of black card and Hunkidory chocolate mirri card.


I have gone for a steampunk look with this easel card using the Expression of Lace Diamond Frame dies which have been decoupaged onto gold mirri card and part of the Top Hat die set.  The patterned papers are from the Tattered Lace Neo Victoriana collection.


I die cut the top hat frome papers from the Neo Victoriana collection and then chopped up parts of another which looked like metal plates to form the steampunk effect for my top hat.

I used a brass button from my stash and the monocle from the Top Hat collection for the watch. I found some papers in my stash with clocks on, small enough to create a fob watch and added a circle of acetate for a more realistic effect.


 The fob watch can actually be moved up and down and has a solid back as a fob watch would have.


It all just seemed to work together, the way I wanted it to fortunately!! and I added a key (from a pack of key embellishments) to complete this project.


I really like this particular die set, the more I used it, the more I found I could make with it. It really does help to have a play first before you dive in and make a project, just to see what works and what doesn't.


I had seen quite a few "Like a Sir" themed items about and thought this die set would lend itself perfectly to  this.  Instead of using the matching charisma papers that you can download with your dies directly from the Tattered Lace Website  I decided to die cut using black centura pearl card and a gold matt mirri card. I paper pieced the cane and hat and again used acetate in the monocle for a more realistic affect.


The backing papers were from a download I had and printed them onto my cream velour paper/card.  I originally purchased this paper from the Dreamees website and use it a lot as it give your projects a lovely suede like feel as well as prints perfectly.  I also used the Tattered Lace Precious Nested Book for my card base.


Again I have added another little fob watch to the spine of the card which is moveable using the monocle from the Top Hat collection.


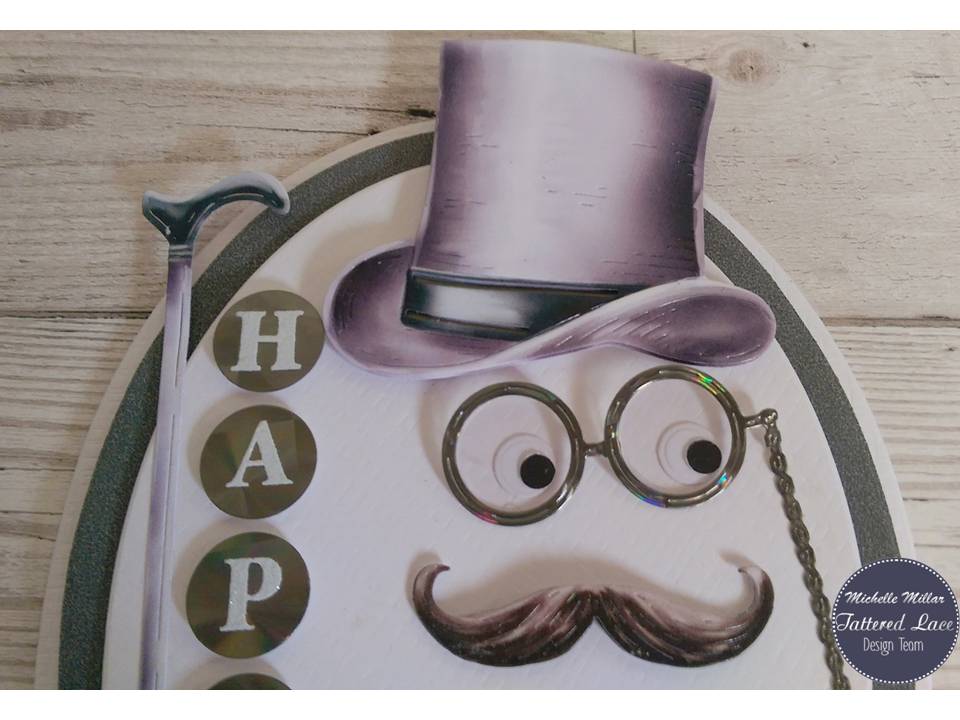
For my oval card I have just used the Top Hat die set but made the monocle into some specticles, adding googly eyes. I added the card stand because I thought my card would sit better on it and then thought it looked like a "Mr Potato Head" with feet!! I have also used the Oval 3 Foundation die set for the card base.


Circus/party themed was my next idea behind this card, incorporating the canes as prop sticks like the ones you get in these photo booths you can hire for parties and weddings.


I have used the match charisma papers for the dies for this project.


I mixed the Top Hat die set with the Nested Pint Glass die set, using one of the larger dies in the set for the face. Making a pair of spectacles again from the monocle, I added some holographic card for some Ringo Starr glasses! ....I just love the ginger moustache and beard on this one.


It just needed something else though and ribbon didn't seem to fit on a male card so decided to tie it into a tie, as I had a piece just the right colour and just big enough to tie!!


Cardstock was a 12 x 12 scrapbook piece from my stash. That's why I have so many random bits of craftstock ......because you never know when you might need an oddment.


Right, on to the Nested Pint Glass die set, Ideal for male cards, a little different and at first I wasn't too sure what to use it for apart from the obvious shape. I used it as part of a face in the previous card and made a shaker card using the largest dies.  I did have to search for the shaker cup, which I knew I had but didn't know where. This shaker cup is one by Stamping Up but there are various other branded ones about, but I knew this would be the right size for my card. 


I filled it with tiny pint glasses using the smallest die in the collection with a remnant of  mirri card that I can only describe as a metallic peach. I also used my Tattered Lace Nested Circle dies to die cut the outer circle. for the shaker cup.


For cardstock, I went with a piece of mustard card, mink centura pearl card onto a kraft card base.


For a slightly different look, I used my Tattered Lace Tall Stepper die for a base with the larger pint glass dies layered up onto mink centura pearl card, mulberry red mirri card by Hunkydory and chocolate centura pearl card for the top layer.


Using some sand coloured core coordination card by Tim Holtz that I had I used one of the small Pint Glass dies to decorate, adding some frosted lace stickles for the foam on my pint.


A few ribbon banners and a sentiment, just to finish it off.


My final card to share is a bit retro, with that familiar diamond pattern I remember my dad having on his socks. I have used the Tattered Lace Diamond Foundation dies on my felt cardstock again to form the pattern.


This time I have paper pieced my Pint of beer and added a layer of acetate for the glass effect, with some frosted lace stickles for the foam.


A piece of worded birthday ribbon finished it off nicely and meant I didn't need to add a sentiment to the front of my card.


Men's cards always seem a challenge to make but I really enjoyed using this collection and I'm sure it will come in very handy in the future.


Happy Crafting


Wednesday 24 July 2019

Stephanie Weightmans Its a Gift Signature Collection from Tattered Lace

Following the launch of Stephanie Weightmans  It's a Gift Signature Collection from Tattered Lace, I am sharing my DT samples made from some of the dies for the launch on Create and Craft TV 

I used the following dies for my samples along with the :-


 My envelope bouquet made using a printed envelope template from the It's a Gift usb, which has been overlayed with a few of the digital images also on the  usb. You can just see the boots and butterfly.
I have also used a mixture of blooms from the Tattered Lace  pressed rose collection and carnations from the Fresco Floral Collection, with a few sprigs of the maidenhair fern from the Oasis Floral Garland collection. All the flowers have been decoupaged.


Any flowers would look lovely and makes a pretty display card to brighten any mantelpiece or shelf.
I have used a lush dusky pink taffeta wired ribbon to finish it off.

As the envelope has a little dimension to it, along with a little weight from the flowers I used a card stand to display the card.  This particular one happens to be a Tonic one and is an invaluable die to have in your collection for projects that like this.


The wired ribbon gives your project a little more shape and a great help for tieing your bows too.


I used all 3 dies for this project. the Layered Flowers, Layered Birds and Vintage It's a Gift Tag dies.
Using the largest printed envelope template which will fit an A5 card with plenty of room to spare, I made an easel card using the Vintage It's a Gift die set as a bird cage. I used the small diamond cluster dies to cut out the inner die to create a cage effect.


I created roses from pink mulberry paper using the Layered Flowers dies and leaf dies from another collection.


I love the shabby chic vintage look to these papers and the envelope was printed on both sides white colour core textured cardstock from Create and Craft, which was perfect for the style of card and structure.


The usb collection also has toppers which can be used as they are or you can create your own using the overlays.


The little birds were printed onto pearlescent card using some ombre papers from the Spring/Easter Tattered Lace paper collection with miniature Fleurs flowers on mulberry paper to match the large roses on the envelope.


 ...And of course, it folds flat enough to go into the envelope.


I have used the Vintage It's a Gift Tag die set as a sort of open book on the front of my card this time. I wasn't really sure when I started this card, the direction I was going with it but sometimes the best thing to do with your dies when you get them is to have a play and find out what works.


  I have also utilized one of the smaller Vintage Tag die along with the smaller layered bird die.


I've used the bird's wing die to make a winged feature on the inside with Tattered Lace stamped sentiments.


 I have used the papers from the usb collection and changed the colourway in My Craft Studio Elite to get the shade I wanted to match my colour core card from Create & Craft.  I also used an older Tattered Lace die - pearl rectangles.

This card will also fit comfortably in the larger envelope template on the usb collection.


Going from larger envelopes to little ones. I used one of the printed envelope templates, reduced it in My Craft Studio Elite to make a little invite card. Just to show that it is possible to make your own sized envelopes but I would suggest that you make the envelope first to ensure and decipher the size of the project to fit inside.


 A quirky idea after seeing various bridal ideas online. Why not make your own instead of getting them printed.

 I printed the envelope onto pearlescent card, adding the invite verse in My Craft Studio Elite before printing it off and die cutting it using the smaller Vintage Tag dies.  Edged in pink lace and decorated with miniature Fleurs flower dies on mulberry paper.


Decorated with a string of flat backed pearls. Dainty and pretty I think and can be adapted for any occasion.


Also on the usb collection are a set of printed gift box templates.  On this particular one I have added some of the overlays and printed it onto cream card, then glittered.


I adding a coordinating tag and chocolate organza ribbon.


The little gift card which fits in the box was made with the smaller Vintage Tag die and a topper from the usb collection.


I didn't stop there, I used the same paper to make matching tissue paper which I also used for the candles.  To adhere the tissue paper to my candles I used Deco Art Matt medium,


 The Vintage It's a Gift Tag die set also makes a lovely card shape. I used snow white centura pearl card stock and a tonic effect apple green vellum which I thought worked really well with the backing papers from the usb collection for my vintage shabby chic card.  Again I have used all 3 die sets for my card.


Matching up some green organza ribbon and grey strung pearls from my stash, with a metal embellishment.


For a slightly different look, I die cut the Layered Flowers from the same printed paper and layered it up with the tonic green vellum on little foam pads for more dimension for a more towering flower.


The long diamond dies to cut a pattern into your card which you can incorporate as borders or to form a pattern.


Finally, I focused on the Layered  Flower dies. I die cut my flowers using the purple charisma paper from the collection, onto my ice white 190gsm photo paper. Shaping each flower before putting them together with a glue gun.


The flowers had a suede look to them which I really liked and used some pink stamens to give them a little more life.


I printed the matching backing paper onto some sumi paper for a more shabby chic panel and used the lacy edge of the Vintage It's a Gift Tag die on silver matt mirri card for my flowers to sit on.


I kept this card quite simple as I was focusing on the flowers.


Fortunately, it just fit in the envelope I made (due to the dimension on the flowers). Again I used white textured colour core card for the envelope.


So there you have it, a few ways you can use some of these dies in this beautiful collection

Happy Crafting


WOYWW #777

Happy 'What's on Your desk Wednesday!' This is my first contribution to the blog, that I came across the other day, so I thought...