blog backbdrop

Thursday 28 December 2017

Visible Image - The Ripple Effect stap set Male Birthday Card

Using the inspiration from the Visible Image gallery on their website, I used their Ripple Effect background stamp to form the main image on a male birthday card I needed to make.


To make this A5 card I used Kraft card for the base with black card as a layer for the main panel of the card which was watercolour card.


Using the largest stamp I heat embossed it onto black cardstock using black embossing powder to form the 3 music records.


On a piece of A5 watercolour card I used my Dreamees dinky inkies to form the background. I chose an orange and yellow from the Spring/Summer Collection and a green from the Autumn/Winter collection.  These are water-based inks. I use a little glycerine on my craft mat to help them glide and blend in the same way as my Tim Holtz distress inks.


Using both circle stamps from The Ripple Effect set. I then made a border around the card using a light brown dinky inky from the Spring/Summer collection.


I then die cut the stamped circles along with some smaller circles to form the middle part of the records and some coordinating card from the Tim Holtz kraft card nostalgic textured card pad.


Using two of the stamps for the centres, I saved the last disc to stamp a birthday sentiment.

I made a record sleeve with the card that I had pre-cut and stamped the wording from the Jazz it up stamp set.  I love this cardstock, it has a lovely grain and slight sheen on one side. the other side is kraft card.


I then arranged my records on the card. I love this background stamp, it's so versatile and after seeing a sample card made using this stamp to make a record, I thought it was a great idea to recreate.


I have chosen these colours as I wanted to achieve a retro feel to the card.


https://visibleimage.co.uk/

Happy Crafting


Birthday Card using Visible Image - Music on World Off Stamp Set

My son needed a last minute birthday card as he had forgotten to get one whilst in town. Well, the snow came and he asked me if I could rustle up something in time for his friends birthday celebrations that evening.

It just so happened I had received my bundle of Visible Image stamps from the black Friday sales and thought they would be perfect for the task in hand.   I decided to use the 
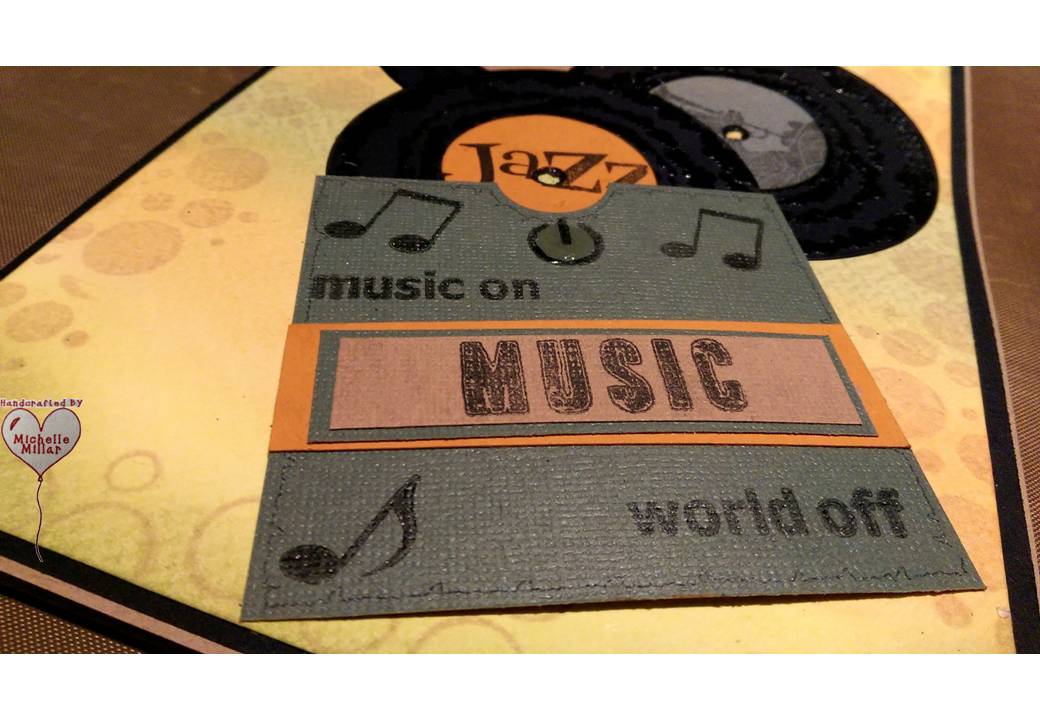
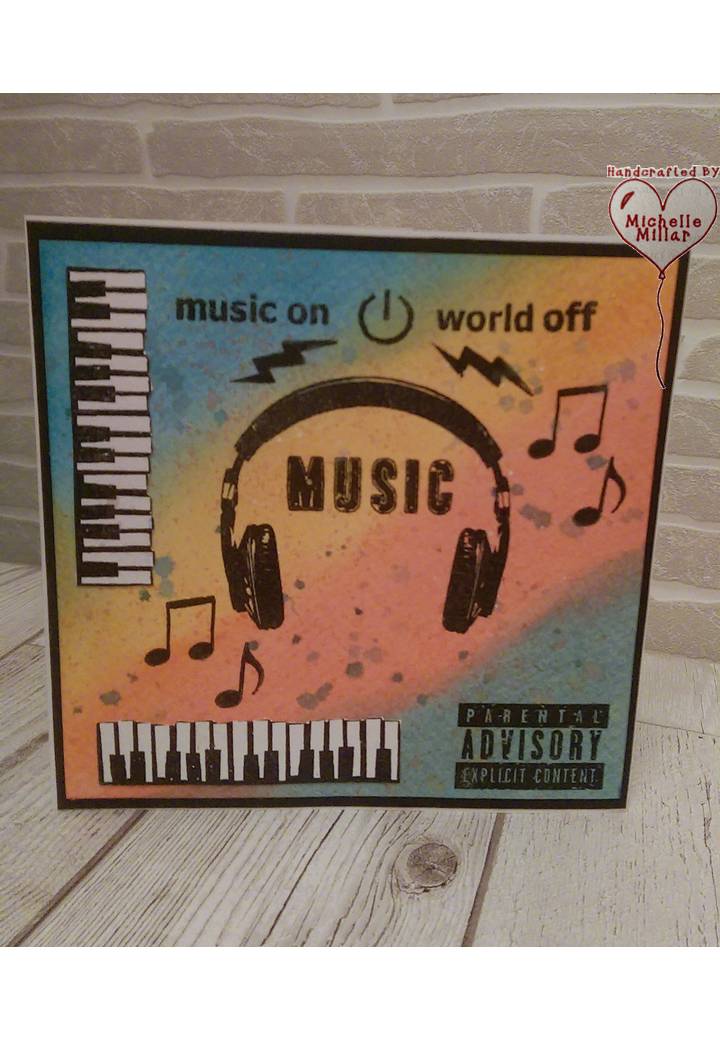
Visible Image Music on World off stamp set.
Instead of an insert, I used the same headphone image and some word stamps from another stamp set  I had.


On watercolour card, I stamped the main image using black Versafine ink and then very quickly covered it with Stamps Away clear embossing powder before the ink dried. This is a good alternative to using the black embossing powder (as long as you work quickly using this technique). Sometimes when using dark embossing powders you can get stray flecks of powder on the image when heat embossing it and can end up with a speckled image.  Tip the powder off as normal and heat emboss and you will still end up with an embossed image.  Visible Image stamps are deeply etched and pick up so much detail.


Another good tip when inking a background with distress inks/waterbased inks is to use a little glycerine with your ink applicator but do not add it to your ink pad. I kept a misting bottle I had and decanted a little glycerine that I purchased from the chemist into it. You only need a few drops mixed with your ink to help it glide across the paper when creating an inky background.

 I first inked my mat then dabbed by dauber into the glycerine (which you can just see above by dauber on the mat) then gently stroked it across the card starting from the corner working in. It gives you a streak free finish.   As you can see I started with Tim Holtz spiced marmalade, broken china and evergreen bough (mini ink pad) distress ink.

I also used Tim Holtz scattered straw distress ink in the centre of the card. Once the inked card was dry I used various stamps from the Visible Image Music on World Off stamp set and heat embossed them onto the card, with the exception of the keyboard which was from the Visible Image Jazz It Up stamp set. This has been heat embossed onto white card.


I then thought it needed to be grunged up a little, so splattered a little distress ink mixed with water on my craft mat and randomly splattered it onto my card, dabbing it with a piece of kitchen towel to absorb the excess ink.

My son was delighted with the outcome and I was happy with it too.


https://visibleimage.co.uk/


Happy Crafting

Saturday 23 December 2017

ATCs For December 2017 Group Swap - Using Dreamees

Here are my ATCs for December 2017, with the only specification for the use of red & green to be used along with a stamp of any kind.]


I used a red and green Dreamees dinky Inkies for the background onto watercolour card and then versafine clear embossing powder through a criss cross stencil stencil, embossing them with gold superfine wow embossing powder.

I also heat embossed The Dreamees Esquisitely Exotic flower stamps onto mars red pearlescent paper by Chloe Endean.
The cute snowman was from The Dreamees Let it Snow stamp set which has stamped onto white card, coloured with a red dinky inky and orange for the nose, metallic green pearl drops for the buttons and frosted lace stickles around the trim of the santa hat. The snowman was also embossed with clear embossing powder. i also used the "fa la la la la" sentiment.
I used pinflair glue gel to get a little dimension on the snowman and added some little polystyrene balls for snow.


Finally, I added some black card as a firm base to the ATCs. and they were ready to go!


http://www.dreamees.org.uk/


Happy Crafting


Inchies For December 2017 Group Swap - Using Stamping Up

last of my swaps for the year. These are my inchies for the December group swap.

For my inchies I used some brick backing paper of The Dreamees Textures cd and backed it onto kraft card.


 I then used the house stamp from the Stamping Up You Brighten My Day stamp set and stamped an extra set of doors onto red card.  ( This stamp set has been retired)  The smallest Crealies square stitched die is perfect for making inchies.

I then added some glossy accent to the windows and finished them off with a tiny tree on each, punched out of green card, adding a glittery gel pen for tree baubles.   The roof trim was coloured with a red gel pen.


https://www.stampinup.com/en-gb


 Crealies dies are available from many craft outlets


Happy Crafting


Thursday 21 December 2017

Quick mini Christmas cards

I needed to batch make some childrens mini Christmas cards and this is what I made.


.
Using a free die from a papercraft magazine I die cut a number of stags heads onto kraft card and added googly eyes.


I used some red pearl drops for the reindeer noses and holly dies. I had a paper pad of Christmas papers leftover from last year.


 Just a simple but effective little card for the season, which I personalised with a gold gel pen.


The second batch I used The Dreamees Snowy Scenes stamp set. I stamped these onto a basic white card and they still came out well I used a dinky inky red and orange ink for the santa hat, heart and carrot nose. The Dreamees blending pen makes it so much easier to colour your images with the ink. I am not a colourist but enjoy colouring my stamps using this method. A gold sharpie to colour the star and a spectrum noir sparkle clear overlay pen to add a little shimmer to the snowman and the base of the snowman around the heart & star.


I cut around stamped images leaving a border and layered them up. Simple mini cards sorted!


Dreamees Snowy Scenes Stamp set


Happy Crafting


Sunday 17 December 2017

Dreamees Reindeers & Rocking Horses

For this Christmas card I used The Dreamees Reindeers & Rocking Horses stamp set.


I stamped and heat embossed the reindeers onto watercolour card using a silver superfine Wow metallic silver embossing powder. I then made a paint from my metallic mica powders using a few drops of water. I mixed this into a paint pallet, You can always add water gradually to get the right consistency but you cant take it away. The colours used were a peach, irridescent silver and raspberry.  For their red noses I used a red pearl drops. When dry I cut them out and used pinflair glue gel to stick them to the card for dimension.

The background was made using snowflake stamps from the same stamp set. On white centura pearl cardstock I stamped the snowflakes using a versafine clear ink pad and then dusted it with metallic turquoise mica powder. To set it, I used a very fine mist of hairspray (dont use hairspray with conditioners as it will make your cardstock tacky).

The card was them layered up with a piece of turquoise centura pearl card (that I happened to have that was the same size) and Dreamees backing paper. Adding a Dreamees stamped sentiment and pearls. The card base is also centura pearl.


http://www.dreamees.org.uk/


Gingerbread Jar Christmas cards

For these special cards I used drew a Dreamees mdf jar shape I kept on kraft card to form the main feature on the card.


On kraft card I layered up some Dreamees papers from the one of the Christmas paper pads also using the gingerbread paper on the jar itself. I used the coordinating paper to die cut The Dreamees divine doily die.


I stamped the recipe onto a thick piece of parchment paper I had. This stamp was from The Dreamees Recipe Bundle. 


I used some gingerbread embellishments, pearls and Hobby House cookie cutter. I stuck the jar onto the card using pinflair glue gel to add a little dimension. 


With the Hobby House gingerbread recipe, I cut around it and edged it in pink ink to fit in with the colours on my card.  I was happy how this turned out in the end.


http://www.dreamees.org.uk/


Happy crafting


Dreamees Clever Cats - Christmas Card

My neighbour is an avid cat lover so thought I would make them a cat Christmas card rather than the usual festive images for this time of year.


I used the snoozing cat stamp from The Dreamees Clever Cats stamp set and coloured it in with dinky inkies. I stamped it onto hammered card as I thought it had a great texture for the cats fur for a more mottled effect, along with the stamped sentiment.  I teamed this up with the Christmas papers from the paper pad and some Dreamee die cut snowflakes, which I used a spectrum noir sparkle clear overlay pen over to make them shimmer.

A border die, a Hobby House snowflake charm and some embellishments to finish it off.
I also used X-cut heart nesting die set.
An alternative card, which shows how adaptable these stamps can be.

http://www.dreamees.org.uk/


Happy Crafting

Christmas Cards using The Dreamees Image Pad

These were made using The Dreamees Image pad toppers and their Christmas backing papers.


The images are from the Bunny Wonderland collection.


http://www.dreamees.org.uk/


These are  heavy weight image card toppers which are double sided, including the sentiments. They are probably 300gsm and on a smooth card, which is perfect for colouring and using your blending brushes with the dinky inkies. The picture only shows the images I have used not the complete selection.

I coloured the images with dinky inkies but used Tim Holtz evergreen bough on the boots and scarf as I wanted a more turquoise colour. I also used my spectrum noir sparkle clear overlay pen for a shimmer to the icy floor. I then made a frame using a rectangular stitched die and some Hunkydory snowfall acetate to put the bunny image behind. Using the Christmas Dreamees paper pad and pearls to make up the card. I love the soft pinky/mint colours of this paper pad.


Another image topper using the papers from the same pad and I have used Dovecraft pearl effect drops on the string of lights the bunny is tangled up in to give a little texture. These pearl drops are metallic, perfect for Christmas lights.

I used the robin images from the pad and a different selection of the papers on these cards. Also coloured these with dinky inkies, adding a few holly leaf dies and some glossy accent on the berries. I die cut the toppers after I coloured them in.


Happy Crafting


Easter Cards

I have a few Easter cards that I'm sharing today and I've been using the Signature Series Digital Florist Everything Anemone Cardmak...