blog backbdrop

Tuesday 26 March 2024

Easter Cards


This is a huge kit, comprising of 25 x A4 pages from topper, tags, panels, card front designs, flower forming sheets, leaves to sentiments, bows, floral inserts and backing papers.
Have a peek at the sample of just what is in this kit as I have only used a fraction of it.

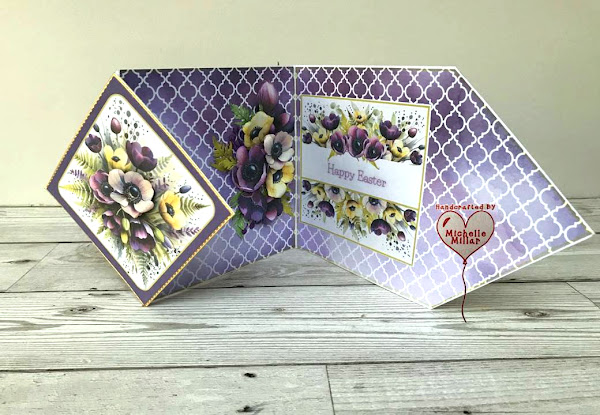
My first Easter card is a diamond flip shaped card and I used a 8 x 8 inch white card base that had unfortunately been squashed in my draw but as it was going to be chopped up it came in very handy.


I used one of the toppers from the kit and some square dies from my stash to die cut the layers for the diamond flip topper. I layered it up with the purple block paper from the kit and then a piece of gold satin mirror board.


Inside the card I've added a posy of flowers to accompany the insert and added a few leaves too. I have also added this to the front of the card too.


I've used one of the sentiments and added shimmer to my card and blooms using
my Sakura stardust gel pens. This card measures 8 x 6 inches.


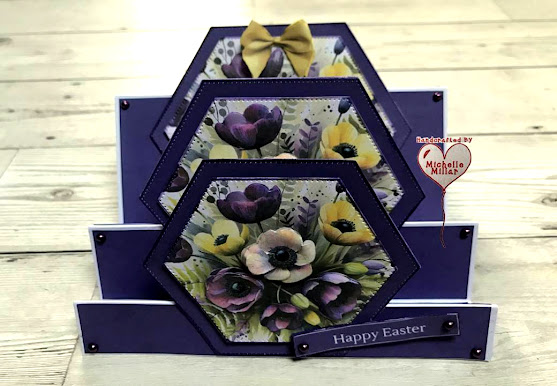
My second Easter card is a hexagonal stair stepper and when I saw the hexagonal topper sheet, it inspired me to make a stepper card.  My card measures 11 x 6 inches.


I used the purple block paper on the panel of my card, as I thought it would really make the toppers pop. I then die cut my toppers using hexagonal dies to create the layers and then mounted them on foam tape to add a little dimension.

I also decoupaged the flowers on the toppers and added two of the bows to the largest topper. Using my sparkle gel pens, I've highlighted around the flowers.


My card folds flat but I have made an envelobox  for it as I did add a little dimension on the toppers.


I've left a space on the back for the message.


My third Easter card is a double staggered Z fold card  and this one measures 9 x 6 inches.
I cut one of the insert sheets into strips and then layered them onto the yellow card strips
that were to form the front of my card.
I've added a few tulips in the corner and two of the purple bows for a little dimension.


I used one of the beautiful floral sheets for the centre panel of my card.


This card will also go flat into an envelope and I have added an insert on the back for me to write a sentiment. 
This is a bumper kit that will cover so many occasions to take you through the year.


It's really easy to add sparkle and shimmer your cards and projects made from these kits. I have a growing collection of Stickles glitter glue but I also love using Sakura stardust gel pens. They are really effective for outlining the edges of your projects as well as highlighting detail too.

There is much inspiration for card styles and folds on Mix It Up Craft by Sam Calcott and lots of these you don't need even need to use dies for. 

If you would like to check out Amanda's YouTube Channel for cardmaking, flower making and inspirational craft videos  you can find her gallery here or even follow on Instagram:  
Flower making has always been one of my favourite things.


Have a great day,  whatever you have planned for yourself.

Happy Crafting


Challenges:-

Little Red Wagon - Florals   (Featured Project)
Creative fingers -AG
Crafty Calendar - more than 1 fold 
Tuesday 5 March 2024

Ice Queen Poppies

I'm sharing two little cards that I have finished and these beautiful poppies that I have used on both of my cards are for different occasions.

First, I made a sympathy card  with a few handmade white poppies, poppy heads and some variegated ivy leaves.


For the card base, I used the dainty trellis die set from one of Tattered Lace's retired collections.  Between the white card base and lattice layer, I added a die cut piece of white vellum.


I used the Digital Florist Ice Queen Poppy print, cut and form set with 2 colour plain sheets, by Opulence by Design Crafts to make my flowers. These flowers are so very pretty just as they are.  I just enjoy to add dimension to my blooms.

On this card I have just cut into the petals and layered 3 flowers up to add some dimension and then finished them off with some diamond Stickles glitter glue in the centres.


I have also added a few of the Variegated Ivy leaves and 2 of the Digital Florist Poppy Heads  (which have been reduced in size), also from Opulence by Design Crafts

Finally, I've edged my card with a clear sparkle overlay pen, for a touch of shimmer.
Sympathy cards are not easy cards to make and although this one wasn't made for a significant time, I thought the white poppies would suit this theme well.


My second card is a birthday card and I've used the retired Fresco collection by Tattered Lace for my card base and to build up the layers to use the papers that came with the poppy download. I really like hues of green that come in these downloads sets, as I find I can match up my colours a lot easier and I never run out. The right shade of green card can be hard to find sometimes.

For my flowers I have just cut into the flower where you can see it is shaped and gently given the flower some shape. For the second and third layer of the poppy, I have simply given it a little bit of shape before sticking them together.


It isn't visible in the picture, but I have added a little shimmer to the centres of my blooms and the edges with a Sprectrum Noir clear sparkle overlay pen. These poppies have just a sheer hint of pink in the petals and I think that the shimmer just highlights the flowers.

I have also used the Poppy Leaf Fussy cut set also by Opulence by Design Crafts. You can print the pale green paper from the poppy download on the back of your poppy leaf sheet if you would like your leaves to have colour on the reverse side when you cut them out, or just simply ink them. You don't have to be too precise cutting them out, I just went over the edges with a little ink which adds some tone to them anyway.

I have also added a few of the variegated ivy leaves and poppy heads too on my card and downsized the poppy heads for my projects. Using a gelly roll stardust pen I have outlined the variegated ivy leaves and the tips of the poppy heads, which again isn't visible in the picture but I just like adding that fine detail to catch your eye.

Also, I don't worry about adding a sentiment to the front of my cards if I don't have a suitable place for one. It can be handy sometimes as some recipients like to display their cards past the occasion that it was sent.

If you would like to check out Amanda's YouTube Channel for cardmaking, flower making and inspirational craft videos  you can find her gallery here or even follow on Instagram:  
Flower making has always been one of my favourite things.


Friday 1 March 2024

Bright Lights Maeve

Sharing a diamond point birthday card made for my Sister-in-Law using the Bright Lights Maeve digital mini kit by Opulence by Design Crafts.


I have been meaning to  make one of these card shapes for sometime since I first saw this design made many times by Carol  the Crafty Stamper who is also a  very talented crafter. Pop over to her blog and follow her, she makes some amazing projects.


I used a 7 x 7 inch white card blank to create the card shape and I used one of the backing papers from the mini card making kit with some mint green mirror board.  For this card I also used the second topper that came with the sentiments on the sheet. 
As the background on the topper was a different colourway to the paper that I was using, I cut around Maeve and placed her onto a die cut square of matching paper to co-ordinate with my project.

The Bright Lights Maeve PDF digital collection download mini kit by Opulence by Design Crafts, comprises of toppers, sentiments and 4 fabulous design sheets to use with your projects.


I also thought a small band of pansy's/violas would look pretty at the top of the card, so I made a few of the Digital Florist Purple and Lemon Pansies and  few Digital Florist Pink and  Lilac Violas with some Pansy leaves in between.
My flowers have been reduced in size a little and I have also added some glossy accents to the centre of  blooms.

If you would like to check out Amanda's YouTube Channel for cardmaking, flower making and inspirational craft videos  you can find her gallery here or even follow on Instagram:  


Have a great day,  whatever you have planned for yourself.

Happy Crafting


Challenges:-


Gothic Fairy Arch

I've finished my Gothic fairy arch and have a few pictures to share with you and I'm also going to add it to one of the monthly chal...