I was very excited to be involved in creating some of the samples for this new collection and hope you find them inspirational.

Using a small brown rattan grapevine wreath purchased quite cheap from a local floristry wholesaler, I chose to use a mix of textures for my wreath using the mini wreath die set

I used a mix of flower forming foam with the charisma papers. I loosely wrapped the wreath with wired hessian, added a few green frosted berries and some glossy accents to the leaves for morning dew.

I chose some cream flower foam inked with peach oil pastels using the Christmas rose dies to create roses to coordinate with my Autumn wreath and some yellow stamens for the centres.

I used the mini wreath die for the card shape and then layered it up to create dimension. Entwined some thin embroidered gold ribbon between the layer of the wreath and then layered the foliage dies around the wreath card before added the butterflies which have been printed onto vellum.

I used the hessian backing paper from one of Tattered Lace's collections and decoupaged the egg dies with their matching charismas (printed onto the glossy card) for a Spring/Easter inspired card.

I particularly loved the butterflies and foilage from this collection as I can incorporate it into so many projects. My focus this month was mainly on different projects that can be made using these lovely dies.

I love decorating my notebook/diary covers and thought these beautiful sunflowers would be ideal for the cover. Notebooks/diaries also make great stocking fillers, so why not decorate it before gifting it.

Onto kraft card I used a wood panel backing paper, edging it with some gathered twigs distress ink by Tim Holtz. I used the Spring blooms sunflowers and tulips along with a mix of the foliage and mini wreath foliage dies. The "hi" wording was cut out using chocolate craft foam.


It's amazing what you can find in your local charity shop when you are looking for something inexpensive to craft with. I found a rather tired chalkboard to upcycle.
I gave it a lick of paint using a fawn crown matchpot tube of paint I bought in Homebase in the reduced to clear basket. These little matchpots are perfect for small projects as they are just enough upcycled an item.

I used the fruits die set, large single ivy from the ivy die set, sunflowers from the Spring blooms and smaller eggs from the eggs die set. The leaves I used with the sunflowers were die cut from a darker green card using the mini wreath dies. It just needed some ribbon, strings and piece of chalk to finish it off. I thought it would brighten up a kitchen wall nicely as a shopping list/memo board.


My summertime mdf gate stand ( from the Dreamees) decorated with the garden tools dies, the wellington boots from the splish splash die set and flowers from the Spring blooms die set.
The ivy dies fitted in so well climbing up the edge of the gate. This project reminded me of my second love, gardening. Sunflowers standing proud with their glorious heads waving in the sun and an array of flowers drinking in the warmth of the sun.
The ivy dies fitted in so well climbing up the edge of the gate. This project reminded me of my second love, gardening. Sunflowers standing proud with their glorious heads waving in the sun and an array of flowers drinking in the warmth of the sun.


The artificial grass I picked up from a shop called Tiger Tiger (I love that shop) you can find all sorts of cool & quirky things in there and knew this square of artificial grass would come in handy.

I really liked these shell dies as combined with the matching charisma papers and printed onto glossy card, they look so lifelike. I used a strip of sandpaper for the sand on the base panel of my beach plaque. The mdf are from my stash by the Dreamees.

The panels have been painted with corinth blue Cosmic Shimmer chalk paint, which dried really quickly.

I also used a large flat backed blue pearl in the clamshell to mimic an oyster shell.

This card was an idea that I had in my head. It was based on the birdhouse in my garden. I looked at the lovely birdhouse die and thought wouldn't it look nice with the Autumn ivy climbing up around it. So making a tall Dl shaped card from a piece of A4 card, I decided it needed to be dimensional.

I created a cuboid shape using kraft card and inked around the edges with gathered twigs distress ink by Tim Hotz to match it up as close as possible to the actual birdhouse. I found it a lot easier to use a fine tipped glue gun to stick the foliage down, as I wanted the leaves to still keep their shape and look as natural as possible.

I padded the birdhouse out with som natural sisal and placed the trio of nested eggs in the centre of the nest. Using the hombre backing paper from last years Tattered Lace easter collection, I was really happy with how this one turned out and think it would also look nice in a box frame.

Another thing I love is flowers and these poinsettias are so pretty, so to thought, I would layer them up to give as much dimension as possible. I also used the pine cones and mistletoe from the Winter blooms die set with the mini fir tree branch from the mini wreath die set.
The base panel of the card is from the Tattered Lace fine filament Portofino collection and I thought that the stencil from the Designer Vintage collection also worked really well with this die.
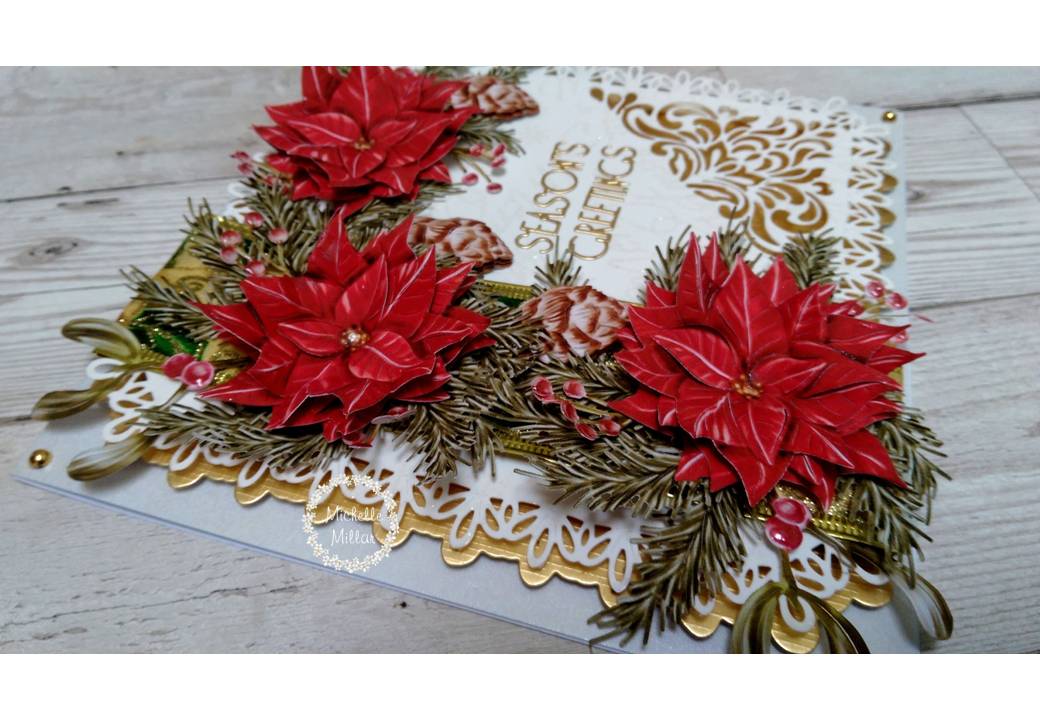
I used some glossy accent on the berries for dimensional shine.

A large festive card for the mantlepiece at Christmas. Behind the flower, you can just see some gold festive wired ribbon and the gold pearls just finish the card off nicely.


I love experimenting with different mediums and here, I have used some film & Angelina fibres which have been fused together with the heat of an iron so that I could die cut my butterflies.


I used the Tattered Lace Heavenly Hexagon nested dies for my double easel card.
The backing papers are from Stephanie Weightman's designer collection and have been printed onto centura pearl pearlescent paper.

All the detail from the dies are captured in the film & fibres and love how the light captures the butterflies iridescent colours.


Finishing with an oval small Christmas Card with the Christmas cactus and the bell jar from a previous collection. Flexi snowflakes have also been added to the edge of the card.
The charisma papers to match the dies can either be downloaded directly from Create & Crafts website:-
or all the free downloads for backing papers and charisma papers for Tattered Lace can be downloaded directly from their website
The charisma papers to match the dies can either be downloaded directly from Create & Crafts website:-
or all the free downloads for backing papers and charisma papers for Tattered Lace can be downloaded directly from their website
I really enjoyed tis collection. It has a bit of everything to take you through all the seasons of the year.
Happy Crafting!