blog backbdrop

Wednesday 21 April 2021

Shutter Artboard

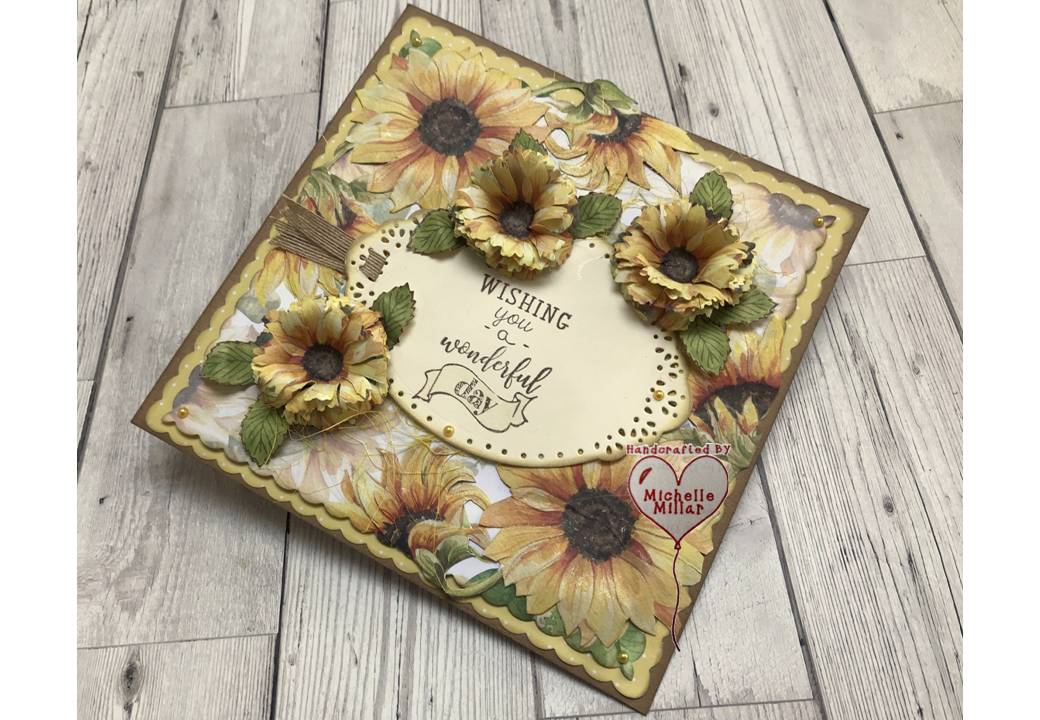
 A little mdf make to share today, which I made for one of my friends for her birthday. I love anything to do with diorama so I am always looking out for little things to use in projects like these.


I had purchased my mdf shutter artboard from The Dreamees before Christmas but hadn't actually got around to making it. As we both have similar tastes in things and a love for gardening and garden centres too, I thought that she might like this too.


To give the shutters a more varnished look, I used some vintage photo distress ink by Tim Holtz on them. I can't remember if these little mdf circles were in the kit or whether I had saved them from previous kits but either way they make great handles. 
I don't throw anything away, sometimes the "waste pieces" come in very useful later on.  The Woodgrain paper that I used for the artboard came from The Works. 


I have decorated the artboard with some nature die cuts from Tattered Lace's Design Teams collection A Wreath for All Seasons. I decoupaged the trowel to give it a bit of dimension and added some glossy accent to some of the berries on the plants.

Inside the shutters, I stamped and heat embossed in gold embossing powder the friendship stamp from one of the Dreamees recipe sentiments, along with part of the Beautiful Babysun sentiment.


I used one of the  Dreamees Nice & Toasty design papers inside the shutters and with what was left, I made the little flowers, using a flower punch from my stash. In the centre of the flowers, I added 3mm pearls.  For 3 little snails on top of the window frame, I inked up some tiny little seashells that I had with some vintage photo distress ink.


I used artificial grass that I knew would come in handy one day, that I bought from that great shop, Flying Tiger. Little toadstools and mdf ladybird was from my stash, mini cactus from The Range and mini terracotta flowerpot was actually from a garden flowerpot man that didn't weather too well so he's been recycled. 

There is only one thing missing from this and that is a traditional garden gnome, If I could have got a dolls house miniature one, I would have added it, not because she loves them but because it's been a bit of a running joke over the years.


Another snail made from a seashell and I thought the hot glue overspill made him look a little more lifelike. I had a leftover ivy leaf, so I used it as a fallen leaf with some glossy accent as some morning dew.


I thought, this project needed to look cute when the shutters were closed and for that feel good factor, on those days, when there is no one to say "good morning gorgeous"....  just open the shutters and smile..... well that is the premise. 

Enjoy your day whatever you have planned for yourself.
Happy Crafting


Tuesday 20 April 2021

Ray of Sunshine birthday

I'm sharing a birthday card that I made for my sister in law today using the Ray of Sunshine paper pad by the Dreamees.


Sunflowers are such a bright happy flower and this paper pad is full of luscious prints to use. On my 8x8 inch 300gsm chocolate card base also from the Dreamees,  I die cut two of the contrasting papers using my square dies from the Fine Filament Portofino collection by Tattered Lace.
Using another sheet of the same sunflower design paper, I backed it onto a piece of thin card and then fussy cut around the larger sunflowers, top and bottom. Then added this to the card as a dimensional panel.


I die cut my topper for my sentiment using the Loops & Lace oval die set and stamped it with the sentiment from the Sweet Sunflower stamp set.

Looking at one of these beautiful design papers and my dies from this stamp and die duo, one of the dies was a really good match for the flowers on one of the papers.


I only needed 3 to really match as the others were going to be layered up as flowers. I cut into some of the petals to give them some shape and inked the tips of the petals with my 2nd gen sparkle honey dinky inkie to tone them. I thought they worked really well.


I had some leaves saved from a previous project that I had stamped on my favourite cream velour card using the stamp set. As these had already been coloured with my dinky inkies, I just needed to add these to my project.

I try to get the most out of my craft products, although saying that we all forget what we have as crafters sometimes but try not to accumulate a lot of the same thing.

You can make some beautiful projects using  The Dreamees paper pads in your crafting and they have been colour matching their sparkle dinky inkies so that they all work together.

Have a good day, whatever your plans are. 
Happy Crafting!


Saturday 10 April 2021

Bee Kind Notecard

 Another little notecard to share today using a combination of digi stamps this time.


I decided to mix these digi stamps as I thought that this combo would make a lovely little card. For my 5.5 x 5.5 inch black card front I used these lovely design papers and flowers from the Honey Bear kit by Imagine that Digi Stamp. I love these daisies, which I have resized and added glossy accents to the centres.


For the centre of my card I have added the Bowbee digi stamps by Vera Lane Studios, which I have coloured with promarkers and added glossy accent to their eyes and wings


I also added this lovely proverb from the Honey Bear Kit. Words so significant for the times we live in and sometimes, a meaningful saying, words or proverb are just what you are looking for to finish your card.


I've added some 3mm gold pearls to finish my card and as much as I don't like to make the same card twice, I really do like this combo, so will probably have to change the design up a little if I do. Have a lovely day whatever you have planned for yourself.
Happy Crafting

Friday 9 April 2021

Happy Bee Day

A little notecard to share today using one of the papers from the Honey Bear digi stamp kit from Imagine that Digi Stamp.


This is my favourite collection so far since the start of the progressive blog challenge and today I am only using a small part of the kit, as this was the paper that I originally did not get to use on both of my cards.


 For my notecard I used:-
  • White 5.5 x 5.5inch card blank
  • A layer of two-tone yellow card 
  • Happy Bee day sentiment - Resized to form the topper for the card
  • A mix of the pretty daisies 
  • bumblebee die cuts by Tattered Lace
  • A piece of lemon gingham ribbon
  • gold pearls


I added glossy accent to the centre of the daisies and the tiny bumblebee wings on the sentiment, also adding sparkle to the honeycomb wording with my sparkle pen. I carried this sparkle through by edging the papers with it too.


I really love these daisies, they are so simple and yet so pretty, which makes them so perfect in my eyes and the fact that they can be resized makes mean that I can make them fit what I am crafting, especially as they also come not coloured too.

I added the extra bees as I wanted this notecard to be more of a sunny greeting card rather than a birthday card and as Kris adds these sentiments that are more interesting than the usual everyday ones, which gives you more to play with.

This little card has already gone off in the post, have a great day whatever you have planned for yourself.   
 Happy Crafting!


    Daring Cardmakers Challenge - Let's Hear it for the Bees                                                


Thursday 8 April 2021

Rosy Tea Party

A thank you card is my make to share today and this one is an adorable digi stamp for this month's progressive monthly digi stamp challenge from Imagine that digistamp.


As I took part in last month's challenge  I was sent this month's digi kit; Rosy Tea Party, to use in this month's challenge.


I really like the pre-coloured option to these digi kits and although I am only using one of the sentiments if you follow the link to Kris's website at Imagine that digistamp not only is there inspiration for her projects from herself and her design team but more info on her digi stamps and the contents of each kit.


I chose a 5.5 x5.5 inch white card base and thought the Crafters Companion Sweet Treats paper collection with matching rolled roses would go nicely with this adorable bunny digi stamp. I did have this beautiful card collection but for this project,  I just used the download of the month which can still be found under April 2018 at:- 

I really like these sentiments too, they are not generic which is refreshing and fit the digi images in the kits perfectly. I also thought these papers complement my bunny topper perfectly too.


I used my pearlescent Dreamees dinky inkies in powder puff pink and planet green to ink around the edges of my cardstock and rolled roses, also highlighting the roses on the topper too.

I decided to add a few little leaves to my rolled roses using one of my punches as they looked a little bare without any foliage and some mint green pearls. 

It's been a lovely sunny Easter Spring weekend, but the snow flurries amid the sunshine that followed after have been a bit bizarre. I think we are all looking forward to seeing brighter skies. Have a good day, whatever your plans are. 
Happy Crafting!


Monday 5 April 2021

Friendship plaque swap

Today I am sharing a decorated mdf plaque that was made for one of my lovely crafting colleagues as part of a craft swap but it just took a little longer to make and send on to her as part of our craft swap.


It is also the start of a new blog challenge for us at Let's Craft & Create and we have a flower theme this month. As with all our themes, there is an ATG option also. My project this month has a lot of flowers, which is one of my favourite things to make.

This project started with a play with some flower stamps that I hadn't' t used for a long time. It's great rediscovering stamps that you haven't used in a while particularly love the raggedy shape of these petals as they are so different and I like different.


I heat embossed the Exquisitely Exotic flower stamps by the Dreamees onto 120gms white Navigator paper with silver Wow embossing powder and then added a little colour with the Dreamees wonders of watercolour pencils. 


To blend the colours I mixed a drop of water with a few drops of the silver mist dinky inkie sparkle reinker in an ink pallet. I prefer to add my water this way than use it in my water brush.


The part that always takes time is, of course, the cutting but it worth it to achieve the look you want. In the middle, I added 4mm grey/silver Dreamee pearls.


After the flowers were made I then made a decision on how I wanted to display them and on which mdf  (funny because it's normally the other way around when you plan a project) I was going to use. I decided on the Pretty Pets set from my Dreamees mdf stash and covered it with one of the new design paper pads, Blushing, from the new Sparkle inks collection.


Instead of adding leaves, I thought the green pollen stamens would make a good alternative. These were originally white pollen stamens that I had inked with a juicy pickle Dreamees 2nd gen sparkle dinky inkie pad.  I didn't have a stamp with the sentiment that I wanted, so I just typed one that I liked onto cardstock.


I did the same with the following hanging plaques and on the bottom one, using her name, I added some definitions for each letter.


Considering this paper isn't any specific brand, I think the shimmer from these dye-based inks are brilliant (not always easy to capture in a photo).

I left enough gap for the plaque to fold in on itself so that I could post it off to her without squishing the flowers too much.

A decorated piece of Mdf is also a great alternative to sending a birthday or greeting card and hopefully longer lasting too.

Have a go at something new, whether it's something that you have always wanted to do or something that you created that was inspired by someone.

Our design team have also been busy this month with projects of their own and there is always lots of fabulous inspiration shared by the crafters on our blog too. If you are interested,  there is a prize for the winning entry, following our theme and a badge for your blog for the top 3 runners up. Just click on the link below which will take you to our blog challenge. 
 Happy Crafting


Music script birthday

Today I am sharing a birthday card made for one of my friends using an A5 background music script stamp by The Timber Boutique.

It is also the beginning of a new challenge for us at Daisy Chains and we are running a monochrome theme this month. As with all our challenges, there is also an ATG option.

Using black and cream card to make up my monochrome card this stamp leaves a fabulous crisp image and I added some organza ribbon to define the layers.


For my flowers, I used this stamp on cream paper and then die cut flower shapes using my Dreamees Sweet Sunflowers flower dies and one of the larger flower dies from their Loops & Lace collection also. 

At this point I was really having a play with these dies to see how well the larger Sweet Sunflower dies would make rose-like flowers as I had already made a few with the die from the Loops & Lace collection.  I was really happy with how they turned out.


I didn't have any black pollen stamens which I thought would go well, so I coloured some myself using a Dreamees sparkle 2nd gen dinky inky in lurex. The ink pad needs to be quite juicy and I only gave them one coating, which gave them a more charcoal look and also added a few of their interchangeable Autumn leaves in sage card.

As these flowers are quite full I made a box for the card in cream and black, using up what was left of my music stamped paper for the front of the box.

A simple card to make really. One stamp has created my backing paper for my card as well as the design paper for my flowers. This stamps will also be a great one to use for Christmas too.

The rest of our design team have also been making some lovely projects this month, along with so many great crafters on our blog every month. It's always lovely to see the inspiration everyone shares. Please use the link below to take you to the blog challenge and thanks for the visit.

Happy Crafting!


Easter Cards

I have a few Easter cards that I'm sharing today and I've been using the Signature Series Digital Florist Everything Anemone Cardmak...