blog backbdrop

Thursday 5 December 2019

Winter Wonderland bunny card

For this months challenge over on our blog challenge at  Let's Craft and Create, the theme is 
"let it snow."

So for my DT card, I have made a Bunny Wonderland card using Dreamees products.


 I have used:-
  • Dreamees Winter Wonderland pre printed card toppers
  • Dreamees sketched and shaded pointy flower stamps
  • Dreamees Christmas double sided backing papers
  • Dinky Inky pearlescent/sparkle ink pad in phlox
  • Design Team mini pine branch die from the mini wreath die set  - a wreath for all seasons collection
  • Promarkers
  • Dusky pink woven stitched ribbon from The Range
  • Stickles glitter glue in frosted lace
  • Ranger glossy accent gloss medium
  • pearls

On 100gsm white HP colour printer paper, I stamped the second smallest flower from the sketch & shaded stamp set using the phlox dinky inky


Dreamees - Sketch & Shaded pointy stamp set


It's difficult to capture the hint of sparkle coming off the flowers. As I had used my reinkers to top up my ink pads recently, my dinky inky was quite juicy with colour and you can still see the fine details of the stamps.

Each flower has 4 layers to it and as I was using one of the smallest flowers, I used a quilling tool to curl the ends of the petals.


I thought the mini pine branch added just enough foliage for my Christmas flowers. I used this mini pine die for my last batch of samples by Design Team, part of Tattered Lace.

The Stickles glitter glue is a must for Christmas themed crafting as it dries with an opaque slightly dimensional glittery shimmer. Leave it to dry overnight to ensure it has set solid.


I also used it as a base to ground my bunny sitting down tangled in his tree lights.


For the winter wonderland topper I used one of my pre printed card toppers. A good 300gsm smooth card which takes your inks perfectly.  I bought this pack of Christmas toppers on one of the Dreamees workshops.

My bunny was coloured in with some promarker pens and I used the sentiment inside

.


These winter wonderland Christmas papers in pastel hues are a lovely alternative to the traditional festive ones. The dusky pink woven stitched ribbon from The Range gave the card a nice contrast.

You can find Dreamees products on either Create & Craft TV where they have regular shows demonstrating their products or you can purchase direct from their website.


Have a look at the great inspiration provided by the rest of the design team over on our blog page


There is also a prize for the best entry.


Happy Crafting!


Monday 2 December 2019

Inspiration Journal

Today I am sharing an inspiration journal I made for a special young lady.


I decided to use kraft card as my base and was pretty happy with how it took the ink especially as each page is double sided.  Each sheet is A5 in size.  I have used Tim Holtz distress oxide inks throughout my journal for that chalky texture and especially as you can layer the inks on top of each other without losing definition.


As well as keeping this quite simple I wanted it to have lots of inspirational sentiments and knowing Poppy's love of art I thought these pages would appeal to her.


Hansa Hand

Traditionally an ancient middle eastern amulet symbolising the hand of Fatima. The protective sign symbolises happiness, luck & good fortune.  There are many different styles and I have sketched a hand with the all seeing eye, watching over humanity and warding off negativity.
I have used a mandala stencil on the backround to tie in with the sketch.


Artist Trading Cards

With a washi tape background, I used a selection of Vera Lane Studios digi stamps.
  • pray n playing
  • just fly
  • puddle jumps


I have used marble backgrounds on my cards using the ink and shaving foam technique ( which also makes the card smell lovely, as it happened to be cocoa butter shaving foam).

I am not a colourist but don't mind colouring small areas and have used promarkers to do this which I found much easier to use than the spectrum noir aqua markers that I had been given.


The Oak Tree Poem 

Inspired by the Oak Tree poem by Johnny Ray Ryder, I drew a tree to fit around the poem using the fall and foliage stamps by the Dreamees also using the stamps as a background for my tree. I absolutely love this poem.


Attached to the page as a flap.


Shine Bright

Using the shine bright and the ripple effect stamp sets by Visible Image,  on a distress oxide background.  Then stencilled with Dreamees dinky inkie pearlescent ink in mellow yellow. The ripple stamp has been heat embossed with gold embossing powder.


Just be Happy

The Visible Image just be happy stamp mixed with the ripple effect stamp to create the bubbles. I have also added some glossy accent to some of the bubbles for texture.


The Friendship Dish

I love this friendships dish stamp by the  Dreamees and have used some heat embossed a set of their flower stamps for a background.


Believe

I have used the Visible Image dragonfly stamp with versamark ink and mica powders and word stamps by Inkilicious. The sentiment added at the bottom was very apt for the page.


Be a Mermaid

I have used a mix of distress oxides and mica powders for the background and a mermaid stamp by stampendous along with a nautical set of stamps by Sheena Douglass from her Sea View collection.
I particularly liked the inspirational sentiments.


Fly

Although the background looks patchy on this one, it was made with antique linen and frayed burlap distress oxides. The sentiment and black butterflies are from the butterfly blot stamp set by Imagine Design Create.  The large heat embossed butterflies are from Crafty Individuals.


Make a Wish

Using distress oxides again and white opaque ink through a stencil which was them heat embossed with clear embossing powder. Also using the Face it & beautifully flawed stamps from Visible Image. 


Creativity

I love this inspirational stamp set by Visible Image and have teamed it up with this cute Autumn days stamp set by the Dreamees.


You've got Mail


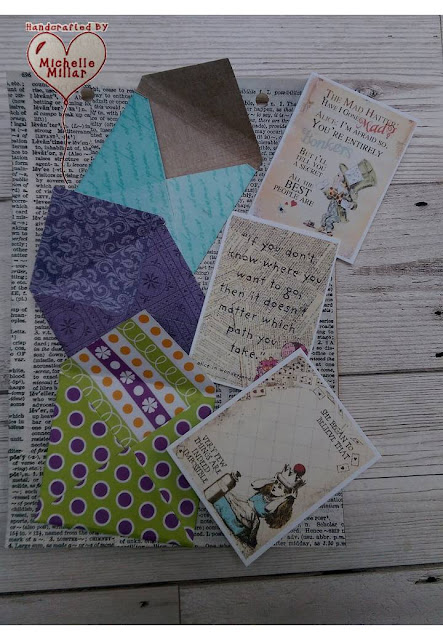
The background is made up of a dictionary page referencing :-  letters/post with little envelopes holding quotes from Alice in Wonderland.


I have used a mix of Dreamees stamps for the background, masking off the face stamp and using antique linen distress oxide for the skin tone on the kraft card.


On the tag, I have used a digi image by Vera Lane Studios using one of her Kokeshi dolls.

I really enjoyed making this journal and didn't have a specific plan when I started it, just went with the flow.  I think that is what is really enjoyable about journal pages, they tend to be a bit of a voyage of discovery. There is no right or wrong with mixed media and sometimes the best work is achieved totally by accident.

Happy Crafting!


Friday 22 November 2019

Design Team samples "A Wreath for all seasons"

Design Team are a new brand launched by Stephanie Weightman and with the input from the design team. For their second launch, this months collection was inspired by Anna Higginbottom & Kathleen Turner at the Innovation Hub.

I was very excited to be involved in creating some of the samples for this new collection and hope you find them inspirational.


Using a small brown rattan grapevine wreath purchased quite cheap from a local  floristry wholesaler, I chose to use a mix of textures for my wreath using the  mini wreath die set  


I used a mix of flower forming foam with the charisma papers.  I loosely wrapped the wreath  with wired hessian, added a few green frosted berries and some glossy accents to the leaves for morning dew.


I chose some cream flower foam inked with peach oil pastels using the Christmas rose dies to create roses to coordinate with my Autumn wreath and some yellow stamens for the centres.

Finishing off with a large taffeta orange wired bow.


I used the mini wreath die for the card shape and then layered it up to create dimension. Entwined some thin embroidered gold ribbon between the layer of the wreath and then layered the foliage dies around the wreath card before added the butterflies which have been printed onto vellum.


I used the hessian backing paper from one of Tattered Lace's collections and decoupaged the egg dies with their matching charismas (printed onto the glossy card) for a Spring/Easter inspired card.


I particularly loved the butterflies and foilage from this collection as I can incorporate it into so many projects.  My focus this month was mainly on different projects that can be made using these lovely dies.


I love decorating my notebook/diary covers and thought these beautiful sunflowers would be ideal for the cover.  Notebooks/diaries also make great stocking fillers, so why not decorate it before gifting it.


Onto kraft card I used a wood panel backing paper, edging it with some gathered twigs distress ink by Tim Holtz.  I used the Spring blooms sunflowers and tulips along with a mix of the foliage and mini wreath foliage dies. The "hi" wording was cut out using chocolate craft foam.


I made a start on the inside of my notebook using some of the dies on the inside cover.


It's amazing what you can find in your local charity shop when you are looking for something inexpensive to craft with.  I found a rather tired chalkboard to upcycle.

I gave it a lick of paint using a fawn crown matchpot tube of paint I bought in Homebase in the reduced to clear basket. These little matchpots are perfect for small projects as they are just enough upcycled an item.


I used the fruits die set, large single ivy from the ivy die set, sunflowers from the Spring blooms and smaller eggs from the eggs die set. The leaves I used with the sunflowers were die cut from a darker green card using the mini wreath dies.  It just needed some ribbon, strings and piece of chalk to finish it off. I thought it would brighten up a kitchen wall nicely as a shopping list/memo board.


My summertime mdf gate stand ( from the Dreamees) decorated with the garden tools dies, the wellington boots from the splish splash die set and flowers from the Spring blooms die set.

The ivy dies fitted in so well climbing up the edge of the gate. This project reminded me of my second love, gardening. Sunflowers standing proud with their glorious heads waving in the sun and an array of flowers drinking in the warmth of the sun.


I added the ladybird from another Tattered Lace collection which is peaking out from one of the flowerpots. The sentiment s from one of the Dreamees new stamp sets and was very apt for my project as well as adding some drops of glossy accent for the waterdrops from the watering can.


The artificial grass I picked up from a shop called Tiger Tiger (I love that shop) you can find all sorts of cool & quirky things in there and knew this square of artificial grass would come in handy.


I really liked these shell dies as combined with the matching charisma papers and printed onto glossy card, they look so lifelike.  I used a strip of sandpaper for the sand on the base panel of my beach plaque. The mdf are from my stash by the Dreamees.


The panels have been painted with corinth blue Cosmic Shimmer chalk paint, which dried really quickly.


I also used a large flat backed blue pearl in the clamshell to mimic an oyster shell.


This card was an idea that I had in my head. It was based on the birdhouse in my garden.  I looked at the lovely birdhouse die and thought wouldn't it look nice with the Autumn ivy climbing up around it. So making a tall Dl shaped card from a piece of A4 card, I decided it needed to be dimensional.


I created a cuboid shape using kraft card and inked around the edges with gathered twigs distress ink by Tim Hotz to match it up as close as possible to the actual birdhouse.  I found it a lot easier to use a fine tipped glue gun to stick the foliage down, as I wanted the leaves to still keep their shape and look as natural as possible.


I padded the birdhouse out with som natural sisal and placed the trio of nested eggs in the centre of the nest. Using the hombre backing paper from last years Tattered Lace easter collection, I was really happy with how this one turned out and think it would also look nice in a box frame.


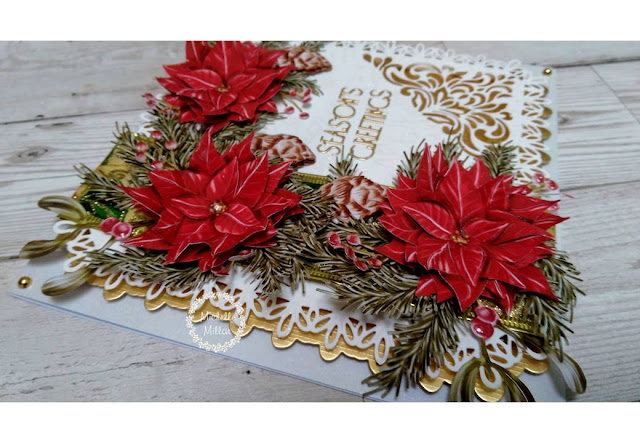
Another thing I love is flowers and these poinsettias are so pretty, so to thought, I would layer them up to give as much dimension as possible.  I also used the pine cones and mistletoe from the Winter blooms die set with the mini fir tree branch from the mini wreath die set. 

The base panel of the card is from the Tattered Lace fine filament Portofino collection and I thought that the stencil from the Designer Vintage collection also worked really well with this die.


I used some glossy accent on the berries for dimensional shine.


A large festive card for the mantlepiece at Christmas. Behind the flower, you can just see some gold festive wired ribbon and the gold pearls just finish the card off nicely.


I love experimenting with different mediums and here, I have used some film & Angelina fibres which have been fused together with the heat of an iron so that I could die cut my butterflies.


I used the Tattered Lace Heavenly Hexagon nested dies for my double easel card.
The backing papers are from Stephanie Weightman's designer collection and have been printed onto centura pearl pearlescent paper.


All the detail from the dies are captured in the film & fibres and love how the light captures the butterflies iridescent colours.


Finishing with an oval small Christmas Card with the Christmas cactus and the bell jar from a previous collection. Flexi snowflakes have also been added to the edge of the card.

The charisma papers to match the dies can either be downloaded directly from Create & Crafts website:-


or all the free downloads for backing papers and charisma papers for Tattered Lace can be downloaded directly from their website


I really enjoyed tis collection. It has a bit of everything to take you through all the seasons of the year.

Happy Crafting!


WOYWW #777

Happy 'What's on Your desk Wednesday!' This is my first contribution to the blog, that I came across the other day, so I thought...