blog backbdrop

Monday 26 February 2024

Retro Postcards

I've been meaning to get around to making these little postcards for a little while now and I really like these sassy retro digi images from Gecko Galz that I thought would look great made up into postcards.


I used some of the Say What Digital Collage Set digi images by Gecko Galz and layered them up with some of the backing papers from the Retro Home Front Digital Craft Kit.


I found a small pack of postcards in my craft stash whilst having a sort out a while ago and decided to use them for some stamping projects but I also scanned the back of one so that I could use them for my postcards on this project.


I have added 'make more postcards' to my list. They are a simple little project  - 'happy mail'  - that you can pop in the post at the price of a 2nd class stamp.


These images really made me smile as I was die cutting them, they are just perfect for journals, tags and cards too.


Gecko Galz offer loads of inspiration on their blog along with challenges to enter and free images to download to craft with.  Pop over to their page follow and subscribe to their monthly newsletter. They also have lots more on their Etsy page.


Friday 16 February 2024

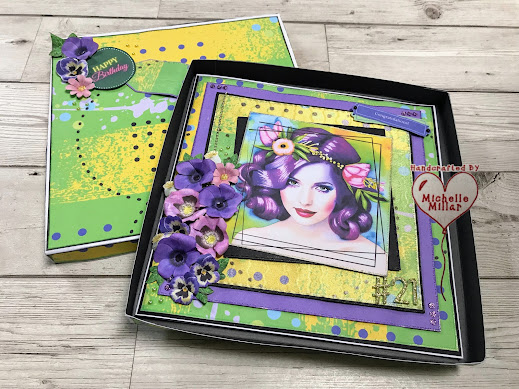
Happy 21st Card

I'm sharing a card made for a special birthday using a mini cardmaking kit that I have been looking forward to using for a while and for this card I have used some of the papers.


I think this beautiful design and these vibrant papers will be just perfect for the person I have made this card for.

The Bright Lights Maeve PDF digital collection download mini kit by Opulence by Design Crafts, comprises of toppers, sentiments and 4 fabulous design sheets to use with your projects.


I started with a white 8 x 8 inch card base and have added some black cardstock between some of the layers. The purple layer was one of the colour block sheets from the Purple Anemone flower forming sheets.

To get the shimmer on the top layer of my paper, I used a textured pearlescent cream paper that I have had for ages and think it was really intended to be used for wedding or special occasion crafting as it has a luxurious feel to it. Using this in my printer has changed the look of my design papers and I'm also making the most of my craft stash too.


I used a very fine gold string bead instead of ribbon that I found at Christmas as a set of 3 colours on a roll and thought it would come in handy. I then chose my flowers, some of which I had previously made up.

I used the the Digital Florist Purple Anemone, the Digital Florist Giant Lilac Poppy,  the Digital Florist Purple and Lemon Pansies, a few Digital Florist Poppy Heads and Foliage Ivy leaves . The little pink dahlia  came from one of the flower sets and it has been reduced in size. I often like to reduce the size of my blooms to suit my project.


I have just added drops of glossy accents to the centres of my flowers and I love the vibrant designs of these collections.


If you would like to check out Amanda's YouTube Channel for cardmaking, flower making and inspirational craft videos  you can find her gallery here or even follow on Instagram:  


Have a great day,  whatever you have planned for yourself.

Happy Crafting


Challenges:-
Allys Angels - AG  (Top Pick )
CD Sunday Plus - AG   ( Top 3 )


Monday 5 February 2024

Watercolour Witches Gift Box

One of my favourite crafty activities lately has been decorating boxes as you can give them a unique look and they are always very useful to put things into too.

For this project, I used some of the papers from Magik Graphics Watercolour Witches Collection, which is available on a CD or as a digital download, direct from their website.


This is a wonderful collection and Susan has also designed these papers to fit on these boxes, which are just under 10 x 8 inches (4 inches in depth), that a lot of crafters have been using and Susan also uses them in her Facebook live craft group.


I printed these papers on my usual 120gsm colour document Navigator paper, as this works for me and since Wilkos is no longer trading, I can still find it at Tesco which saves me having to order online.

I kept decoration to a minimum as I didn't want to cover up these wonderful papers.  This box isn't for me but I will definitely be making one to keep.


Inside, I opted for this rich amethyst metallic paint from Finnabair Art Alchemy which is amazing to use and leaves a fab velvet rich shimmer.  I also chose a different image for the inside of the lid as I thought that the colours tied in nicely.


I gave the box two very light coats of matt medium to seal it, making sure each layer was completely dry before adding the next, this prevented the paper from wrinkling or any colour bleed from the inks. It also left my box with a nice smooth finish. I then edged the box with gold wax.


I thought one of the mecha moths would look good in the top corner of the box. This one was made from hot glue and I coloured it with some copper wax. At different angles, you can see through parts of it, which adds to the dimension.

I did make a 7x 7 inch card to accompany my box. This collection also has a range of inserts to accompany the various designs for your cards and is certainly one that I really love and can not recommend enough.


All this one needed was a trio of flowers from my box that I had previously made up using some blooms from Opulence by Design Crafts and a little moss.

My decorated box has been on a bit of a tour (collecting various stamps along the way) before eventually reaching its destination safely.

Have a great week,  whatever you have planned for yourself.

Happy Crafting


Challenges:-
Mix it Up - MM    (Top  Pick ) 


Gothic Fairy Arch

I've finished my Gothic fairy arch and have a few pictures to share with you and I'm also going to add it to one of the monthly chal...