blog backbdrop

Thursday 31 December 2020

Bouquet of Blooms 60th Card

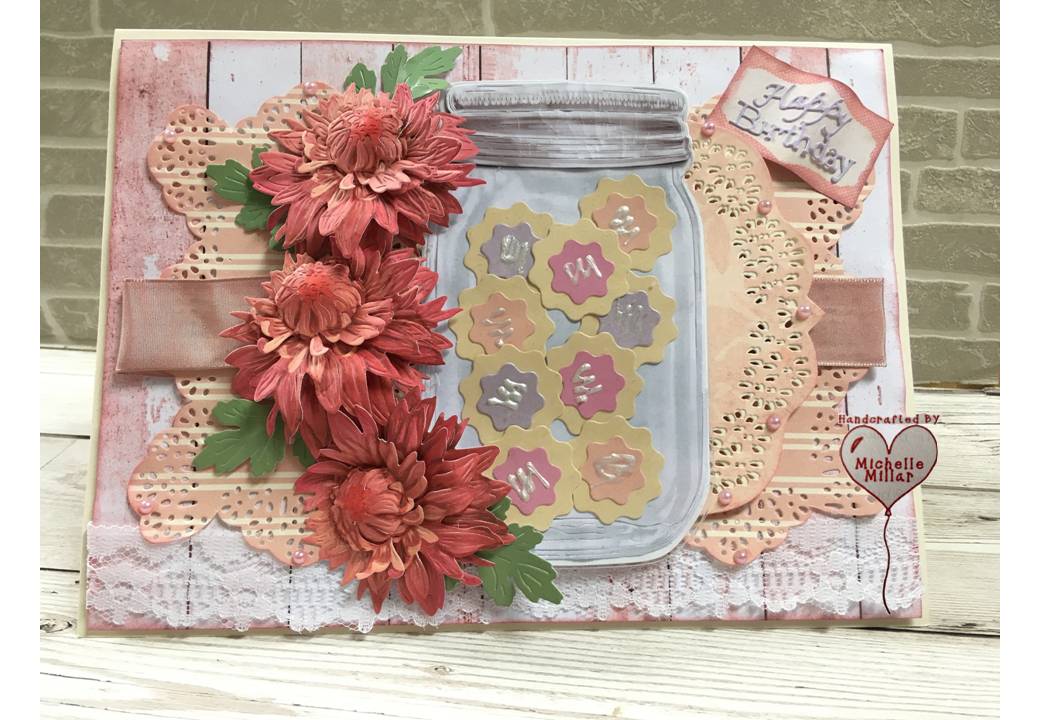
On the last day of the year, I thought that I would share a card that I made a few months ago for a  lovely lady in our craft group for a very special birthday.


She didn't actually know that we were making cards for her and that's the best kind of surprise for a crafter, handmade and craft.......lots of craft in fact.

For my card, I started with an 8 x8 inch 300gsm white card base and chose the Dreamees sapphire dreams paper pad. One of my new pads to use and I know for a fact that I am not the only crafter that loves the smell of their new paper pads.....strange but very true.

The day before I started to make this card, I had a flower making day as flowers take me a little longer to make these days. As I hadn't quite decided on a plan for my card I decided to make a batch of flowers and just see how they turned out.


Using a mix of the sapphire dreams and plain cardstock I used the loops and lace flower dies to create my flowers, As I only had white pollen stamens, I used some of my Dreamees sparkle 2nd gen dinky inky reinker to colour them the shade that I wanted and added Dreamees 4mm pearls to the rest.


I had some french navy colour core card that I used to define the layers in my card and used the circle loops and lace doily die for the centre topper and one of the border dies in the oval set to make a ribbon band for my polka dot ribbon to sit on.


On a printed die cut piece of the backing paper from the paper pad, I stamped the recipe of a birthday sentiment and decided to have my flowers cascading around the topper. For the foliage, I used the dies from the embellishment set in the loops and lace collection and die cut the leave in silver satin board to tie in with the dimensional silver glittered 60 in the corner.

Fortunately, I did have just the right amount of flowers I needed for my card and if you are a few blooms short the rolled roses are always a good space filler and easy to make without a die. On these I added a little ink to the edges which gave them a little shimmer too as the Dreamees 2nd gen dinky inkies do just that, colour and shimmer perfectly.


I added a verse to my card and made a box, hoping it would withstand a trip in the post and by the look of it, it did which is always a relief when you make something.

To be fair the post are pretty good, I make a box and then wrap it in a layer of brown paper before sending and that seems to work pretty well and keeps the weight and price down as well as adding an extra layer for wear and tear.

I know there have been a lot of complaints about Royal Mail with the run up to Christmas but I think they have been doing an amazing job under extremely difficult circumstances, working silly hours which is easy to forget.
Enjoy your day whatever you are doing and best wishes for the New Year.
Happy Crafting


Wednesday 30 December 2020

Last of the festive cheer

As we are close to ringing out the end of this year I thought I would just share the few cards that I managed to get made which were only a handful by all accounts.

My little collection all made with my festive Dreamees stamps and Loops and Lace die collection by the Dreamees which as you can see a lot of my cards has been my favourite go to die set collection lately. I particularly love this Santa Paws stamp set that Hayley Bignall designed, which really does capture a traditional essence of Christmas.


Each card does vary as I don't like making identical cards. The card above has the addition of the pine cone stamp by Skull & Cross Buns to match the tag Christmas tag I made earlier.


I made all the festive flowers using the Loops & Lace flower dies and used mostly Dreamees festive design papers from their past CDs and paper pads. I painted my stamped images using my second generation dinky inkies.


This adorable stamp is also part of the Santa Paws stamp set and with a bit of imagination, you could adapt this and use all year round. I know I am biased where Dreamees are concerned but when you love what you use its only natural that you want to share it with others too.

I love using my Stickles glitter glue in frosted lace at Christmas for all those snowy icy edges as it adds that perfect amount of glittery texture that doesn't rub off like glitter can do.


These sparkle dinky inkies are brilliant. They just add the right amount of shimmer without going over the top but you can intensify that sparkle with the  re-inkers  should you want to.

Some of the sentiments were Festive Dreamees ones from a past printed Christmas collection with backing papers.

The adorable winter bunny was coloured in with a promarker. I wanted him to stand out and the colour worked well.


And something a little different using a little mdf stocking and the Christmas sentiment tab stamps.

Finally, finishing with another stocking card made for my brother in law and family using the little mdf stockings by the Dreamees and the little fir tree branch die by Tattered Lace. For the background, I also used the poinsettia embossing folder.  I added a few miniature bells to the edge of the card and some stickles glitter glue in frosted lace for a snowy effect.

I had hoped to make a lot more cards this year but unfortunately, it just didn't turn out that way, which is a shame but not the end of the world.
Enjoy your evening
Happy Crafting


Tuesday 29 December 2020

Cookie Jar flowers Birthday card

 My card today is one with cookies and flowers, two things that I love and this one was made for my sister in law a few months ago.

Last year I sent it to their old address my mistake, as they had just moved and this year, I nearly forgot to put an insert inside, as I always add a personal verse inside. Next year perhaps, I will get I right.

I wanted to use these beautiful chrysanthemums from the  Tattered Lace Pressed Rose collection because not only are they huge as die cut flowers go but they look so life like too. I added the foliage from some Fleurs dies that I had which matched these flowers perfectly.

I also used the mason jar from the  Grandmas Kitchen collection by Tattered Lace, along with the two smallest dies from their cookie cutter die set for my biscuits, then added a little swirl of pearl drops for icing on the top. I also die cut an acetate panel for the front of my jar to complete the look.

The backing papers were printed onto some cream velvet card from my stash using the Grandmas Kitchen USB collection. This paper just gives my card a more textured feel for my shabby chic styled card. I then used the large lacy circle Lace die by the Dreamees along with their oval border die to make the panel for another layer.


A little white lace and dusky pink taffeta ribbon between the layers and sentiment in the style of a recipe label (also from the usb) to finish the card off with some rose pearls.

.

I thought it would be a change to add a sentiment to the front of one of my cards.
I was attempting to make smaller cards earlier in the year but the size is creeping back up as I do like making 7 and 8 inch cards when I have flowers to add to them.

Fortunately, I was able to give her the card this year as we saw each other before the second lockdown. I think we are all hoping for better things next year or even an improvement on this year at least, but more importantly, stay safe, healthy sane where possible ......
   Happy Crafting


Thursday 24 December 2020

Butterflies in Abundance Birthday card

Good morning, sharing a birthday card that I made earlier in the year but just haven't got around to posting it. This one was for one of my friends birthdays.

My 7-inch card has been planned around a sketch design with a splatter across the centre. I've kept the card mostly monochrome with just an accent of dusky pink in the ribbon, pearls and little flowers on the butterfly wings.


Sketches are great for planning your cards and very useful when you want to use up your backing paper by matting and layering shapes for your card.

For my flowers,  I stamped and heat embossed the flower stamps from the Dreamees Butterflies in Abundance set onto vellum using bright white Wow embossing powder.


I did the same for the large butterfly. This is a gorgeous butterfly stamp and so detailed along the edge with delicate flowers.

I used a panel of white pearlescent card which I had passed through the Dreamees corrugated embossing folder and then splattered it with a little carnation 2nd gen sparkle dinky inky reinker.  The colour of the ink was a good match for the taffeta ribbon that I was going to use on the card.

The papers for my card were chosen from one of the Dreamees CDs and I mounted them onto black card to define the layers before putting the card together.

I added some white sisal between the topper and the butterfly for some texture and used some silver mist reinker dinky inky mixed with a little water in my water brush to add a little shimmer on the edges of my flowers.

As this was going to be delivered by hand, I didn't have to worry about it getting crushed in the post. Where an envelobox  isn't deep enough, I make a box for my cards and also add a personal verse inside as I tend to leave a sentiment off the front of my cards where I feel there isn't a specific place for one.

Enjoy your day and Merry Christmas .
Happy Crafting


Tuesday 22 December 2020

Daydreamer Birthday card

 A stamped birthday card to share today and not a flower in sight with this one. This was a birthday card made for my Niece's birthday.

For a change, a 6x6 card using the  Daydreamer stamp set by Visible Image which I have coloured with promarkers and used glossy accent on her glasses to highlight the lenses.


I masked my stamp and used a brick stencil with distress oxide inks by Tim Holtz, along
with some second generation stamping in the background.


Its a really nice stamp and Visible image have great sentiments to compliment all their stamps that are not just very inspirational but very original too.

Short and sweet today, I have a few makes that I haven't got around to sharing yet.
Have a good day, whatever you have planned.
Happy crafting.


Sunday 20 December 2020

A Little Princess Birthday card

Today I have a princess birthday card to share, which was made for my friend's little girl.


From an A4 300gsm cream colour core card, I have made a gatefold card for my card base and used one of the backing papers from the Tattered Lace enchanted collection downloads front panels and inside of my card.


I added a personal verse and the dancing mice from the same collection using the having a fling die and the matching charisma papers.


For my princess castle, I used the 3D castle die from the  Tattered Lace Enchanted collection with cream colour core card and cerise card for the turrets. Great detail on these tower dies and I've used the flowers and foliage from the collection to embellish as a forest/secret garden around the castle.

The domed towers give just the right amount of dimension and not too much to make it a problem to go it the post, which is something I have to think about now when I make card unfortunately as there have been occasions when they haven't survived the journey too well.

Another one of those die sets and collections that I will get plenty of use out of which is always great.

Happy Crafting


Thursday 17 December 2020

Raymonds Snowman

Today I am sharing a little Christmas decoration made using the Raymonds digi stamp set for December from the Progressive Challenge on Imagine that digistamp.
This month's free digi stamp set download with the progressive challenge is really cute and perfect for a winter birthday for a child as it also has sentiment to compliment that but I have used the digi stamps to make a winter mobile to hang in the window of my porch.


I enlarged the Let it snow digi stamp disc and placed Raymond in the middle, with the Celebrate Winter sentiment, just above his head. I coloured Raymond and his truck in with promarkers, adding my stickles in frosted lace for some snowy texture.

I made the accompanying snowflake discs smaller. As this was going to be hung up, the other side of my winter mobile was going to just show the snowflakes which are so pretty.


I've displayed it on my tree to take the picture as it will show up much better and look a lot more festive......as well as not keep moving while I try and take a picture.

Funnily enough, it was the Christmas ribbon from my stash that gave me the idea to make a hanging decoration, as I thought the blue beads and wooden star matched the snowflakes so well.
I used my stickles in frosted lace also on the snowflakes and the really make them twinkle when they catch the light. 

There is some lovely inspiration on the blog challenge from other crafters who have also joined in the challenge this month which is always great to see everyone's spin on making something using the same material. That's what crafting is all about.
Happy Crafting


Easter Cards

I have a few Easter cards that I'm sharing today and I've been using the Signature Series Digital Florist Everything Anemone Cardmak...