blog backbdrop

Tuesday 16 February 2021

Time - Tag Tuesday

Sharing a  tag which I've made as part of a colour challenge.  The theme was black, white and add another colour.


My other colour I have added is red, in the form of 2 small red lacy hearts.  A piece of red card leftover from a project that I had heat embossed with a lacy stamp using black embossing powder and I then used my heart punch.  That's why crafters never throw anything away!


For my tags, I used my vintage bookmark dies by Tattered Lace and on one of the black tags I used a script embossing folder and rubbed a little cloud white versa magic ink over the raised areas of the tag to highlight the script.

I took a piece of sumi paper and stamped it with my script stamp by Timber Boutique and then heat embossed it with black embossing powder.

I stamped the fob watch stamp by IndigoBlu onto white card and added a crackle accent gloss by Ranger onto the centre dial. I also used the Love You Longer stamp by Visible Image.

I used black soot distress oxide ink to edge the rest of the tag as I put it together and found some black peel offs in my stash to form a chain for the fob watch.  I also added a few drops of glossy accent for interest .


Thank goodness for challenges and swaps because it's also a great excuse to get back to making those projects that you haven't done for a while. 

A rummage through your stash to accommodate a theme and then just going where the mood takes you and create....

This particular tag is destined for Tag Tuesday  and I've really enjoyed making this, another thing on my list to get back to doing.
Happy Crafting!


Sunday 14 February 2021

Football Shaker card

 Today I am sharing a shaker birthday card that I made for my nephews birthday.


As he loves his football and I have made him a few football cards, I was looking for a bit of inspiration for something different and came across a card on Pinterest made by a blogger cardsandacuppa by Sarah Jane Rae using stampin' up products, so decided to put my own spin on this card as its such a clever idea and has given me the inspiration to create this card in the first place.


For my card I used:-


The charisma for this die can be downloaded for free directly from the Tattered Lace website. click on the link below and you will find the file for the download at the bottom of that page.

I stuck the nets, the shirt and the football boots to the red panel of card and placed the footballs between the acetate. I used my antistatic bag to help eliminate the static to allow the footballs to move freely. 

The three layers were die cut in one go to make the shaker card


To make the card look tidy inside of the shaker card, I used the cream panel of card on the inside. and created a plain insert sheet for my sentiment. I used some glossy accent on the champion badge that I stuck to the football in the corner of the card and used one of the sentiments from the Hexagon Heaven die set on the matching card.

This is another really useful die set that. Great for girls too! If you have MyCraft Studio, you can change the colours of the charisma papers and have different colour shirts.

Enjoy your day whatever you have planned.
Happy Crafting


Monday 8 February 2021

SpecOwl Delivery

Today I am sharing a birthday card made for someone very special, so I decided to use this lovely image of a barn owl, which is his favourite bird.

For my 6.5 x 6.5 inch base card, I used the Dreamees 300gsm chocolate cardstock and then added a shimmery green layer which I created using the avocado sparkle dinky inkie ink pad from the new Shades of Sparkle collection.


I ran the avocado ink pad along the rim of a measured square of Dreamees kraft card to create the illusion of my shimmered layer of card and then added another layer but from the Totally Timber paper pad. 

For my next layer, I used the corrugated embossing folder with a piece of the wood grain design paper from the same pad to add some texture.

I printed out the matching charisma twice on glossy card, for  SpecOwl Delivery die by Tattered Lace which is from the Autumn Allure collection and decoupaged it using pinfair glue gel. I also die cut a plain panel of design paper fro the Totally Timber paper pad for behind the frame of the owl. The colour and texture of the paper seemed to tie in with the die very well.


I made a few flowers using the Build a Peony stamp which have been stamped and heat embossed with bright white embossing powder on pink card. I thought the flowers would tie in well with those on the image.  I also used the sentiment stamp from the Dreamees fire lillies stamp set.


Sometimes you can't always find the right shade of card to blend with your patterned papers when making a card so having these inks that tie in with the design paper in this Shades of Sparkle collection has been a real bonus for me as I can now create me own cardstock layers too.

Enjoy your day, whatever you have planned.
Happy Crafting


Sunday 7 February 2021

Birthday Bunny ATC cards

 A couple of ATC cards to share today which I made using this month's digi stamp free download from Imagine that digi stamp for their monthly progressive challenge.


This month with these adorable digi stamps, I decided to make some ATC cards, another one of those crafts I really enjoy doing and on my list to get back to making and swapping this year.

I coloured my image with some promarkers and shimmered the balloon, then layered it onto some coloured card with a top layer of sumi paper that had been heat embossed with a worded stamp (leftover from another project). A little ribbon behind the sentiment and a few gems.
For my second card, I used the pre coloured digi image and added the extra pre coloured circle discs which i reduced in size. I added enough glossy accent to these to make them dome an set  into embellishments and was really happy with how they turned out.


I could have made a birthday card with cute little digi stamps but decided on an alternative by making these ATC cards and now these cards are ready for me to send, swap or make some more.

Happy Crafting


Friday 5 February 2021

Falling leaves card

 A simple little card to share today which can be used for a birthday or even a just because card, an excuse to stay in touch, brighten someone's day with some unexpected post, especially for those struggling with staying at home in order to stay safe.


So,  for my little card, I used some simple little leaf digi images and the easiest way to get a more natural on these leaves is to smoosh a bit of Tim Holtz distress oxides with a spritz of water, which is exactly what I did here.


 I used wild honey, lucky clover and frayed burlap and after covering the leaves in one pass, I dried them off with my heat gun. I have to say I am really impressed with the paper that I've been using that was recommended to me, it holds the ink really well considering that it is only 120gsm. I've also been using it to make my flowers too.  I purchased a ream of this Navigator paper (orange wrapper - for colour documents) from Wilkos for £4.99. definitely worth a try and good for your charisma die cuts too.


 I made a 6x6 card from kraft card and added a topper in burnt orange and olive green before added a few of my leaves on top. I will save the rest of my leaves for another project. I added a piece of hessian ribbon and a button.


A little sentiment from one of my Dreamees stamps with I mounted on some co-ordinating card and a few gold pearls to finish my card off.

I had been looking for a big leaf stamp to make a card like this but found that these digi stamps worked out much better as they can be resized.  I'm really loving Autumnal leaves at the moment, so have a few more cards in mind to do.

Enjoy your day, whatever you have planned for yourself.
Happy crafting


Added to ITD - Ribbons&Bows challenge

Enjoy the little things hanging plaque

Todays make to share is an mdf plaque that  I made in a craft swap with the Dreamees Catchers, which is a great craft group on Facebook for Dreamees followers. I  am also sharing this for our blog challenge on Let's Craft and Create this month.
Our challenge this month is Red, Pink and or White and of course, as with all our challenges, there is an ATG option.

MDF is a great to decorate. Once you start adding your papers, die cuts, flowers and embellishments, you have a lovely gift to give someone.

This is what I used for my hanging plaque:-
  • MDF shaped 7.5inch plaque
  • Dreamees Loops square die set
  • Dreamees Loops and Lace embellishment dies
  • Dreamees Tickled pink paper pad
  • Dreamees Woodgrain embossing folder
  • Dreamees Loop and Lace flower dies
  • Dreamees mdf mason jar from craft magazine mdf kit
  • Dreamees white pollen stamens
  • Dreamees Friendship stamp sentiment
  • Dreamees 4mm hot pink pearls
  • Dreamees 6mm white pearls
  • Dreamees walnut sparkle dinky inky
  • Dreamees vellum to heat emboss sentiment
  • Kraft card
  • White textured card approx 150gsm for a few flowers
  • Taffeta dusky pink wired ribbon
  • A strip of white lace
  • A piece of 12cm pink satin ribbon to hang the plaque up
  • Natural bind wire
  • Hobby House wood buttons
The Loops and Lace die set is a fabulous collection For this project, I am only using the square shape set with the embellishment and flower dies.
I decided to matt and layer the tickled pink paper pad with kraft card and pick up the white in the paper by using a white textured card for some of the flowers.

After covering the mdf in some of the tickled pink paper and deciding how I wanted my plaque to look, I used the half border die in the set to create a double border panel to go across the centre of my plaque, adding another piece of white lace on top, building on the layers.

For the flowers, I die cut these from the Loops and Lace flower dies using the tickled pink papers and kraft card, with the foliage from the embellishment die set. After, I carefully edge them with the walnut sparkle dinky inky for a hint of shimmer and a more vintage look.


On the other side of the plaque made some textured flowers using the white textured card, by adding coiled stems from the natural bind wire and pollen stamens popping out of the little flower heads that I had made. The outline flower dies in kraft card added a spikey foliage to the spray.


I love this little mason jar from this mdf kit and was looking forward to using it in a project. I covered the jar in a little piece of tickled pink paper and then used the hearts that popped out of the flower dies to make cookies for the cookie jar.
The little bees from the embellishment die set were die cut from a small piece of white pearlescent card and silver glitter card. I carefully tore a piece of vellum to fit the place I wanted the sentiment to sit and heat embossed the sentiment with silver super fine embossing wow powder from one of the Dreamees early friendship stamps.

I popped the two flower shaped wooden buttons at the top of the plaque and after I added the pink satin ribbon to hang it up, my plaque was ready to send off to Sonja.

I really enjoy crafting for others, especially when it's something that they are not expecting. Crafting is all about sharing your inspiration with others.

Our design team have also been busy this month with projects of their own and there is always lots of fabulous inspiration shared by the crafters on our blog too. If you are interested,  there is a prize for the winning entry, following our theme and a badge for your blog for the top 3 runners up. Just click on the link below which will take you to our blog challenge. 

Happy Crafting


Twins - New baby Cards

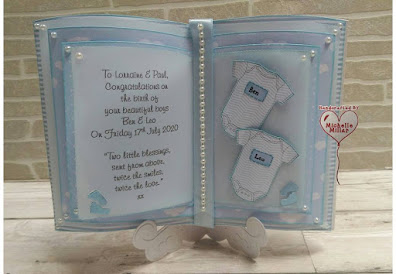
Today I am sharing a baby card that I made for my neighbour who had two adorable little boys in July last year but with one thing and another I have not had the opportunity to share it.


As the theme for our blog challenge this month at Daisy Chains is with children/babies in mind, this seemed the ideal time to share it.

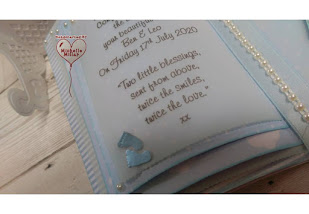
I used the Tattered Lace nested book die for the main structure of my card along with a mix of Tattered Lace and downloads new baby backing paper mixed with powder blue vellum.

For the little baby grows I used a free digi stamp download and printed it onto one of the backing papers, adding their little name labels after.  The little metallic feet embellishments were made using a punch from my stash, purchased from a charity shop.
On the opposite page I had printed a personalised message onto the vellum page.


My open book card can lay flat or on the card stand I made using the Tonic floral affections ornate easel stand die .


I also added a few embellishments from my stash to the pages in the card book


I used white centura pearl card stock for the largest book die and also for the card stand so that it all matched, finishing off with blue satin ribbon and some white flat backed pearls.
This style of card makes an ideal new baby card which can be adapted to add photos too.
I made a very similar a few weeks later, keeping it a little more CAS and adding a photo of my friend's new addition to her family.
I have also added the same embellishments to the inner pages but chose to keep the photo of this handsome chap as my focal point on the card. These little lads have really grown since writing this post, they grow up so quickly.

The rest of our design team have also been making some lovely projects this month, along with so many great crafters on our blog every month. It's always lovely to see the inspiration everyone shares. Please use the link below to take you to the blog challenge and thanks for the visit.

Happy Crafting


Gothic Fairy Arch

I've finished my Gothic fairy arch and have a few pictures to share with you and I'm also going to add it to one of the monthly chal...