blog backbdrop

Monday 30 July 2018

Fleurs - Fleurs Flower Dies & Mulberry Paper Collection Launch - DT samples

Following the launch of the Fleurs flower dies & Mulberry paper Collection launch on Create & Craft TV.    I thought I'd share my DT samples with you. These dies can also be purchased directly from www.Crafting.co.uk


An aperture card also using the Fleurs flower dies on mulberry paper and Tattered lace Moroccan trellis die.
I have used a glue gun for the flower centres and then quickly dipped them into My Craft Studio fine crystal glitter.


Fleurs Mulberry Launch - Fleurs Mulberry flower/leaf dies & mulberry paper and also using the Tattered Lace diamond trellis die. I have also added some foliage in this bouquet using the leaf dies onto the covered stemmed wires.


Fleurs flower dies on mulberry paper to make my "blazing star flowers", leaf dies for the stems and the Tattered Lace pearl dies.  Added hot glue to the end of the stem and then dipped in My Craft Studio fine crystal glitter as well as edging the flowers in glitter.


Fleurs flower dies on mulberry paper, Tattered Lace pearl circle die and a mix of mulberry paper hearts and Tattered Lace papers. Instead of making stemmed flowers I have just layered up the flowers to show the versatility of these little dies.


Fleurs flower dies on mulberry paper to make my alums for this card and also using the Tattered Lace rounded corner square dies and sentiment.


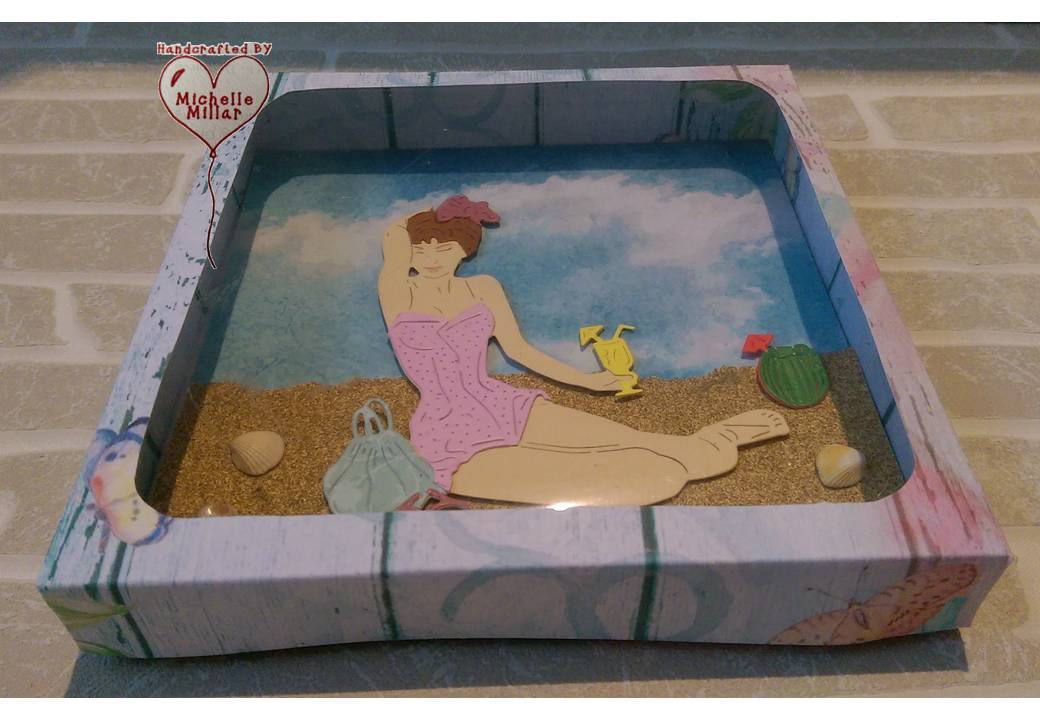
A window box aperture card with acetate front and Fleurs flower & leaf die using the mulberry paper. The flowers are actually on leafed stems which can't be seen very well from the picture.

A selection of Charismas, papers and projects can be downloaded directly for free from Tattered Lace.

Happy Crafting


Sunday 29 July 2018

Image transfer on MDF

I made a plaque for a friend using a picture of their dogs trying out an image transfer onto the mdf and thought I'd share the process with you.


I started with one of my Dreamees mdf pieces and painted it with a cream match pot that I had. I picked up a few of them from Homebase really cheap as they were discontinuing the colours. Perfect size for painting small pieces like this and easy to store as they don't take up a lot of space.

The picture was printed onto a slightly thicker gsm of paper (for colour printing) than your regular photocopier paper.  I just happened to have this paper left. It does need to be a laser printed copy and not inkjet.  If you use an inkjet print, the colours will run when you add your matt medium to it.  
I got mine printed at the local library.


I really like this DecoArt matt medium. It goes on smoothly and leaves a lovely matte finish, perfect for your journaling too.  Modge Podge will do the job too.


Give your picture a thick even coat of matte medium. You want to cover all the picture until it looks opaque.


Stick the picture face down onto your mdf and smooth down to get rid of any air bubbles. This is important as it can give your picture an uneven finish if left to dry with them in.  I used a small ruler and careful run it up an down to ensure a smooth finish.


I left it to dry overnight and then used a damp piece of kitchen roll (you can use a cloth) and just placed it over the picture for about 3mins to absorb the moisture. It may need more time, depending on how much of the moisture sinks in but don't flood it with water.


I used a piece of sponge but you could just use your finger and gently start to rub away the paper.  This takes some patience and don't rub too hard or you may damage your image. Just keep adding water bit by bit, letting it soak in and rubbing off a little more.


Once all the paper had been removed I let it settle and dry out before adding a layer of my matte medium all over the plaque just to seal it and give the plaque an even finish.


Next for the decoration. I stamped and heat embossed my Dreamees Ditsy Stitch flower stamps (the first flower stamps I purchased from the Dreamees) onto some of their backing paper and die cut some foliage from their peculiar leave & flourishes die set onto some peach satin board by Create & Craft.

Ditsy Stitch

Dreamees peculiar leaves & flourishes


I layered up the flowers and added some yellow/gold crystal gems in the centre.
I edged the plaque with Dreamee pearls and added a little yellow gingham ribbon to finish my hanging plaque off.

Happy Crafting

Monday 23 July 2018

Sister 60th Birthday Card

I was asked to make a birthday card for a sister's 60th so given her favourite colour and that she liked flower I decided to go with my Dreamees flower stamps and die.


For this card, I used a white linen card base and layered it up with lavender satin board by Create & Craft and The Dreamees something stitchy backing papers in the same colourway.

The sentiment has been heat embossed using superfine metallic silver Wow embossing powder with one of The Dreamees sentiment stamps.

I have heat embossed The Dreamees pretty pearls flower stamps onto some of their patterned backing paper in the same colourways and added a little hint of colour in the centre using on of their lavender pearlescent dinky inkies.  The flowers have been layered up, shaped and finished off with plum pearls in the centre.

I adhered the wording/ number and heart metal embellishment in the centre of the card and didn't think it needed any more than that.

Pretty Pearls

For the lacy aperture centre, I have die cut the card centre using The Dreamees square lacy divine die to get the aperture and then the lacy die with the white linen card.  Inside I have added a mint green vellum layer to catch the light and give a hint of colour behind the panel. The card insert covers the panel inside. I really liked the effect of the acetate leaves I used on another card so decided that they would go well with this card too.  The leaves have been heat embossed onto acetate using a Chloe Endean mix of fine Wow embossing powder in Hollywood Hills.  The leaves are from The Dreamees sweet sunflowers stamp set.

square lacy divine die set


When you have taken the time to make a special card, I think it also needs a book to keep it in, in the same way, you would wrap a gift.  I have used Crafters Companion Indulgence centura pearl double sided 300gsm card to make the gift box and used their envelobox scoreboard (as I always do) to make the box.


Happy Crafting

Saturday 21 July 2018

Tattered Lace Sunset Beach Collection Launch - DT samples


Following the launch of the Tattered Lace  Sunset Beach launch on Create & Craft TV I am sharing some of my samples.

I had 4 die sets to work with:-

Sunset Beach - Ella


Tattered Lace Dies Sunset Beach Collection Ella die, used to make a shadow box card. The dies have been paper pieced and I have used Tattered Lace backing papers to make this project, with the exception of the sandpaper used for the grainy sand.  I printed the paper onto card, double sided, to get the same wood effect print inside too.


Sunset Beach - Bathing Beauties


Tattered Lace Sunset Beach - Bathing Beauties collection. A gatefold card using candy striped Tattered Lace papers. I have again decided to paper piece the dies for an array of colour. In this collection, you have Sandy, Grant and Francesca.  


Sunset Beach - You are Clawsome


The mdf plaque has been painted with chalk paint and I have used sandpaper for the grainy sand. Finished off with some little shells from my walks along the beach.  I have used Tim Holtz spiced marmalade distress ink and clear embossing powder on the crab which has been die cut from hammered card to give a little more texture.


I have used the same Sunset Beach Collection - you are clawsome die to make a card, using embossing folders on the backing papers to add a pattern and texture.  I just used the spiced marmalade distress ink on the crab instead of embossing it.


Sunset Beach - Sandcastle


Using a balsawood postcard I covered the front with Tattered Lace paper, adding some cream lace around the edged and decoupage the sandcastle die with peach mirri card.


The Charisma papers were not ready for me to craft with when I made my cards for the launch, so due to short deadlines, I decided to paper piece the die cuts and leave the last die dimensioned in mirri card. From the mirri card you can still see the depth of detail from this die.


A selection of Charismas, papers and projects can be downloaded directly for free from Tattered Lace.


Happy Crafting


WOYWW #777

Happy 'What's on Your desk Wednesday!' This is my first contribution to the blog, that I came across the other day, so I thought...