blog backbdrop

Thursday 31 May 2018

Daughter Birthday Card - Butterfly dies

I love this butterfly arch die from Chloes Creative Cards.  In April this year, Chloe brought out her first box set (limited edition).  It's such a pretty die that I decided to use it on my daughters birthday card.


I used the butterfly die on a piece of A5 Crafters Companion white Centura Pearl cardstock in both corners and then used the matching stamp set from the box set to heat emboss with Choe's own mix of Wow embossing powder in Lilac Aurora.


The die cut topper was mounted on to a piece of coordinating lilac satin board from Create & Craft
For the base card, I used Crafters Companion Indulgence double sided card.


I used my verse for the front of the card, framing it with a Crafters Companion frame die in the lilac satin card.

The swirl die in the matching satin card is from Joanna Sheen and finished off with some aurora borealis gems.

Happy Crafting


Entered into the following blog challenges:-

Die Cuttin' Divas - ATC
Simply Papercraft - ATC
4 Crafty Chicks - ATC
Monochrome Magic - ATG Monochrome Magic
The Crafty Addicts  - ATG 


New batch of ATCs

Thought I'd share my latest batch of ATCs that I have been making.

The following sets of ATCs were Vera Lane Studios digi stamps. These are from the Kokeshi Dolls collection.


I think these digi stamps are absolutely adorable and both sets were made for the children in my after school craft group.


This is also a Vera Lane Studios digi stamp called BowBee.  I have used a marbled background on these ATCs from shaving foam and acrylic ink.
This is the Vera Lane Studios Mechanical Flower digi stamp.

Another marble background on these ATC swaps for a group I belong to.  The theme was ribbon and bows and this is how I interpreted it. This is a Singles Vintage Corset stamp available from Creative Expressions.
I have used this stamp a lot as its so versatile.  Its the Shine Bright stamp set from Visible Image.  As the theme for the ATC swap was numbers, that's how I incorporated it. I have also used their main Ripple Effect stamp in the background.

Happy Crafting


Friday 25 May 2018

Mixed Media Diary Cover

I am doing a guest DT over on A Inky Mess  this month and decided to use my diary cover for the  mixed media ATG challenge, which is just for fun.


 This is my A5 page a day diary that I use to put all my crafty commitments down and keep a log of my projects.  It seemed a little bare so I decided that it could do with a revamp.


First, I gave it a light covering of white gesso, giving it a mottled effect so that I could still see a little of the silver cover through it.


Then using a feather stencil out of my Deco stencil set by Craft sensations purchased at The Range, I used the lilac acrylic mousse by CreaBox.  I happened to see these in Lidl whilst shopping.  They are easy to apply and dry with a smooth chalky texture.


The texture mousse dries quite quickly but I did leave it overnight to dry and carried on with another project (this also stops me prodding it in eagerness to continue).  I used some Creative Expressions gilding wax on half the feather in Pewter to highlight the feathers a little and tone down all that lilac.  I also used some Dovecraft pearl effects that I had just to make a border of squiggles, for a bit more texture.


I still felt it needed something else, so added a little pearlescent mint mica powder, mixed with water and spritzed over the cover before rubbing it into the cover.  The mica powder does look a lot darker in the pot in the picture. It gave the book cover a minty background shimmer which I was a lot happier with.


 I downloaded these cute zombie owl digital images from Oddball Art by Lizzy Love.


 I coloured them with Tim Holtz distress oxides in seedless preserves and twisted citron, highlighting with peacock feathers, candied apple for the heart and antique linen for a hue of colour on the eyes.  I then added some glossy accent to the eyes and hearts.  For some more texture, I used some Tim Holtz stickles in clear rock candy.


 You can see the effect of the rock candy stickles on the zombie owl a lot clearer in this picture. I wanted the owls to look a little dishevelled.


I used pinflair glue gel to stick the owls down and cosmic shimmer glue for the rest of the embellishments. The cover was finished off with sequins, button die cuts and chipboard hearts.


 From the same set of stencils, I used the circles stencil and the pink chalky acrylic mousse on the back of the diary.


I kept the back quite simple adding some Craftwork Cards candi in gingham, glossy accent and a few die cuts.

Pop over to An Inky Mess and have a look at the great projects the design team have been making this month and have a go at entering the challenge which can be anything to do with mixed media.

Happy Crafting


Thursday 24 May 2018

Tattered Lace - Neo Victoriana DT cards from Create & Craft TV

I'm sharing the card made for the Tattered Lace - Neo Victoriana shows on Create & Craft this week.
There is something a little surreal to see your work on live tv.

I was given three of these beautiful dies to work with:-


I used the Tattered Lace Charisma papers, double sided on cardstock and then cut my pocket watch template out for the card. I wanted it to resemble a large pocket watch, so used the distressed gold paper for the outside and one of the lovely steampunk cog papers inside.

For the Mechanical background die I used a richer two tone paper from the collection, which was printed on to glossy cardstock and layered up a few times to give the illusion of a working clock face. I also added the hands of an old travel clock (I have a habit of dismantling things before recycling them).


I stamped a simple sentiment inside to finish it off.


Using the same Mechanical background die I made an exploding box.  This time I used the matching Charisma paper with the die, adding layers to create more dimension and adding some silver gilding wax to the edges of the die to give it a more jagged metal look.

I themed this one on a sort of Alice in Wonderland meets steampunk.

I added some glossy accent to all the bolts.

Inside I made a steampunk hat with the Neo Victoriana papers


I also used the papers to make the embellishments, adding some glossy accent for texture.


I had some gold wired ribbon which just set it off nicely as this stuff stretches to give a great distressed wired look.

 The back view always has to look as good as the front, so added some detail there also.


The quality and detail of these papers are fabulous and have so many possibilities. I really enjoyed making this particular project.  I had an idea in my head as to how I wanted it to look, but you are never quite sure how that idea will actually transpire. I have to say, I'm really pleased with the results.

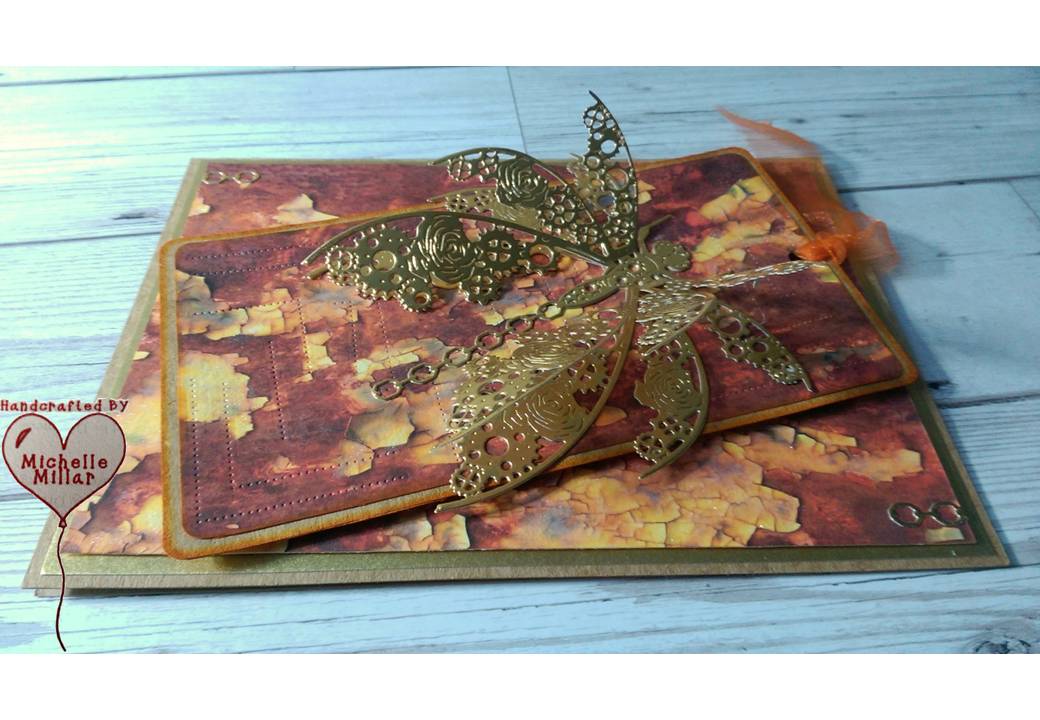
For my tag card I thought the rust paper would go really well with the Mechanical Dragonfly die which I die cut from gold mirri card. The paper had a bark look to it. I used kraft card as my base card. I also used the little rivet dies from the Mechanical Background die on the tag to add a little interest to it.


These dies cut perfectly and this particular die is so delicate, especially when you layer it up for dimension. For a slightly dewy effect, I added a little clear sparkle with my spectrum noir clear overlay sparkle pen.


I finished this card off with an insert printed from one of the paper (on a watermark setting) with a verse.


Using the same Mechanical Dragonfly die I created an aperture card. I used peach cardstock for the die on the front which was layered onto a fine membrane topper from the Mechanical Background.
I used the same Neo Victoriana paper as another topper on the front as well as inside the card. The little roses are from the Voyage Extraordinaire die.

In the aperture I have used the same fine membrane from the Mechanical Background die.
This time I used the matching Charisma paper for the die which has been layered onto acetate to give the dragonfly more stability. It was then hung from a piece of acetate.


I also added tiny aurora borealis gems to the centre of some of the cogs in the wings.


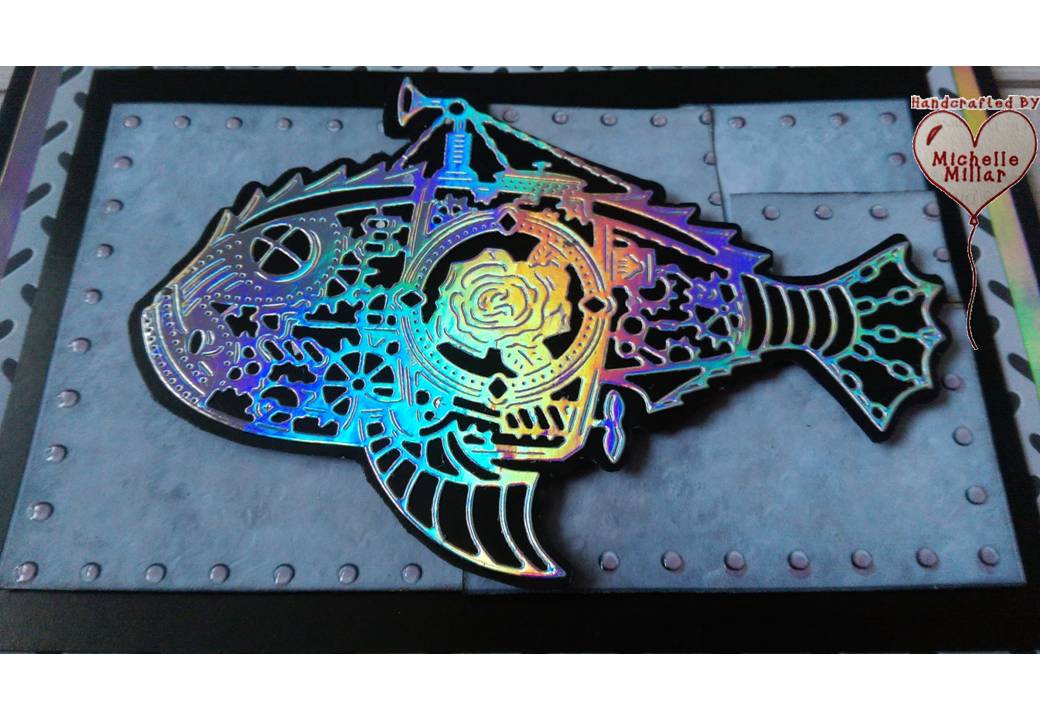
My next card is the Voyage Extraordinaire die, the steampunk fish. For my monochrome card, I used rainbow mirri card on the die and those fabulous Neo Victoriana papers

I used glossy accent on the studs and love how that mirri card catches an array of colour.


The top layer of the card was made in panels with foam pads to support it. It's difficult to see from the picture but I was trying to capture the idea of metal panels.

Once I started working with this die, I realised that there was a lot more to it than meets the eye. Being mechanical, there are lots you can snip away to change it about.


Using the same Voyage Extraordinaire die, this time I made a stepper card using the matching Charisma paper for the fish, which has been made dimensional in the centre as if you were looking through the skeleton of the mechanical fish. I have used those beautiful Neo Victoriana papers again.


I have also used the chain tail from the Mechanical Dragonfly die along the stopper strip on the stepper card.


You can see the dimension of the Voyage Extraordinaire steampunk fish better from this picture and I have also added the Mechanical Background die to the backing paper to create a little texture, highlighting it my spectrum noir sparkle clear overlay pen.


I thoroughly enjoyed working with these dies and seeing what the rest of the design team have made with their dies too.  

A selection of Charismas, papers and projects can be downloaded directly for free from Tattered Lace.


Happy Crafting

WOYWW #777

Happy 'What's on Your desk Wednesday!' This is my first contribution to the blog, that I came across the other day, so I thought...