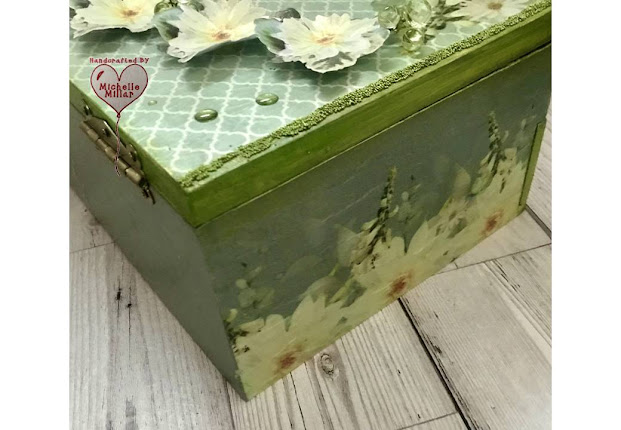
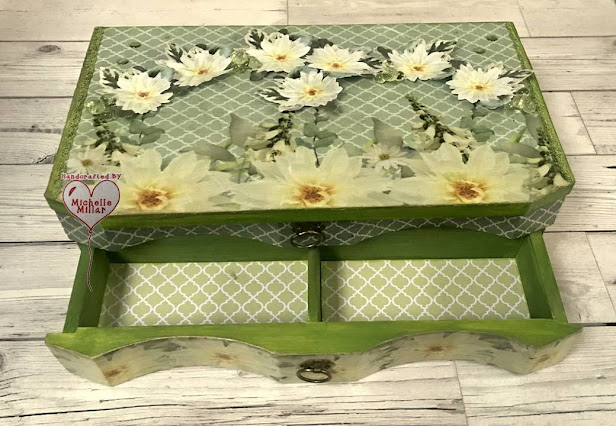
I have finally got around to decorating an mdf jewellery box a friend gave me some years ago. It has been sitting in a box waiting for some inspiration and when I saw this new Dimensional Dahlia collection by Opulence by Design, it gave me the idea to use some of these beautiful papers as rice papers to decorate it.
The Collection I am using to upcycle my mdf box is the Digital Florist Dimensional Dahlias Cardmaking Kit by Opulence by Design. This is a 20 page downloadable PDF kit, with a mix of design papers, tags, toppers, sentiments and flowers.
My Epson Ecotank is great and economical for digital printing but a bit more sensitive when it comes to tissue paper/rice paper.
Nevertheless, it is happy to take printable sumi paper, which is what I had in my craft stash to print on. I attached the Sumi paper with a tape pen to a piece of A4 copier paper to feed it through my printer rather than using a removable adhesive spray, leaving a small border of copier paper adhesive free for my printer to pull it through.
The Sumi paper has a textured thread running through it which is lovely for background papers and has a great woven feel to it too.
I painted all the areas that needed painting first, using a Sparkle Reinker pearlescent dye based ink in Kiwi by The Dreamees. Once Dry, I gave it a coating of Matte Mod Podge to seal it. For a more shabby look, I lightly sanded all the edges of the box.
I then started to add my sumi/rice paper to the edges of my box, being careful not to add too much Mod Podge to start off with as once dry, I would go over the whole box to completely seal it.
Along the lid of the box, I've added metallic green microbeads, they just mixed in really well with this project.
On the lid of the box, I chose this design because I think these flowers are so beautiful and have added the single blooms to sit on top as embellishments, alongside the crystal berries but I needed to give my flowers some more texture to protect them.
I still printed on 120gsm Navigator paper) I first embossed the leaves with clear embossing powder, happy with how that looked, I added some iridescent embossing glitter to the veins of the petals and then covered the flowers with a layer of Mod Podge to give them a light vinyl feel to them that I could still mould them in my hand with a flower tool.
For the bottom of the compartments inside the box, I cut up some of the patterned paper. This box is a lot bigger than I had originally thought and think it will come in very handy now that I have given it a facelift.
The final thing to do was to go over it with wax, which is what I normally like to do, and for this project I used, Prima Art Alchemy Antique Brilliance wax in Lucky Clover and Prima Art Alchemy Opal Magic wax in Vintage Silk. In some of the pictures, you can just catch the shimmer from the Vintage Silk wax.
I like making my craft stash stretch further like any other crafter and having more options to use my craft stuff. It's also really handy to be able to just print off what you need sometimes.
I have really enjoyed working with this kit, especially using these beautiful papers as rice papers for the first time, which I will definitely be trying again.
If you are interested in the link to Opulence by Design's Website, you can follow the link below including the YouTube channel where you will find lots of really inspirational card craft and some brilliant flower making tutorials that I have certainly made use of.
Have a great week whatever you have planned.
Challenges:


15 comments:
This is so pretty and beautifully done.
B x
Absolutely fabulous! You really have created a treasure chest. Hugs, Valerie
what a gorgeous box with fab paper and great color Michelle
gr karin
Absolutely beautiful project Michelle! Nicely done! Thanks so much for joining in the fun at Beautiful Blossoms! Good Luck and we hope you’ll come back often. We appreciate your support!
Darlene
BB DT
BEAUTIFUL BLOSSOMS CHALLENGE
DAR’S CRAFTY CREATIONS
A beautiful recycle of a jewelry box, such pretty papers!!
Thank you for joining our challenge at Triple B and Beautiful Blossoms!
Diane TB Co-Owner and BB DT
{Nellies Nest}
{Triple B}
{Simply Clean & Simple} NEW
Absolutely fabulously decorated love the beautiful paper and gorgeous flowers-beautiful result and so useful too
Carol x
This is a gorgeous, upcycled treasure box! Thanks for sharing with us at The Beautiful Blossoms Challenge and we hope you'll join in again soon.
Donna xx
Beautiful Blossoms Challenge
Paper Funday Challenge
Inspiration Station Challenge
Oh, my goodness, Michelle, this box looks amazing! I'm sure it was a lot of work, but the final result was definitely worth it. It is absolutely stunning.
Stunning transformation xx
OH! Michelle, what an absolutely gorgeous project, you certainly transformed the box, which is stunning and a lovely shape too. I love you used a digi kit and printed it all out as you wanted it. I think we are made to feel it's not crafting when using digi papers and images, but you have shown it certainly is. I LOVE this. I must get back to some digi work!
Faith x
Your upcycled trinket box looks amazing Michelle, a lot of work but the results are definitely worth it.
xx
Beautiful box, I love it. Thank you for joining us at the Crafts Galore Encore Challenge.
Hugs
Danka
Twórcze pasje Danki {My Blog}
A lot of work went into this box and is shows - it is a beauty. Thanks so very nmucg for joining us this time at the Creative Fingers challenge
thanks so much for your lovely comments x
Michelle, this is so pretty! Iʻm sure you will get loads of enjoyment and use from it.
Post a Comment