blog backbdrop

Showing posts with label Sheena Douglass. Show all posts

Wednesday, 24 March 2021

Musical Soul birthday card

My card today is a stamped card that I made for my son's birthday with a musical theme to it as he is a budding musician.


To create the background and the topper for my card I used Tim Holtz distress oxide ink pads in peacock feathers and twisted citron. I love these distress oxides, they are perfect for layering colour without losing tone.


The card I used for this project happened to be Hunkydory ink Me 300 gsm card. It's a beautiful super smooth card which takes the ink really well and I think I am running very low on it.

For the main image I used one of my many favourite stamps by Visible Image - Jazz it up and the reason I chose this one is simple, not only is it a brilliantly textured stamp, but my son also plays the saxophone. I stamped and heat embossed my image with black embossing powder to add to the textured finish on this stamp.


I created a stamped border around my topper and the background that I had made, using the small splatter stamp from the Music on - World off stamp set by Visible Image. I also added glossy accent to the piano notes from the piano/keyboard stamp in the  Jazz It Up stamp set, along with the scales and musical notes from Sheena Douglass's Music & Dance stamp set.


Visible Image has some really thought provoking sentiments to accompany their stamp sets and I love the slightly blurred typewriter style too.


I used black card to frame the topper and my background too before backing it onto my white cardstock. I also chose these colours as my son likes green and I liked the two-tone blend of the colours that I have used.


I didn't feel that it needed to have a birthday sentiment on the front as I added a personal verse for the inside of the card and I made an envelope using some two-tone 12x12 card from my stash that I had bought some time ago from The Works, great shop.


I love to hear my son play the saxophone, he has an ear for music and a  natural ability to play. I can't even read music let alone play an instrument.....unless you count the recorder in junior school ha ha....not a good memory!!

Music is the one thing that can unite souls around the world from every walk of life.
"Music is a world within itself, it is a world that we all understand "- Stevie Wonder
Enjoy your day,


Monday, 2 December 2019

Inspiration Journal

Today I am sharing an inspiration journal I made for a special young lady.


I decided to use kraft card as my base and was pretty happy with how it took the ink especially as each page is double sided.  Each sheet is A5 in size.  I have used Tim Holtz distress oxide inks throughout my journal for that chalky texture and especially as you can layer the inks on top of each other without losing definition.


As well as keeping this quite simple I wanted it to have lots of inspirational sentiments and knowing Poppy's love of art I thought these pages would appeal to her.


Hansa Hand

Traditionally an ancient middle eastern amulet symbolising the hand of Fatima. The protective sign symbolises happiness, luck & good fortune.  There are many different styles and I have sketched a hand with the all seeing eye, watching over humanity and warding off negativity.
I have used a mandala stencil on the backround to tie in with the sketch.


Artist Trading Cards

With a washi tape background, I used a selection of Vera Lane Studios digi stamps.
  • pray n playing
  • just fly
  • puddle jumps


I have used marble backgrounds on my cards using the ink and shaving foam technique ( which also makes the card smell lovely, as it happened to be cocoa butter shaving foam).

I am not a colourist but don't mind colouring small areas and have used promarkers to do this which I found much easier to use than the spectrum noir aqua markers that I had been given.


The Oak Tree Poem 

Inspired by the Oak Tree poem by Johnny Ray Ryder, I drew a tree to fit around the poem using the fall and foliage stamps by the Dreamees also using the stamps as a background for my tree. I absolutely love this poem.


Attached to the page as a flap.


Shine Bright

Using the shine bright and the ripple effect stamp sets by Visible Image,  on a distress oxide background.  Then stencilled with Dreamees dinky inkie pearlescent ink in mellow yellow. The ripple stamp has been heat embossed with gold embossing powder.


Just be Happy

The Visible Image just be happy stamp mixed with the ripple effect stamp to create the bubbles. I have also added some glossy accent to some of the bubbles for texture.


The Friendship Dish

I love this friendships dish stamp by the  Dreamees and have used some heat embossed a set of their flower stamps for a background.


Believe

I have used the Visible Image dragonfly stamp with versamark ink and mica powders and word stamps by Inkilicious. The sentiment added at the bottom was very apt for the page.


Be a Mermaid

I have used a mix of distress oxides and mica powders for the background and a mermaid stamp by stampendous along with a nautical set of stamps by Sheena Douglass from her Sea View collection.
I particularly liked the inspirational sentiments.


Fly

Although the background looks patchy on this one, it was made with antique linen and frayed burlap distress oxides. The sentiment and black butterflies are from the butterfly blot stamp set by Imagine Design Create.  The large heat embossed butterflies are from Crafty Individuals.


Make a Wish

Using distress oxides again and white opaque ink through a stencil which was them heat embossed with clear embossing powder. Also using the Face it & beautifully flawed stamps from Visible Image. 


Creativity

I love this inspirational stamp set by Visible Image and have teamed it up with this cute Autumn days stamp set by the Dreamees.


You've got Mail


The background is made up of a dictionary page referencing :-  letters/post with little envelopes holding quotes from Alice in Wonderland.


I have used a mix of Dreamees stamps for the background, masking off the face stamp and using antique linen distress oxide for the skin tone on the kraft card.


On the tag, I have used a digi image by Vera Lane Studios using one of her Kokeshi dolls.

I really enjoyed making this journal and didn't have a specific plan when I started it, just went with the flow.  I think that is what is really enjoyable about journal pages, they tend to be a bit of a voyage of discovery. There is no right or wrong with mixed media and sometimes the best work is achieved totally by accident.

Happy Crafting!


Tuesday, 19 February 2019

Teenage Music Birthday Card

Sharing a music birthday card made for my Teenage son made using a mix of Visible Image and Sheena Douglass stamps.

I created the background and topper using Tim Holtz distress oxide inks in candied apple, salty ocean, wild honey and twisted citron.
I used the Visible Image "Music on World off" stamp set, adding glossy accent to the headphones and heat embossing the "parent advisory" stamp.


I mixed this with the free Sheena Douglas "Music & Dance" stamp set from the Creative Stamping magazine (issue 52) from 2018, decoupaging the guitar on the left.

I also used a combination of stamping and heat embossing to create different textures. I love the chalky finish from the distress oxides too.


I matt and layered it onto white card using foam pads and added a personalised verse inside. The finished card measures 7.5 inches square.  These stamps are ideal for teenagers or male cards or just generally music lovers when you are looking for something that little bit different.

Happy Crafting


Wednesday, 25 April 2018

Mini Journal

I am doing a guest DT over on A Inky Mess  this month and have made my first mini journal for the mixed media ATG challenge,  which is sponsored by Gecko Galz this month.   Gecko Galz is offering a $25 spending spree as a prize for the winner on their online shop etsy.

My mini journal measures 3 inches x 2.5 inches.


I started with:-

  • a piece of black shoe box (this had a lovely vinyl feel to it) measuring 3 inches x 2.5 inches
  • some textured brown paper packaging
  • black acrylic paint
  • clear gesso


After I scored a spine on my mini journal cover I gave it a coat of gesso, adding the brown paper packaging and adding another layer of gesso before leaving it alone to dry overnight. (I did give it a little blast with a heat gun to start it off and then decided it would be best not to fiddle and let it dry properly).


Once dry I gave it a coat of acrylic paint and left it to dry overnight.  I will point out that I started this in the evening knowing it needed time to dry and did the same when I used the acrylic (less temptation to fiddle with it). The brown paper gave it a lovely texture.


Once dry, this was where the experimenting started. I used some old gold metallic gold gilding wax by Creative Expressions. The gilding wax really highlighted all the ridges in my journal cover and transformed it.  I really loved the look it gave it.


I decided on the following embellishment to decorate the cover:-
  • Royalty foiled layered stickers by Sticko
  • Vintage nostalgic epoxy stickers by Bottle Cap inc.
  • Metallic Mesh ribbon by Ribbonbox
  • Glittered hearts - made using a glue gun and a pink glitter glue stick


I teamed these with some tiny red gems for the crown and some red metal nailhead stickers


I used a mix of a cosmic shimmer strong pva based blue and pinflair glue gel to stick these down.


On the back, I used a pair of metallic copper feather stickers and made some pink glitter gems using the glue gun and the pink glitter glue stick.


Now onto the journal pages which were made up of a cream music sheet from an old music book purchased from a charity shop (the pages are lovely and thick) and a sturdy piece of cream card.

The sheets measure 2.5 inches x 4.5 inches and are folded down the centre. I chose a sheet that fortunately had some images on the back that would tie in nicely with my journal.


I used my Tim Holtz distress oxides from the brights collection to add colour to the sheets and the mini label and flower dinky dies from  Docrafts (Xcut).  I made two corner pockets and a larger pocket for the mini tags.


I used a mix of stamps some cute kitten stamps given to me and paw prints with a sentiment from the Dreamees clever cats along with a fishbone punch purchased in a charity shop.

On the tags, I used some little Inkadinkado stamps, a little glossy accent and a glitter pen I also used a Crafters Companion edging die on the pocket.  I have used my pearlescent dinky inkies to colour the girl and on the page to give a different finish to the distress oxides that I have used which give a chalky finish when dry.
I wanted to make use of these adorable stickers made for me by the very crafty Pauline Newton whom I swap ATCs with, in a craft group. I added some pearl drops, lace and a few die cuts to finish the pages.

I have used sequins, stickers, dies, gems and ribbon flowers on these pages.


For this page I have used the music paper which was already cream but as the paper is quite thick, it takes the ink very well, I have also used the Inkylicious stamp Hope with a balloon and Sheena Douglass's Music & Dance stamps.  Although it's not clear from the photo the girl has been coloured with The Dreamees pearlescent inks.

I have filled the pocket with tiny Dreamees flowers heat embossed onto red pearlescent paper from their stylish shoes stamp set. Also, a die cut fairy, butterfly, foliage and red pearl drops.I have used a few of the music stamps of Sheena Douglass Music & Dance collection

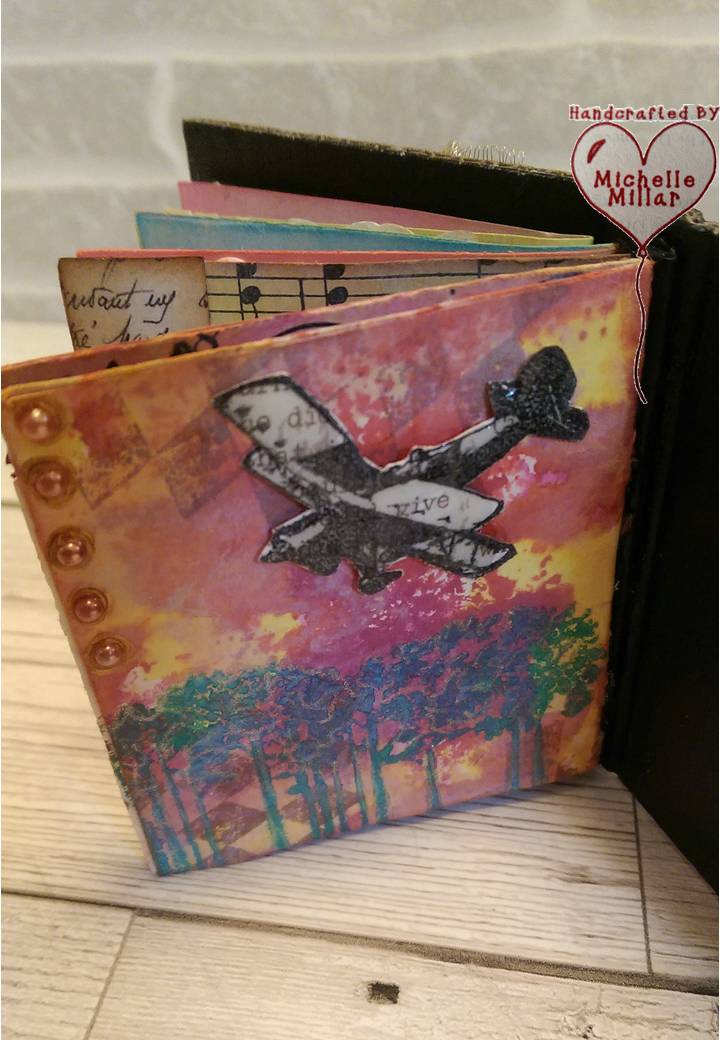
On these pages I have used dinky vintage car and plane stamps by CArt-Us and a nature stamp (trees) by Artemio. A little background stamping using Visible image Mesh-ellaneous and Crafty Individuals distressed diamonds background stamp. Ive used Tim Holtz distress oxides brights collection to colour the cards and finished off with a little glossy accent and gold pearl drops.

For these pages I have used an  Inkylicious photo negative stamp, and old London issued stamp and Debbi Moores metal magic onto a nature red rubber stamp set.


Metal Magic is used with a clear versamark inkpad and when heated, enables you to create your own metal embellishments using your stamps or by pressing shapes into the heated granules to make an impression before it sets hard. I have used gold but check out the link for alternative colours.


Once all the pages were done I stitched them together 


I then added a mini spine of black card to hold it all neatly together using pinflair glue gel and left it to stick over night.


Once stuck firmly ( I love pinflair glue gel gives a very firm, rubbery, clear adhesion that is also flexible) I stuck the book to the spine of the journal using more of the same glue, leaving it to dry.


I really enjoyed making this mini journal and because its dinky you can you lots of little stamps and embellishments that you have in your stash.  Just take it a page at a time.  I hope you've enjoyed my tutorial.


Don't forget to enter the challenge with a chance to win some crafty goodies from Gecko Galz and have a look at their shop on etsy. The monthly challenge runs from 25th of every month.


Happy Crafting

Also entered into Crafters Castle -  ATG Mixed Media challenge


Boutique Birthday Card

I made a card for my daughter's birthday earlier this year, which was inspired by samples from this kit. When you make cards for family ...