
It's that time of year in the crafting calendar to start thinking about a spot of Christmas crafting and with lockdown for the past 8 weeks a lot of people have already started making them. So, today I am sharing my Christmas samples following the launch this morning of the Magical Memories collection by Tattered Lace on Create and Craft TV.

This collection has some lovely traditional Christmas dies, charisma papers and beautiful backing papers which I really enjoyed using. As I use a lot of mdf in my crafting I thought these dies lend themselves perfectly to some Christmas door hangers for children.

Using the backing paper from the USB and the Santa die with matching charisma papers for this collection. Some of the charisma papers are available to download for free from the Tattered Lace website.. I typed that well know sentiment using the My Craft Studio Software onto one of the backing papers before printing it off.
https://www.tatteredlace.co.uk/downloads/artwork/

Adding another sentiment to the other side along with the Comet die and some bells to decorate his antlers. I added some silver mist reinker from my Dreamees dinky inky around the edges of the mdf door hanger to add a little shimmer to the beautiful paper and a few gems with a nice big festive bell.

All adding to the excitement of waiting for santa and the big bell is a handy tell tale sign that someone is not in bed!

Staying with crafting with children in mind using this collection, I thought that these samples would be perfect for an idea that I had for a Christmas Eve Book.

Using the Tattered Lace Enchanted Book die from a previous collection, I thought that if I created a few pages with pockets, these could be used for a child to add their letter for Santa and for Santa's letter to them, as well as a checklist of things for the child to do Christmas Eve before bed.
 I started with a Comet on the inside page (except I coloured his nose red to look like Rudolph) and the Midnight Mass holly die to accompany my Christmas poem for the front page. I can not take credit for the poem, it was an adorable one that I found.


I used the backing paper to decorate the pages and pockets and to make the Santa letter letter, I used one of the backing papers from the USB and used My Craft Study software to make the letter for the child to complete and place in the folder ready for Santa. Using the Sleight die to decorate the front of the pocket. The envelope was a download on Pinterest.

The page to follow was for Santa's post so I used the Santa die and the Treasured Tails dies, which are those cute little red squirrels. I thought the parents could then add their letter from Santa to the pocket for the child to find on Christmas morning.
The back page is the checklist with all the things to remember to do before bed.
Here I added the Pine Cone Infusion Teacup to decorate the page along with some reindeer food which needs to be sprinkled (the label was a free download from Pinterest).

On the back, I chose one of the lovely picturesque schenes from the backing papers on the USB. I absolutely love making this sort of thing. Add a few more pages for the child that you are giving it to, to add other ideas onto it, let their imagination run wild.
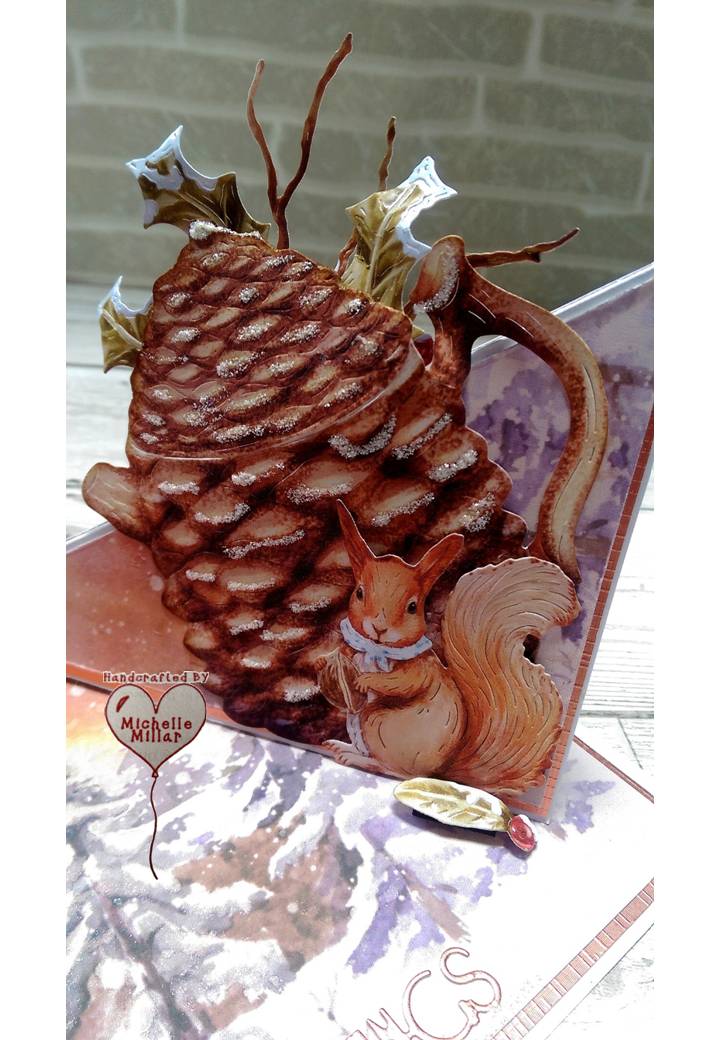
 For this double twisted easel, I used the Magical Memories papers from the USB along with the Pine Cone Infusion Teapot, Pine Cone Infusion Teacup and those cute squirrels the Treasured Tails. I have also used a little of the Midnight Mass holly and two of the holly leave decoupage leaves came in really handy as stoppers for my card. I just so happened to have two tiny scrap discs of mdf from a project (I have a habit of keeping random things!!) and they made perfect stoppers for my card with a little tacky glue to hold them firmly in place.

To make the contents of my mug more interesting, I added some copper embossing powder to the inside of the cup and on the pine cones, added a little frosted lace stickles for a snowy glaze.


Creating an aperture card using Comet the reindeer and the backing papers from the USB. I added my sentiment on My Craft Studio before printing it out, ready to be die cut. I added some frosted lace stickles drops to the front of the card for textured snowdrops.


An open book easel card using the Tattered Lace Notebook dies to make the book and the papers from the USB for some interesting pages. I then Made an easel card adding the book onto the easel and decoupaging part of the Sleigh die on the base of the card for the stopper.

I added some ribbon to the Comet reindeer dies attached them to Santa on the opposite page. You've probably noticed a common theme with Santa here, he's carrying a silver bell. I had a handy packet of these, just perfect for Christmas.

When I saw the backing paper with the chimney, I knew exactly what type of card I wanted to do, so here it is! Its a part wrap around the card and I like how the outline die allows you to have for instance Comet's antlers standing out there loud and proud.... with bells of course.


The card itself is a tent card with the sleigh wrapping around the front of the card.

Individually these dies work equally as well. I have used Comet with some gold glitter card as an acetate (snowy) card with a navy Comet shaped panel inside.

I managed to stamp a small festive sentiment inside also.


For a small Santa card I die cut Santa in black card stock and as I thought the black made him pop a little better and them made the card shape with the outline die in red. To make him stand up I just cut the bottom of his boots off.
Really handy and simple for small cards.
 I did exactly the same with the Sleigh card, except I used gold mirri card to highlight the sleigh. Another small really effective festive card, with just a few gems.

You could put them together and have Santa pulling the sleigh. These festive dies have lots of possibilities.

For a more traditional card, I have used the Midnight Mass holly die which has been decoupaged with the robin this time and the Pine Cone Infusion Teapot die along with the Pine Cone Infusion Teacup die, not forgetting the Treasured Tails squirrel at the front. I decoupaged his nut to get a spare one at his feet.

The backing papers on the USB have matching inserts for you to add your own stamped or printed verses.

I printed the backing paper for the front of the card onto some cream velour paper from my stash. I think I originally purchased this from the Dreamees some time ago. It gives the card a more suede feel to the card which I thought worked well with this festive card.

Another more traditional style card using the Midnight Mass holly die decoupaged and the sleigh die in the centre this time. I printed my sentiment using one of the backing papers from the Magical Memories USB onto a pearlescent paper using My Craft Studio again. I also added some glossy accent to the berries to give them a little more definition.

I thought the pearlescent paper by centura pearl highlighted the soft golden detail of the backing paper. The colours of this collection have got those perfect warm undertones.

A few metallic gold pearls was all the embellishment that was needed.

From reds to greens. I have used the Expression of Lace Diamond frame die from the Even more Word Craft Collection for the centre topper on my card for the Midnight Mass die which had been decoupage, complete with the robins from this die set. I have added a little silver mist reinker on the snowy edges of the holly to make them twinkle a little and added some small metallic pearls to the topper.

What about those birthdays around Christmas. I was looking at The Treasured Tails dies and the Pine Cone Infusion dies and thought that they didn't have to be for Christmas and with a few snips here and there here is what I came up with.
 Using one of the square dies from the Tattered Lace Fine Filament Portofino collection and Tattered Lace's own cardstock, I chose one of the scenic backing papers from the USB and coordinating papers added a birthday sentiment onto matching paper using My Craft Studio. I then snipped part of another Pine Cone Infusion Teapot to make my squirrel house and did the same with one of the Teacup, making it into a food storage pot.

With the spare handles I made a swing, wrapping some fine twine around the handle for the handles and using the base of the Pine Cone Teapot that I had altered for the seat of my swing. I coloured the snowy berries from the Midnight mass die with a red sharpie and then went over the top with some glossy accent.

I edged my card with a white versafine ink pad and added a little shimmer to my squirrel's scarf, with a dot of glossy accent on their noses.
A delightful collection, in my opinion, to work with and hope you have enjoyed seeing these too.


Using the backing paper from the USB and the Santa die with matching charisma papers for this collection. Some of the charisma papers are available to download for free from the Tattered Lace website.. I typed that well know sentiment using the My Craft Studio Software onto one of the backing papers before printing it off.
https://www.tatteredlace.co.uk/downloads/artwork/


All adding to the excitement of waiting for santa and the big bell is a handy tell tale sign that someone is not in bed!


Using the Tattered Lace Enchanted Book die from a previous collection, I thought that if I created a few pages with pockets, these could be used for a child to add their letter for Santa and for Santa's letter to them, as well as a checklist of things for the child to do Christmas Eve before bed.


The page to follow was for Santa's post so I used the Santa die and the Treasured Tails dies, which are those cute little red squirrels. I thought the parents could then add their letter from Santa to the pocket for the child to find on Christmas morning.
The back page is the checklist with all the things to remember to do before bed.
Here I added the Pine Cone Infusion Teacup to decorate the page along with some reindeer food which needs to be sprinkled (the label was a free download from Pinterest).


Creating an aperture card using Comet the reindeer and the backing papers from the USB. I added my sentiment on My Craft Studio before printing it out, ready to be die cut. I added some frosted lace stickles drops to the front of the card for textured snowdrops.


An open book easel card using the Tattered Lace Notebook dies to make the book and the papers from the USB for some interesting pages. I then Made an easel card adding the book onto the easel and decoupaging part of the Sleigh die on the base of the card for the stopper.

I added some ribbon to the Comet reindeer dies attached them to Santa on the opposite page. You've probably noticed a common theme with Santa here, he's carrying a silver bell. I had a handy packet of these, just perfect for Christmas.

When I saw the backing paper with the chimney, I knew exactly what type of card I wanted to do, so here it is! Its a part wrap around the card and I like how the outline die allows you to have for instance Comet's antlers standing out there loud and proud.... with bells of course.


The card itself is a tent card with the sleigh wrapping around the front of the card.

Individually these dies work equally as well. I have used Comet with some gold glitter card as an acetate (snowy) card with a navy Comet shaped panel inside.

I managed to stamp a small festive sentiment inside also.


Really handy and simple for small cards.


You could put them together and have Santa pulling the sleigh. These festive dies have lots of possibilities.

For a more traditional card, I have used the Midnight Mass holly die which has been decoupaged with the robin this time and the Pine Cone Infusion Teapot die along with the Pine Cone Infusion Teacup die, not forgetting the Treasured Tails squirrel at the front. I decoupaged his nut to get a spare one at his feet.


Another more traditional style card using the Midnight Mass holly die decoupaged and the sleigh die in the centre this time. I printed my sentiment using one of the backing papers from the Magical Memories USB onto a pearlescent paper using My Craft Studio again. I also added some glossy accent to the berries to give them a little more definition.

I thought the pearlescent paper by centura pearl highlighted the soft golden detail of the backing paper. The colours of this collection have got those perfect warm undertones.


From reds to greens. I have used the Expression of Lace Diamond frame die from the Even more Word Craft Collection for the centre topper on my card for the Midnight Mass die which had been decoupage, complete with the robins from this die set. I have added a little silver mist reinker on the snowy edges of the holly to make them twinkle a little and added some small metallic pearls to the topper.

What about those birthdays around Christmas. I was looking at The Treasured Tails dies and the Pine Cone Infusion dies and thought that they didn't have to be for Christmas and with a few snips here and there here is what I came up with.


With the spare handles I made a swing, wrapping some fine twine around the handle for the handles and using the base of the Pine Cone Teapot that I had altered for the seat of my swing. I coloured the snowy berries from the Midnight mass die with a red sharpie and then went over the top with some glossy accent.

I edged my card with a white versafine ink pad and added a little shimmer to my squirrel's scarf, with a dot of glossy accent on their noses.
A delightful collection, in my opinion, to work with and hope you have enjoyed seeing these too.
Stay safe
Happy Crafting
Michelle
x


3 comments:
Beautiful makes Michelle love the Christmas albumn and the door hangers -like your thinking about the bell lol -love the twisted easel one too
Carol x
Hi Michelle all your makes are stunning. They are a joy to look at. You have been very busy. Take care. Hugs Jackie
Oh my, I don't know what to say. You have created so many beautiful things. Love the book for Christmas Eve. Great Idea to add pockets. Love the twisted easel card and all of the other beautiful things. Love your bird cards. Wish I could make my Mom something as gorgeous as that. You did a wonderful job! So glad I stopped by. Hope you have a wonderful week.
cindys-greencricut
Post a Comment