blog backbdrop

Tuesday, 28 July 2020

Mens Birthday Squeeze Card

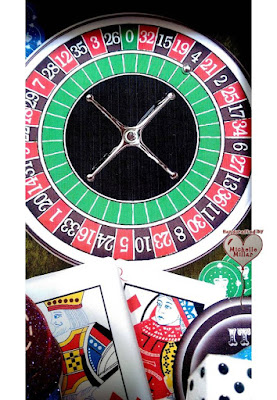
Good morning, today I have a squeeze card to share. I have made one of these roulette scene cards in the past and think that they are a great design. I made this card for my brother's birthday, earlier in the year.


I downloaded this fabulous artwork from Debbi Moores Website, which is a great alternative to the traditional genre available when you are looking at making men's cards. This project is downloadable in PDF format for £1.50 and available until the files runout. I have added a link below.

https://www.debbimoore.co.uk/prodpage.asp?ProdID=4984 
Cards For Men Scene Card

I like the fact that it has tabs that enable the card to be squeezed pretty flat to go into an envelope (all depend on how much you want to build it up).

There are plenty of elements to add to the card from this download and on the gambling chips, I have used some of Debbi Moore's crystal print magic. I love this stuff. As much as I love glitter, I am not a huge fan of it as I and my family always end up wearing it for days after ...weeks even!!

Print Magic is like an opaque embossing powder than turns your card into glitter card without losing any detail from your image or shedding any glitter and its amazing how far a small jar goes.


To bring out the chrome in the roulette wheel, I highlighted it with some glossy accent, also using this on the eyes of the dice.


I decided that a silver metallic pearl would work perfectly for the ball in my roulette wheel and placed it on the birth date.


I have also used the glossy accent on the faux pearl around the Happy Birthday sentiment which made the sentiment stand out a little more.


I used a cream base card to back my roulette scene card onto. I really like the dimension on these scene cards and Debbi Moore has so much to choose from on her website. 

Every month she offers a free download on her website which enables you to make a beautiful card from what you have downloaded. You can't get better than that to inspire you to keep crafting.

Stay safe


Happy Crafting!
Michelle 
x


Wednesday, 15 July 2020

Cool Retro Camper Birthday card

Today I am sharing a birthday card that I made for my brother using a little stamp called the cool retro camper.


I always find it easier to stamp when it comes to making men's cards. I heat embossed with clear veraFine ink and black embossing powder onto white card and then painted the camper vans with a small paint brush and my chalk dinky inky reinkers in zest, rust and poppy. For the chrome bumper, wing mirrors number plate, I used a little dinky inky reinker sparkle 2nd gen in lustre with a little silver mist on the window screen.


For the luggage and luggage rack I just filled it in with a little rust, sunset and breeze in the chalk dinky inky pads you only need the tiniest amount. 

After cutting them out I backed them onto some stitched black card squares.

For the background on a piece of white stamping card,  I used the sunset, blaze and poppy dinky inky chalk pads and the bubble stamp from the Visible Image Jazz It Up stamp set.


I edged the card with the chalk dinky inky in poppy before adding a black matt layer of card behind it.


I then scored an A4 piece of 300gsm white card to place my retro camper van topper onto and add some glossy accent to the headlights of the van for dimension.

I love this little stamp and think it makes a cool male birthday card but change the colours and it would suit anyone I think.


Happy Crafting!
Michelle
x

Sunday, 5 July 2020

Keep Crafting notecard

For our Blog challenge on Let's Craft and Create this month with are celebrating the theme of red white and blue, so I have made a keep crafting notecard with those colours.


 Using a 5.5inch white card base I mounted royal blue and red cardstock followed by a white topper.

I had some remnant cardstock to make up my lettering - royal blue centura pearl and cherry red from Tattered Lace using the classic letter dies by Crafters Companion.  The lace border die is also by Crafter companion and I used some colour core blue and red cardstock by Create & Craft from my stash.
I twisted some bakers twine - this had a paper texture rather than the usual rope one that you get and added it to the to of the border.


I used a little heart die which I passed through an embossing folder and added a some foam pads to add a little dimension to it.


A simple  CAS notecard using, easy to make, whether you are celebrating the 4th oth July or just dropping a line to say hi .

Have a look at the inspiration from the rest of the design team and what our crafters have been making for our blog challenge this month. There is a prize for the winning entry and a badge for your blog for the top 3 runners up.


Happy Crafting!
Michelle
x

Just Fly note card

This month I am sharing a little note card with a digi image from my favourite Vera Lane Studios. Also, this month on our blog challenge at Daisy Chains we are running a theme of "design paper" and this is the DT card that I will be using for the challenge.


I love making my own backgrounds and backing papers for cards and one really easy technique I use a lot is the marbling one with shaving foam and acrylic ink sprays.


I used a red, blue and green acrylic ink spray with shaving foam and it never fails to amaze me how the colours change when swirled with shaving foam.

For the topper on my notecard, I used my brushos in purple and turquoise.


My digi stamp by Vera Lane Studios is from the Just Fly set she comes in JPG and PNG format and this set comes with the sentiment, a cute little cat with wings(that I haven't used on this card) and the adorable gipsy fairy which I have coloured with some promarkers. I have added a little glossy accent to her eyes as I always do.

One of the places that you can find Vera Lane's digi stamp collections is on Etsy.


There is also a great blog I can recommend you visit:-


Have a look at the inspiration the rest of the design team have been making this month for our challenge, along with what the crafters on the blog challenge have been making too.


Happy Crafting
Michelle
x

Birthday Card - Bright Lights Isabella Cardmaking Kit - WOYWW

I'm sharing another birthday card made for a friend and  I have used the travel the world through paper Bright Lights - The Isabella Col...