blog backbdrop

Showing posts with label John Next Door. Show all posts

Tuesday, 3 December 2024

Christmas Cards

I have just finished a few Christmas cards that I have made using the festive  Noel Christmas Bunting digital download kit from Opulence by Design Crafts so thought that I'd share them with you.


I used 6 x6 inch kraft card blanks for my card base (I cut these down a fraction) and the John Next Door Georgian Frame Maker die set (5 inch die set)  along with the Celtic outer frame (53/4 inch) die.  

I must say that this frame maker collection is an absolutely brilliant set of dies. John Lockwood thinks of everything when he designs a collection for crafters and this set is just perfect for me since I have gone back to making mostly smaller cards.  His products are also available from The Art of Craft who provide great customer service too.


My festive bunting is up and I wanted to make a few cards to illustrate the versatility of this great kit.  

I made some of the embellishments in the kit smaller so that I could make mini bunting out of the cookies for my card and used another reduced version of the NOEL lettering as a topper in my card too.


On this card, I have heat embossed the festive letters and on all my embellishments I have used my go to Sakura clear glaze gelly roll pen for the fine detail and stardust gelly roll pen. I would normally use glossy accents but find that I have more control using the pens in small areas.  I have also used a hint of Stickles stardust glitter glue on the larger star shaped cookie.

I've highlighted the fairy lights in the backing paper with a clear overlay sparkle brush pen for an added shimmer along with the trim of the gingerbead's hat.

The embellishments have been mounted on foam pads and shaped a little to add some depth.


I then went on to make these fun gingerbread festive tags and got a little carried away!
I also added a few sprigs of John Next Doors holly and a gold wax seal. I have been making a few of these to go on the back of my Christmas cards.

As if I didn't have enough on my tags, I added a stamped faux metal sentiment that I made using some of Debbi Moore's metal magic. It works like a chunky embossing powder that you melt and stamp into. After about 20mins it sets like an embellishment.


I've really enjoyed creating with this kit. I don't tend to make a lot of Christmas cards but love this bunting kit and the fact that you can also use it to make lots of little festive projects too. 

If you double-backed them and covered them in extra-thick embossing powder, they would make wonderful gingerbread paperchains and Christmas decorations, too!
Finally, cute little napkin holders, by attaching some organza ribbon as a tie.

Well, Christmas is only a matter of weeks away now and no matter how organised I think I am going to be, .....I never seem to be ready haha.

If you want more inspiration and demos from Opulence by Design, follow the links below. Amanda is a very talented designer and I really enjoy creating with her designs.

Have a great day, whatever you have planned for yourself.

Happy Crafting


Challenges

Monday, 7 October 2024

Aqualicious Florals Birthday Card

I'm sharing a 6 x 6 inch birthday card today which I have been made using the gorgeous Ultimate Aqualicious Florals Cardmaking and Papercrafting digital download Kit from Opulence by Design Crafts.


Along with the 6 x6 white card base I used the John Next Door 6 x 6 inch Deco Frame Maker die set from his Frame Maker collection , which I based my card around. This is a fantastic die collection.

The Ultimate Aqualicious Florals Cardmaking and Papercrafting digital download kit contains 40 PDF pages - this one is another bumper kit with a great selection of shaped toppers, decoupage, panels, floral numbers, inserts etc, and the papers are just beautiful. Do have a look for yourself.


I chose the papers that I was going to use for my card, along with an insert for the inside of my card and changed my mind on the flowers which needed to be bigger and not reduced. There are a very good selection of flowers in this kit so I really didn't need to adjust anything to fit my project. 

I also decided not to use my hydrangea die as I found it easier to cut out the hydrangeas from Amanda's papers and decoupage a  few of the flower buds on top, rather than phaf about with tiny bits that come out of the die....some end up on the floor and the others end up like a jigsaw that never look the right way around....


To create some dimension under the hydrangea, I just added a few foam pads. I cut out about 3 of these hydrangeas and just slotted them together, using the roses to nestle them in, hiding any edges. I also added Diamond Sparkles Stickles glitter glue to the centre of the buds. 


I have also die cut a set of John Next Door's Shadow Leaves with some of the paper left over from one of the kits. I keep a folder with my left over pieces of paper from my download kits as these are really hand for die cutting your flower and floliage. These leaf dies have a lovely embossed detail on them but unfortunately it doesn't show up in the picture. I added few die cut stems as fillers too and then added more Stickles glitter glue.


I have added my insert to coordinate with the front of the card


I made an 1/2 inch dimensional envelope using my Crafters Companion envelope maker board which came with my Ultimate Pro. I have had this for so many years and still use it all the time for scoring and box making. 

I didn't add a sentiment to the front of my card as I didn't feel there was a place for it and apart from added a little shimmer to the edges of the petals (which unfortunately doesn't show up in the picture) using my clear glitter overlay brush pen along with edging the toppers with a Sakura stardust pen, my card is finished.

If you are interested in more inspiration and demos from Opulence by Design, you can follow her on Youtube

These were the hydrangeas in my garden this summer, hopefully they will flourish a little better next year.


Have a great day,  whatever you have planned for yourself.

Happy Crafting


Challenges:

Wednesday, 2 October 2024

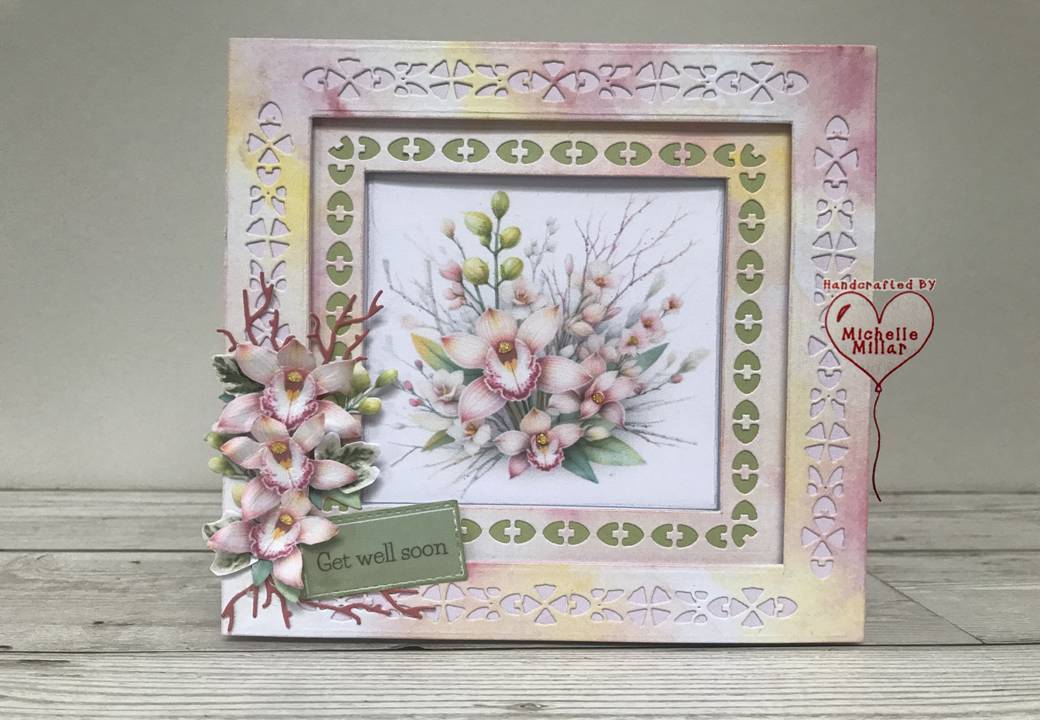
Pink Orchid Get Well Card WOYWW

 I'm Sharing a 6 x 6 inch get well card today that I made using the Cymbidium Pink Orchid Arrangement Topper Sheet from Opulence by Design Crafts.


I'm linking to the weekly blog hop for 'What's on my workdesk Wednesday' (WOYWW), where we all see what everyone has been doing. If you'd like to know more about it, please visit Sarahscraftshed.co.uk. This week marks their 800th week.


On my desk is everything that I collected to make my card. As I do not have a craft room and I find it too heavy to keep moving my die-cut machines around, I find it easier to cut what I need upstairs and then bring what I have done in a folder down to where I am crafting.

I used John Next Door's Celtic Frame Maker die set  (5 3/4 Frame Maker). John's products can be purchased directly from The Art of Craft.  He designs some gorgeous collections at a very good price range.

I also used the free digital download paper from Opulence by Design Crafts Watercolour Wonders Lemon & Strawberry Cheesecake Wash as I thought it would go perfectly with these beautiful orchids on the topper sheet.

The green colour block paper has also come from one of the collections along with the pastel pink layer, I used for the base of the frame. (this was from the Ice Queen Poppy Collection)

and a few twiggy stems from one of my Tattered Lace collections that have been die-cut in pink cardstock.


I thought these Orchids were just beautiful when I saw them and the delicate Celtic frame dies would be the perfect die set to arrange my card around.


To create my floral embellishments, I used the orchids from the same topper sheet as they were exactly what I needed, along with some foliage. I also used yellow Stickles glitter glue in the middle of my blooms with a Sakura clear glaze pen.
There was a selection of sentiments on the base of the Topper Sheet to coordinate with your project or keep for another one.


The ivy leaves are a very handy foliage to add to your project and I find it quite easy to fussy cut Amanda's flora and foliage. There are quite a few free downloads on her website too and the papers certainly come in handy when you can add them to a project like this.

If you are interested in more inspiration and demos from Opulence by Design, you can follow her on Youtube

I have also managed to finish off my Autumnal wreath.  These are all the lovely banners and embellishments that I printed off.


Shabby Art Boutique have some fabulous downloadable printable crafts that you can subscribe to and then download for free. They are ideal for your journals, scrapbooking etc..
Quite productive for me! I think I need to lie down now ha ha!
Have a great day,  whatever you have planned for yourself.

Happy Crafting


Challenges:
A Perfect Time to Craft - AG   -  2nd Prize Winner


Boutique Birthday Card

I made a card for my daughter's birthday earlier this year, which was inspired by samples from this kit. When you make cards for family ...