blog backbdrop

Showing posts with label Charming Cascade. Show all posts

Thursday, 26 October 2017

Dreamees Part 2

I was never that into stamping, but when I discovered Dreamees stamps that changed. I found their stamp sets so inspiring and easy to stamp with.  With that my confidence grew and now I love it, beginning to push my craft boundaries.

I have made a lot of mdf pieces as you are probably beginning to see and I have a wider selection of my makes on my Pinterest page, so pop over using the link at the top right of my page and have a look.

I have a few more mdf pieces I'd like to share with you.


This Dreamees mdf plaque was made using one of the Dreamees earlier stamp sets. Its from their Friendship set collection. I stamped onto their whimsical wonders paper collection and heat embossed using black embossing powder. I then stamped onto coordinating paper  and layered it all up to make the topper. The butterflies have been stamped twice to give their wings dimension too.
I used all the stamps in this set on this project.


My Dreamees mdf shoe was decorated with the same backing paper from the same collection. I used the sentiment from the Stylish Shoes stamp set and stamped butterflies from their Fall & Foliage stamp set. These have been heat embossed onto coloured vellum using silver superfine embossing powder. I stuck a small mdf stand behind to make it stand up.


A hollow and solid mdf heart decorated with the Whimsical Wonders backing paper. These papers can be found on cd also. The sentiment is from the Pretty Petals stamp set. The little white flower was from A Charming Cascade stamp set which has been heat embossed onto vellum.


Another two piece mdf plaque using the same papers and stamped sentiment from the  Swirly and Sentimental stamp set, along with the butterflies which have been heat embossed onto pink vellum using silver embossing powder.


I particularly like this little heart plaque I made. I first painted it with duck egg chalk paint. I really like the texture of chalk paint, then using off cuts of the same papers I made a patchwork heart. Adding a little lace ribbon and making those pretty vellum flowers from The Dreamees A Charming Cascade flower stamp with the bright white Wow embossing powder, it all seem to die in so well.
The sentiment is from the Pretty Pearls stamp set. The circle die is from Tattered Lace, Perfect Pearls set.


This is a variation on the above heart plaque, using the sentiment from The Dreamees  Stylish Shoes stamp set.


On this mdf Dreamees heart I used the Subtle Sweetness paper pack and the Sketched & Shaded rounded flower stamps have been heat embossed using embossing powder along with the Friendship recipe stamp from their Recipe set.


Another Dreamees mdf heart this time I used a Stamping Up lace background die (which unfortunately is now discontinued) stamped onto craft card and heat embossed using bright white wow embossing powder. It made a really pretty background. As you can see I have used the same flower stamp on vellum. The sentiment is from The Friendship collection, one of the earlier stamp sets.

I made this Dreamees plaque into a free standing one, although the picture shows it sitting on an easel.  I used papers from the Dreamees Fantastic Florals cd and the Hanging Basket stamp set which was adapted to make a sewing machine as Hayley Bignall demonstrated on one of her demos.
Stamped onto cream card and layered onto coordinating card with some flowers made using the Creative Chrysanthemums stamp set and Tim Holtz victorian velvet distress ink
.


My Dreamees mdf watering can plaque with backing papers and mini windmill templates from Dreamees Creative Card Templates cd. The stamps from Creative Stamping Magazine Issue 38 with a  free whatever the weather stamp set.

A  large mdf Dreamees teapot, decorated with papers from the Fantastic Florals cd along with the flowers. Made into a chalkboard memo plaque. I made a little matching chalk holder out of cardboard which is attached to the ribbon. The chalk can be easily replaced into the holder.
I would recommend that you prime the base of your mdf before applying the blackboard paint with a clear gesso or primer. This will give your mdf a good base for the chalkboard paint to adhere to. 
I hope you've enjoyed the makes I have shared and perhaps taken some inspiration from them.

Happy Crafting

Floating Sauce Boat

There have been many adaptations of The Floating Tea Cup and this is mine...using a sauce boat.
I was in a charity shop when this little white porcelain sauce boat and saucer caught my eye and true to form I wasn't thinking about putting sauce in it.

Thinking about the weight and how I was going successfully suspend the boat in the air, I decided this would make a perfect vessel to pour my flowers out of. 
To make this work you need a small bendable stainless steel spoon, loosely bent into an  S shape.
With the sauce boat I needed to make sure the end of the spoon fit comfortably in the pourer of the boat as it needed to sit flat on the porcelain so that I could get a good base to glue it.  The spoon end needs to sit as flat as possible onto the saucer. 

I used a quick drying araldite rapid glue. With porcelain being porous, I needed to ensure it would stick.  The sticking was the tricky part, as unlike card you are suspending weight which needs to be balanced.

I turned the sauce boat on its side and first stuck the handle of the spoon into the pourer. As it doesn't stick instantly, you'll need to find something to hold it in place whilst you are waiting for both pieces to bond. Only when this stage is done can you move on to sticking the spoon to the saucer.

I found something to sit the sauce boat on so that it wasn't putting any weight on the spoon. I then used enough araldite rapid glue to form a good bond between the spoon and the saucer. If you were using a china cup and saucer you would probably use a few coins stuck to the saucer to weight the saucer down, but my sauce boat was heavier so I raided the nuts and bolts tin (men always seem to have stacks of those) to find something small but weighty Glued this down at the same time.
It will be trial and error to get the right balance.

I left this overnight to set firm. Its very important you have a solid structure. This isn't a project you can rush.

Even though the you wont see the spoon once you have covered it in your chosen decoration, I decided to cover mine in pollyfilla (a cheap version of it) so that if I did leave any gaps, you would not see the spoon...as you can see above.

Now for the flowers. You can use silk, paper or  anything of your choice, but I decided to make mine...and I needed a lot!

I heat embossed my Dreamees Charming Cascade flower stamps in three sizes with gold  glitter Wow embossing powder onto some mars red pearlescent paper by Stamps by Chloe. This pearlescent paper is a good weight and hold flower structure really well. This is my favourite flower stamps from The Dreamees. Its very pretty and has so much detail to it.


I used a ball tool to shape the centre of the flowers and pinched the middle of each petal to give them some shape. Off set the flowers when layering them up. I added pearls in the centre.


I used the smallest flowers in the jug, building up the sizes as they poured out, remembering to put flowers behind the spoon as well. I covered the weights on the saucer next and then built around it trying to make the flowers look as if they were sitting an flopping in the saucer as much as possible....hence why I made enough flowers as you don't want to skimp on flowers.

http://www.dreamees.org.uk/

https://www.chloescreativecards.co.uk/


Dreamees - A Charming Cascade Flower Stamps & Stamps by Chloe - Pearl Paper


I really enjoyed making this and hope you like it too. If you have any questions, I would be happy to answer them.

Happy Crafting


Monday, 23 October 2017

Upcycling cherry trays

A trip to Tescos proved more fruitful than expected when I eyed up some delicious 1kg cherries that were in a very nice plain wooden tray. Not only were they on offer, but I thought I could make use of the box they were sitting in once we'd eaten all those cherries!

When I realised these trays were stackable, I decided another trip to Tescos was needed and was delighted to see that the cherries were still on offer. These trays are slightly smaller than A4.


I used 2 coats of  duck egg chalk paint and then decided to use one of my Dreamees flower stamps to decorate the trays. I finished it off with some Dovecraft clear glitter glue for the centres of the flowers, which took the colour of the paint below to give a lovely aqua sparkle.
I was really pleased with the finish.


Dreamees - A Charming Cascade Flower Stamps
All it takes is a little of imagination to create something different or breathe new life
into something old.


Happy Crafting


Friday, 20 October 2017

The Glitter Girls Embossing Boards

Finding The Glitter Girls along my crafting journey has formed a staple part of my crafting.
 I watched Barbara Scarlet & Kathy Mills on Create & Craft one day and was mesmerised by the stunning cards they produced.

By using a special embossing tool that fit in the channels of the board you created dimensional layered cards of different shapes by embossing onto cardstock. This is especially effective when using pearlescent card.

Even though The Glitter Girls are no longer trading, these very talented ladies are still very much crafting and giving inspiration to others as they have always done. As for the boards, certain ones are still very much sought after.


Once these layers had been cut out, you would then start layered up your card as some of the examples below.


This was one of the earlier cards I made using the Fanciful Embossing Board. It consisted of 5 layers and was embellished with a decoupaged garden fairy by Debbi Moore. I have used a mix of mirri board and embossed Hunkydory cardstock for the back layer of the card which has been folded back.


These boards are double sided so you can make  two styles of cards and this particular one has a corsage  panel on the side.


I made the little shoes out of patterned paper using a template I found on Pinterest. I have used Crafters Companion centura pearl cardstock in baby blue and white.


With this card I have used different colours and a personalised verse, along with one of The Glitter Girls cards stand templates. I also used the Illusion box board Embossing Board to make the box. I have used blue and white Crafters Companion centura pearl cardstock


Another card with a personalised verse using the same boards but this time I took an Anne Geddes image, pyramaged it  and made a watermark of the image on the back of the verse. I have used pink and white Crafters Companion centura pearl card stock.
The most popular and I think most used of these embossing boards is probably the Bookatrix embossing board and is still a very firm favourite with Glitter Girl fans like myself.


As you can see it has layers like a book which would be joined together using red liner tape along
the spine.


Definitely the most used of all my embossing boards and as intricate as it may look to make a card with one of these, you can actually put it altogether quite quickly as there are no fiddly bits to cut out.
I often put an acetate layer on these cards as I like to find a verse, change it, add to it and then print it onto heat resistant acetate which in this case is Crafters Companion.
I have used Crafters Companion white & Turquoise centura pearl cardstock as I wanted to theme it along with Tiffany colours.  The flower frame is a stamp by Chloe Endean - Stamps by Chloe, which has been heat embossed a few times onto off white pearlescent paper using super fine silver Wow embossing powder and then layered up to give the flower ring dimension.


This is a very similar style of card using the Lavender centura pearl card, an acetate top layer again
with another verse and the same Chloe Endean - Stamps by Chloe flower frame stamp.
This time it has been heat embossed a few times onto heat resistant acetate using bright white Wow embossing powder and I have fussy cut a layer of the flowers to give dimension to the flower frame.


With this card made with the Bookatrix board I added an easel base to the card so that I could add a large handmade embellishment. I made the flowers using The Dreamees A Charming Cascade Flower Stamp set which was embossed onto vellum using fine bright white Wow embossing powder.


I specifically wanted a converse boot for this card so found a shoe template on Pinterest which I had to adapt to make it look more like a boot. I used a piece of canvas for the toe and edge of the shoe to give it texture and shrunk the logo to fit on the boot.


This time I have made a wedding card, used peach and white centura pearl pearlescent card,
 an acetate panel and inked up some paper flowers to co-ordinate with the cardstock.


On this birthday card I have layered the centura pearl pearlescent card with vellum layers which have been printed from The Dreamees Sensational flowers CD.
I have heat embossed one of The Dreamees Recipe stamps onto matching pearlescent card using superfine gold metallic Wow powder. I managed to find a piece of lace to co-ordinate perfectly for the spine of the card and for the flowers.
I used a mix of Dreamees flower sets to make my flurry of blooms which have been heat embossed with the same embossing powder onto papers from their Sensational Flowers & Pretty Pets CDs
  • A Charming Cascade Stamp Set
  • Sensational Flowers Stamp Set
  • Blossoming buds Stamp Set
  • Recipe Bundle Stamp Set


I love this image. Its from the Glitter Girls Vogue collection but can also be found on the Just Ladies CD and these images were made to fit perfectly on the embossing board collection. This embossing board is the The big Screen.
I have used black centura pearl pearlescent cardstock, burgundy Kanban Candy Core brocade card and an acetate layer.


The Big Screen Embossing board, Vogue topper, Chocolate centura pearl cardstock, gold mirri  board, embellishments to finish off.
This card was made with the other side of the Big Screen Embossing Board and the lovely topper is from The Glitter Girls Vogue collection CD (also on the Just Ladies CD). This style of card is still a show stopper but as it is flat makes it ideal for posting, finished off with some pearls, it really didn't need much added to this card. The image has a Grace Kelly look about it.


these days and still very sought after. This board has 3 templates on it and is a fair sized board.The finale of boards to showcase has to be the special edition Once Upon a Time Board, which appears to be very rare.


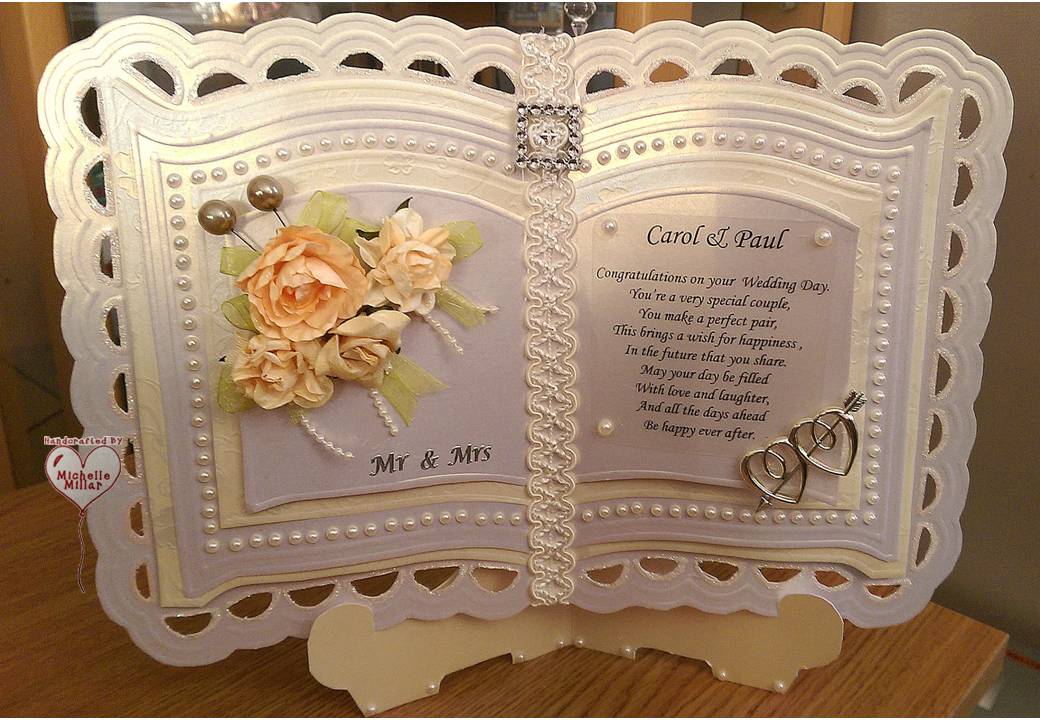
I needed to make a vintage wedding card and this board fit the bill perfectly. I used 5 layers of this board and a mix of white & Ivory centura pearl cardstock with ivory wedding print themed vellum.
A card like this needs to sit on a stand and used some ivory vintage wedding lace down the centre of the spine.  I added some cream/peach vintage paper roses which I glittered the edges of the petals with a Spectrum Noir clear overlay pen to make them glisten a little and finished it off with some embellishments and a printed personalised acetate verse.
I made the box using by Crafters Companion Box Board but used the Bookatrix embossing board to make the panel in the box. The box was made from some A3 Crafters Companion double sided Timeless cardstock which has a beautiful coated finish.

https://www.crafterscompanion.co.uk/


With die cut machines being the way forward and metal dies readily available to create these style books now, like many Glitter Girls followers, I still use my boards and have no intention of getting rid of them anytime soon!

I hope you've enjoyed an insight into some of my favourite makes using these boards.


Happy crafting.


Decorated MDF Gift Boxes

I had a few small MDF gift boxes sitting in my craft box for a long time, waiting to be decorated, so I thought it was time to use them. For...