I was never that into stamping, but when I discovered Dreamees stamps that changed. I found their stamp sets so inspiring and easy to stamp with. With that my confidence grew and now I love it, beginning to push my craft boundaries.
I have made a lot of mdf pieces as you are probably beginning to see and I have a wider selection of my makes on my Pinterest page, so pop over using the link at the top right of my page and have a look.
I have a few more mdf pieces I'd like to share with you.
This Dreamees mdf plaque was made using one of the Dreamees earlier stamp sets. Its from their Friendship set collection. I stamped onto their whimsical wonders paper collection and heat embossed using black embossing powder. I then stamped onto coordinating paper and layered it all up to make the topper. The butterflies have been stamped twice to give their wings dimension too.
I used all the stamps in this set on this project.
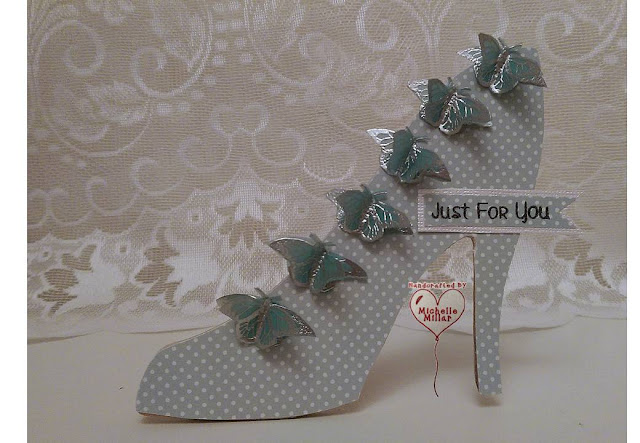
My Dreamees mdf shoe was decorated with the same backing paper from the same collection. I used the sentiment from the Stylish Shoes stamp set and stamped butterflies from their Fall & Foliage stamp set. These have been heat embossed onto coloured vellum using silver superfine embossing powder. I stuck a small mdf stand behind to make it stand up.
A hollow and solid mdf heart decorated with the Whimsical Wonders backing paper. These papers can be found on cd also. The sentiment is from the Pretty Petals stamp set. The little white flower was from A Charming Cascade stamp set which has been heat embossed onto vellum.
Another two piece mdf plaque using the same papers and stamped sentiment from the Swirly and Sentimental stamp set, along with the butterflies which have been heat embossed onto pink vellum using silver embossing powder.
I particularly like this little heart plaque I made. I first painted it with duck egg chalk paint. I really like the texture of chalk paint, then using off cuts of the same papers I made a patchwork heart. Adding a little lace ribbon and making those pretty vellum flowers from The Dreamees A Charming Cascade flower stamp with the bright white Wow embossing powder, it all seem to die in so well.
The sentiment is from the Pretty Pearls stamp set. The circle die is from Tattered Lace, Perfect Pearls set.
This is a variation on the above heart plaque, using the sentiment from The Dreamees Stylish Shoes stamp set.
On this mdf Dreamees heart I used the Subtle Sweetness paper pack and the Sketched & Shaded rounded flower stamps have been heat embossed using embossing powder along with the Friendship recipe stamp from their Recipe set.
Another Dreamees mdf heart this time I used a Stamping Up lace background die (which unfortunately is now discontinued) stamped onto craft card and heat embossed using bright white wow embossing powder. It made a really pretty background. As you can see I have used the same flower stamp on vellum. The sentiment is from The Friendship collection, one of the earlier stamp sets.
I made this Dreamees plaque into a free standing one, although the picture shows it sitting on an easel. I used papers from the Dreamees Fantastic Florals cd and the Hanging Basket stamp set which was adapted to make a sewing machine as Hayley Bignall demonstrated on one of her demos.
Stamped onto cream card and layered onto coordinating card with some flowers made using the Creative Chrysanthemums stamp set and Tim Holtz victorian velvet distress ink
.
My Dreamees mdf watering can plaque with backing papers and mini windmill templates from Dreamees Creative Card Templates cd. The stamps from Creative Stamping Magazine Issue 38 with a free whatever the weather stamp set.
A large mdf Dreamees teapot, decorated with papers from the Fantastic Florals cd along with the flowers. Made into a chalkboard memo plaque. I made a little matching chalk holder out of cardboard which is attached to the ribbon. The chalk can be easily replaced into the holder.
I would recommend that you prime the base of your mdf before applying the blackboard paint with a clear gesso or primer. This will give your mdf a good base for the chalkboard paint to adhere to.
I hope you've enjoyed the makes I have shared and perhaps taken some inspiration from them.
Happy Crafting


No comments:
Post a Comment