blog backbdrop

Showing posts with label Fall & Foliage. Show all posts

Wednesday, 2 March 2022

Februarys Memory Book Page

I have another memory book page to share with you, which is part of a monthly group craft swap project that I have signed up to for this year.


The aim is to use as many Dreamees products where possible but more importantly to have fun creating. 

I've used our usual 6x6 inch kraft card base which we are all using for our "flip flap book" page swaps, so that after all the swaps are complete, these book pages will fit into the spine that Carol Bignall has shown us how to make.

For the first side, I've used papers from the Rose Garden paper pad and a selection of dies. In the lattice pocket, I made a decorated tag in its own matching decorated string envelope.


I found a template for the string envelope online, which I think will be very handy to use with my patterned papers for other projects.  Using a small piece of heavyweight kraft card, I created lots of layers for my shabby chic tag mixing in some lace, ribbon and die-cut embellishments.


These sentiment recipe stamps are a really nice touch in projects like this.


I also like making embellishments out of stamps and this retired stamp was one of the Dreamees very early stamps. I thought that it would make a sweet little hanging embellishment so added some glossy accent for some texture and a glitter pen around the heart.

A stamped sentiment on the reverse of my little mug


I found a poem for the winter month of February which I added under the first flap and used the rest of the cute little mice from the Autumn Days stamp set, placing them in the barrel from another set.


At the base of the second flap, I popped in an ATC card which was created using one of these cute stamps from their mushroom house stamp set.


I also added another ATC card using one of the Kokeshi doll digi stamps from Vera Lane's digi stamp collection for this month's swap.


On the reverse side of the book page I used the Dreamees Aquamarine paper pad


I created an acetate frame for my stamped flowers using the loops and lace oval die and had to keep in mind not to add too much dimension as it was going in a book.
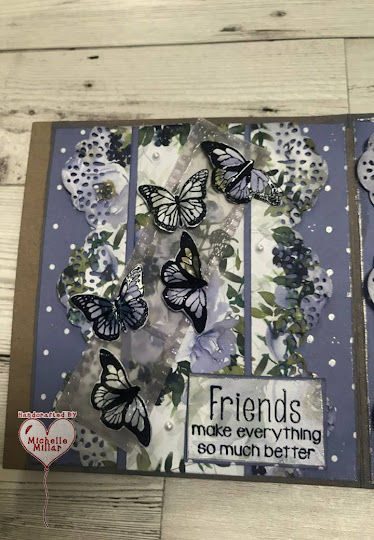

The butterflies have been heat embossed onto the same pretty design paper and then attached to a stamped/heat embossed piece of grey vellum film strip.

I have traced over various areas of the book page with a shimmer pen to add a little twinkle here and there and bring out some of the lovely colours in the design papers.

This is the only project that I have made a craft commitment to this year and have been enjoying being part of it.  I have a month to complete these projects which is great because I can pace myself and plan these small projects out and although I have cut back on all my crafting now, it's important that I still continue to do the things that I enjoy.

I have already received two gorgeous memory book pages from my swap partners for my "flip flap" memory book and love how each page is so unique and beautifully put together and that is what is so great about these projects, every page will be different.

Have a great day, whatever you have planned for yourself
Happy crafting


Saturday, 5 December 2020

Festive knit card

Today's card on my blog is the second of the festive card in preparation for the Christmas season and with the last blog challenge of the year for us at Let's Craft and Create we celebrating it with a traditional festive theme.

When I made my card, I had just received my new Autumnal embossing folder by the Dreamees  - cable knit. These 6 x6 3D embossing folders leave a lovely embossed detail to the card and I think this embossing folder is going to be my new favourite as it can be used with so many projects throughout the year.


On my 300gsm card base, I used sage card from the Dreamees followed by some rich colour core red card from my stash, saving the 250gsm cream colour core card for the top. The design of the folder resembles my jumper, so I got the idea to thread a piece of wool through the card to make it look as if the robin was pecking it. (probably not the best choice of colour to photograph).


I used the Little Red Robin stamp set from last Christmas and coloured this little fellow in with my Dreamees watercolour pencils. Adding a little foliage from a mix of a few more past stamps from the Dreamees, the Fall & Foliage leaves stamps and an acorn from the Winter Woodland stamp set. 

I stamped the holly leaves using the Sketched & Shaded Pointy flower stamps using the sparkle 2nd gen dinky inkys in crocodile but as my card is quite dark, it's not very visible in the picture. 

The sentiment has been heat embossed with white embossing powder using one of the sentiment stamps from the Santa Paws stamp set and I have also used the smallest oval dies from the Dreamees Loops & Lace die set.

I had some stitched red ribbon that matched my red card that was just right to sit behind my holly. 

No flowers on this card and I have deliberately kept this one quite simple. As I have a love of nature and I feed the robins that nest in my garden all year round, it seemed very apt to finish this year's challenge including one on my card.

Our design team have also been busy this month with projects of their own and there is always lots of fabulous inspiration shared by the crafters on our blog too. If you are interested,  there is a prize for the winning entry, following our theme and a badge for your blog for the top 3 runners up. Just click on the link below which will take you to our blog challenge. 

Happy Crafting


Friday, 4 December 2020

Autumnal Wishes

Greetings! The card on my blog today is an Autumnal one which was made for my friends birthday.

Even though I'm always drawn to pinks and purples, I do love the colours of Autumn and with the beautiful paper pads from the Dreamees, in particular, this one I have used today, Autumn Haze, I made a decision to swap flowers for Autumn leaves.


One of my well used Dreamees stamps sets, the Fall & Foliage; which has been stamped onto some coordinations Tim Holtz textured card stock that I had left in my stash, then inked around the edge for a more natural looking leaf.

I find the Dreamees precision scissors a godsend for cutting these out.   Even though I find cutting out a struggle these days, as a crafter who loves making their own flowers and creating a project from scratch, giving up something you love doing is the last resort, so, you wind it down a dozen notches and just go with the flow.


Cut Bun was stamped on craft card. I love  Hayley Bignall's style of drawing all her character stamps and flowers they are simply adorable.


Using the Loops and Lace doily die with one of the design papers from the Autumn Haze paper pad, I added the leaves in a semi circle with a few for the bunny to sit on.


I also added a textured layer by using the Make an Impression Corrugated Embossing folder also by the Dreamees with some coral card that had been inked with the walnut sparkle second gen dinky inky.


My 8x8 card has a kraft card base and I have added some purple frosted berries from my stash purchased in a bundle of lovely colours by Anna Marie at a Craft Show a few years back some plum 4mm Dreammee pearls to finish my card off.

Enjoy your day whatever you are doing.
Happy Crafting


Friday, 5 April 2019

Puppies & Butterflies card

Today I am sharing a DT notecard for the April blog challenge over on Let's Craft and Create with the theme "beautiful butterflies"


I used some backing papers from the Dreamees Pretty Pets cd along with this cute little bone punch purchased from a charity shop from next to nothing.


I also used the Dreamees Pretty Pets stamp set which I coloured in with their dinky inky ink pads.
I tried to make the pups fur look a little textured when colouring them in with my water brush.
The centre puppy had a shimmer of glitter added using a specturm noir clear overlay sparkle pen, which is my go to pen.


I then made the butterflies using the Dreamees Fall & Foilage butterfly stamps (I love this stamp set) which were heat embossed onto turquoise vellum using superfine silver Wow embossing powder.


I used the Tattered Lace rounded corner nested rectangle dies and layered my panels up using foam/shaker tape to add a little dimension between the layers.


I thought the inside could do with a flurry of paw prints also.


Take a look at the rest of the inspiration by our DT team and blog challenge entries on Let's Craft and Create Blog Challenges. There is also a prize offered every month to the winning entry.

Happy Crafting


Friday, 5 October 2018

Autumn Card

For this months blog challenge on Daisy Chains, I am sharing a DT card made with this months Autumn theme in mind.


I used one of the mdf fairy doors from the Dreamees  kit to draw around for the template of my card onto kraft card and then used their Fantasy Fairydoor stamp set to make my little house for a mouse.
I stamped the door a few times to layer up elements of the door such as the panels, hinges, door knocker and window (which also has glossy accent on it).


For the leaves around the house and the mouse, I used the Dreamees Fall & Foilage stamp set onto some Tim Holtz kraft core nostalgic collection textured cardstock. I love this 10.8cn  x  14cm card pack by co-ordinations as it has 24 colours in matching hues with a few sheets of each and think these particular colours are perfect for Autumn leaves.

Fantasy Fairydoor


Fall and Foliage

The little mouse came from the Autumn Days stamp set, also by the Dreamees.


Although the little mouse looks very white in these pictures, it is actually a pale grey one.


Pop over to the Daisy Chains blog page and see what the rest of the design team have been making.

Happy Crafting


Wednesday, 29 November 2017

Dreamees MDF Fairy Doors & Toadstall

The Dreamees Mdf Fairy Door Kit was one of my favourite kits to make up.. It came with enough pieces to make a small fairy door too.  I used the papers from The Dreamees Textures cd and the fairy from their Fantastic Fairies cd. 


This is the larger of the fairy doors

 The little flowers were made using a small flower punch and wired twine for the vine. I used one of the fairy toppers from the Dreamees Fantastic Fairies cd, glittered it and added some wings made with part of one of the Dreamees flower stamps.


For the smaller fairy door,  I used the Fall & Foliage stamp set around the door . I  heat embossed the leaf stamps onto some co-ordinations cardstock with gold super fine metallic Wow embossing powder. I made some little stepping stones out of greyboard and covered them with pebble papers from the cd. I sourced a shaped mdf piece for my fairy door to sit on and added a few little wood embellishments to stack next to the door. The door knocker was made using some wired twine.


When the Dreamees mdf  Toadstool came along, I thought this would make a perfect gift to make.
I used The Dreamees Textures cd for the little door and plinth the toadstool stands on.
For the base and spots, I used some leftover canvas paper I had as I loved the texture on it.


http://www.dreamees.org.uk/


These make a lovely keepsake

Happy Crafting 


Thursday, 9 November 2017

Dreamees - Autumn Days Stamp Set

For my Dreamees October card swap I decided to use  a mixture of the Dreamees Autumn Days and the Fall & Foliage stamps sets.


I used kraft card as my card base and used the wood grain background stamp by Stamping up (which you can just about see) onto cream paper.  I then added a fine lace border die in kraft card  and stamped lots of leaves onto various pieces of leaf coloured cardstock from the Tim Holtz Kraft Core mini nostalgic pad collection. After cutting them out I edged them with a little dinky inky brown ink to soften the leaf edges and shaped them a little between my fingers.

The large acorns were stamped onto kraft card using The Dreamees Woodland Wonders stamp set, shaded a little and I added a little glossy accent to the acorn.


I used the Dreamees Autumn Days stamp set to stamp onto hammered card for the topper and then I coloured with The Dreamees dinky inkies again. I tried to give the pumpkins a little shading and a coat of my spectrum noir clear sparkle overlay pen for a little sheen.


http://www.dreamees.org.uk/


Happy Crafting

Boutique Birthday Card

I made a card for my daughter's birthday earlier this year, which was inspired by samples from this kit. When you make cards for family ...