blog backbdrop

Showing posts with label Cute Bun. Show all posts

Wednesday, 3 August 2022

July's Memory Book Page

I am sharing July's flip-flap memory book pages for our Dreamees monthly group swap and I have gone for a beach summer vibe on these.


For my first page, I created a pocket for my 2 beach hut tags using their shed stamp which converted nicely into a beach hut, and on the adjacent side a seaside theme canvas with a porthole view onto the beach.


I created an inky background using distress oxide inks and gave my beach huts a slightly distressed finish using my chalk dinky inkies. I found a few beach themed embellishments that I had in my stash from Tattered Lace which worked really well and added a few pieces of clip art that I found online.


I used a piece of fine sandpaper that I had leftover from another project to cover the front of the pocket to mimic a sandy beach and add a little texture too along with the teeny shells. The crab was one of my Tattered Lace die cuts which I also inked to sit on the backing paper that has some background stamping, a little hard to capture in the photo.
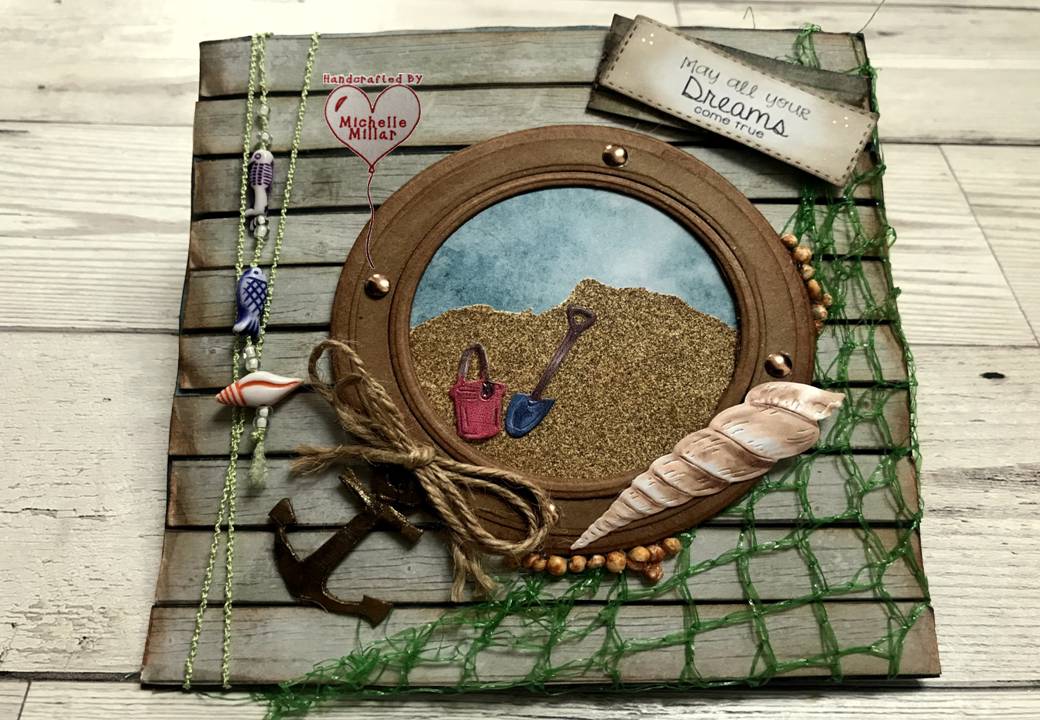


For my second page, I cut the driftwood backing paper up into slats, inked, and backed it onto foam tape before sticking it down, leaving a slight gap between each slat.

To make the porthole, I just used varied sizes of my nested circle dies using kraft card and some bronze enamel embellishments to finish it off.

I still wanted the porthole to look a bit more rustic so I added some barnacles which I adapted using polystyrene balls, ink & glue. These had fallen out of my son's lap tray that I had glued back together and the darn things get everywhere.  You think you have got rid of the ones you don't need and they come back! So I used some.  The fruit bag netting always comes in handy for this sort of crafting too.


Sometimes you need a particular embellishment for a project and you can't find one the right size to fit so I went online and found a free clip art, printed it out and then traced it onto cardboard twice (the grey cardboard from the back of notepads).  Once gessoed, I added a little paint and wax and it looked just as good as a metal embellishment.


On the flip side of the pages, the beach theme continues, and I decided to recreate on one of these pages, a summer vibe card that I had made for my friend using the mdf camper van from the Dreamees mdf embellishment sheets.  On the adjacent page, I have created another pocket with some mini tags and the ATC card that I normally make and add to my swap partner's pages.


For these 6x6 inch flip flap memory book pages, I find it easier to create each page and then stick them into the kraft card base once they are finished.

For the background, I used my all-time favourite stencil,  Daisy by Visible Image with distress oxide inks. I also used a mix of my smallest Dreamees flower dies and the Summer Breeze paper pad to decorate the camper van. I love this paper pad and have used this throughout this project as the colourways fit perfectly. The lustre reinker dinky inky by the Dreamees is perfect for getting that chrome finish on your mdf.


A little glossy accent in the middle of the daisy is all that's needed, such a lush stencil and distress oxides are my favourite go to ink.
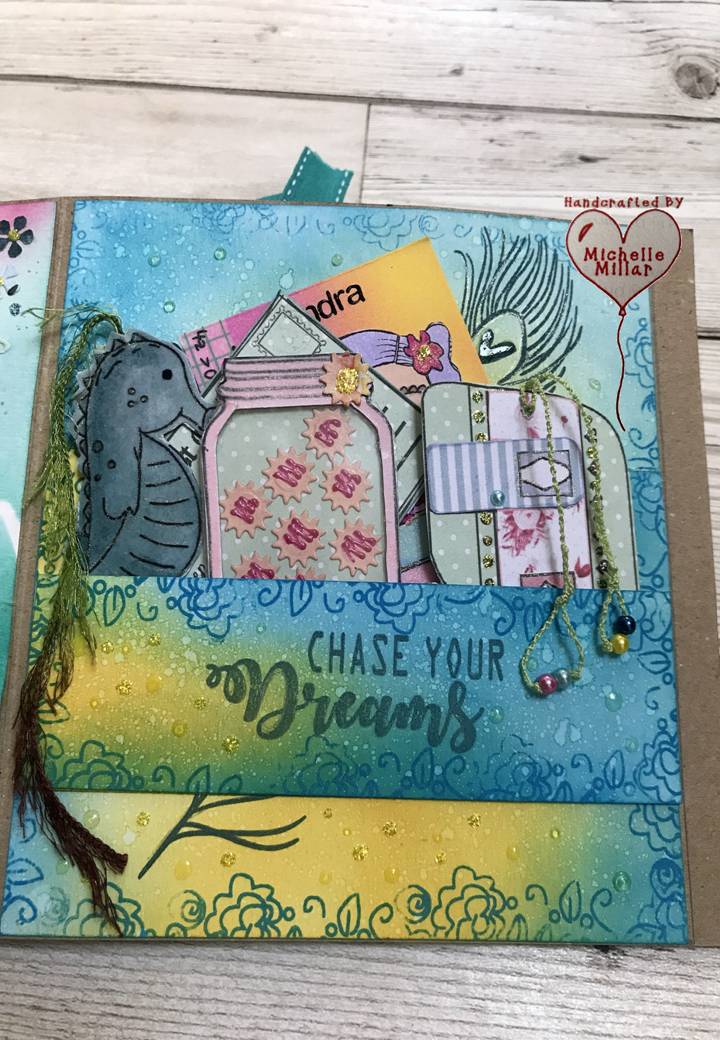

For these flip flap book pages, I use a lot of digi images from past Dreamees CD roms. They are easy to resize and print onto their design papers which also come with sentiments too.


I created the background for my page using distress oxide inks and then added some stamping 


The little double sided seahorse has been heat embossed with clear embossing powder for a smoother texture and the jar of cookies has an acetate front. The caravan has been decopatched and decorated with stickles glitter glue and the postcard has a stamped image of cute giraffes on the reverse.


Another ATC to add to this project before sending it off to my swap partner. These Kokeshi dolls are really cute by Vera Lance Studios. I love her digi stamps. Well, that's another set of flip flap pages complete for this month.

It's certainly been a hot summer so far and by the look of it there is still more summer sun to come our way.

Have a fab day whatever you have planned for yourself.

Happy crafting


Monday, 16 May 2022

April Memory Book Page

Today I am sharing April's flip-flap memory book pages from the monthly group swap that I have been involved in.


I try to use as many Dreamees products where possible to comply with the swap but more importantly, it's about having fun creating. 

There's a bit of a bunny theme going on here and I kind of enjoy creating a scene when using my little critter stamps as its so easy to mix and match lots of your sets to work together.

For these book pages I was working with a black and another colour of choice, so I decided to go with the Dreamees sensational sepia paper pad throughout.


One of the design papers created the backdrop for the scene of  "the carrot hunt" for my Easter bunnies


On the adjacent page a portrait of the golden bunny nestled in some die cut fretwork frill flowers. I decided to use some of Debbi Moore's metal magic for the bunny and a couple of the sentiments. This is amazing stuff. It works very much like an embossing powder except you stamp into it when it has reached its melting point. It sets like an embellishment in about 20 minutes. Also, this stuff lasts ages.

On the reverse side of my book page I have gone for a creativity theme.

The mdf dream catcher has been painted with black gesso and then covered with sparkly black embossing powder. On the background, I used texture paste through a brick stencil and then spritzed it with a Pretty Gets Gritty pearl spray in toffee, also adding some to the paper roses.


On my last page, I chose one of the Dreamees recipe stamps and created some artist easels with inspirational quotes.


Finally, I added some ATC cards, which always complete my book pages, one made with Dreamees stamps and the other using the Just Fly digi stamp by Vera Lane Studios.

Have a great day, whatever you have planned for yourself

Happy crafting


Saturday, 2 April 2022

March Memory Book page

I have another memory book page to share with you, which is part of a monthly group craft swap project that I have signed up for this year.


The aim is to use as many Dreamees products where possible but more importantly to have fun creating. 

I've used our usual 6x6 inch kraft card base which we are all using for our "flip flap book" page swaps, so that after all the swaps are complete, these book pages will fit into the spine that we have been shown how to make.

I have used the ray of sunshine paper pad for this month's theme. They may not be a spring flower but they certainly give the burst of hello yellow sunshine & smiles that we all need after emerging from those winter blues.


Behind the shutters, I've also added a poem for March and used my dies for the cascading blooms, and made some fleurs foam crocuses on a bed of moss.
The really small pearls are ideal for these projects but I have been using my Stickles glitter glue a lot more as they are so versatile and come in so many great colours.


I found these little windmills on one of the Dreamees older cds but as I wanted the paper to match my project, I just printed the originals off and drew around them onto the paper pad before cutting them out. I have a few windmills in my garden and they are certainly working hard today!


Talking of winter blues, ironically I have gone for the Sapphire Dreams paper pad for the other side of the book page. Another really pretty paper pad and I was thinking of colours that my swap partner had not yet had in her book yet, so this was my choice.

For the first part of the page, I kept it very simple on the outside with just a pretty envelope.  The second part of this page was quite personal to my partner, as it was in memory to her beloved dog that she had recently lost. I added a little poem for Treacle alongside the stamped topper.


"When tomorrow starts without me,
don't think we're far apart,
for each time you think of me,
I'm right inside your heart....."


Using a little mdf embroidery hoop from an old Dreamees kit that I had, I painted it and made a  memory hoop, adding a little mdf feather, which I also painted with gesso and then top coated with some Dylon iridescent pearl drops that I found in my stash. The hoop actually shimmers with the gold mica flecks in the cobalt blue sparkle reinker but it doesn't show in the picture. The picture of Treacle is double sided and attached by a jewellry finding.


Inside the envelope, I made a large decorated tag, adding some little flowers which I have also made to co-ordinate and finished off with a recipe of happiness stamp.

These flip flap book pages have been really enjoyable to make and I have received some beautiful book pages in return.

Have a great day, whatever you have planned for yourself

Happy crafting


Sunday, 30 January 2022

Tickled Pink Memory Book Page

A new ongoing group project to share today -  a book page for a Flip Flap memory book which I am making as a group craft swap every month.


All our books will be made out of the same 6 x 6 inch Kraft card base as a starting point and to use Dreamees products where possible.

The preference I had from my partner for the first page of our book page was pink and a rainbow for the cover if possible.  As I didn't have any stamps or toppers or anything that I could adapt, I remembered a wonderful little fabrics & trimmings shop that I often like to browse around when I'm in the area and picked up this rainbow applique in one of their many baskets of goodies. I couldn't believe my luck when I saw it.

The pink satin ribbon will be used to fasten her book at the end. I've also sent my partner another piece of ribbon to attach when she has all the pieces of her book from her swap partners over the coming months so that it matches.

On the mdf dreamcatcher embellishment, I first coloured with a Dreamees dinky inky reinker in treasure and then topped up with gold gilding wax. For the feathers, I used mica powders.


On the reverse of my book page, I picked another set of pink papers to coordinate and chose a family tree theme, adding the sentiment:-

Family:- Where life begins & love never ends

Inside the die cut lacy heart which I folded, I added some  stamped bunnies  and another
sentiment. 


"Behind you, all your memories, 
 Before you, all your dreams, 
 Around you, all who love you, 
 Within you all you need"


I had to add some ATC cards so chose one of my favourite digi stamps by Vera Lane Studios - Kokeshi dolls and for the other ATC I chose the Dreamees Cute Bun stamp as this was a Dreamees project.


For the hearts in my Family Tree, I used the centres from one of the Loops & Lace flower dies, which are really handy if you want little die-cut hearts.


Just in case extra hearts were needed to add to the family tree, I made a little envelope to tuck in the pot under the tree. The pot being a milk churn stamp that I cut in half.

I really enjoyed making this as I could pick it up and do a little bit at a time over the course of the month and this is the sort of thing I really enjoy anyway.

Everyone's pages will be different which is what is great about it too and I am already looking forward to the next one.

Have a great day, whatever you have planned.
Happy crafting


Monday, 5 July 2021

Cute Bun Birthday Wishes

I have been doing more stamping lately and realised that I hadn't shared some cards that I had made last month, so thought I would start with this one.


Our blog challenge at Daisy Chains this month is running a dies/stencil theme and as with all our challenges they are ATG. My card for our challenge this month has an even mix of both.


On a 7 x7" white card base I added a pale blue mirri card layer and then on the white stamping card topper I used the Dreamees sparkle dinky inkie in periwinkle for the base colour and then a mix of their colours through one of their circle stencils from their Treasured Stencils set.


The Dreamees stamp Cute bun was coloured with promarkers and I added the square frame from their Loops & Lace die collection, inking the frame to match the background. Another one of my favourite character stamp sets, I have quite a few favourites. I stamp with what I love and it's as simple as that really.


I also used the Dreamees Fancy Florets flower duo stamp/dies. These were coloured with periwinkle, watermelon and lemon drizzle sparkle dinky inkies and finished off with gold pearls. I love the sparkle from these inks. A great shimmer, never overpowering. 


My birthday card was for a little girl growing up fast. I have been making a conscious effort to make more use of stamps in my stash. When you make cards for family and friends, you find that you need something different each year and at the moment I'm in a stamping phase.

The rest of our design team have also been making some lovely projects this month, along with so many great crafters on our blog every month. It's always lovely to see the inspiration everyone shares. Please use the link below to take you to the blog challenge and thanks for the visit.


Happy Crafting


Tuesday, 5 January 2021

Sending Smiles & flowers card

Today I thought I'd share the card that I made in our group Facebook  Dreamees craft swap whilst in the second lockdown. As it is also the first blog challenge of the year for us at Let's Craft and Create I also thought It would be a nice project to start the year off.

Our theme for January is Cheers to you, and as with all our challenges, there is an ATG option.  It's been a challenging year for everyone, with very little to celebrate, so why not send a card to a friend to give them a reason to smile today.

I decided to use the Dreamees Autumn Haze paper pad and make some flowers to pick up the colours in the papers.  I chose an easel card as I thought it would support the half-moon display of flowers.


For my flowers, I stamped and die cut my flowers using the Dreamees Beautiful Babysun stamp and die set using the denim sparkle dinky inky pad on some textured aubergine coordinations Tim Holtz card stock from my stash and patterned design paper from the  Dreamees Autumn Dreams paper pad.


I only had white pollen stamens by the Dreamees, so decided to colour them to tie in with my project using the honey sparkle dinky inky.  The colour really well, especially if you juice the pad a bit with the matching reinker. That way you can have stamens whatever colour your wish. 


I added a little foliage from the same Beautiful Babysun die set using some soft green card and a few green frosted berries, with a little sisal between the layers. I've used the smallest dies from the oval Loops & Lace dies collection for my sending smiles sentiment, which was from the Dreamees Cute bun stamp set.

I used the woodgrain design paper from the Autumn Haze paper pad as a faux wood plaque for the card topper and mirrored it through as a stopper for the card, saving one of the larger flowers for the centre stopper on the card.
I really enjoyed making this card for the lovely Erika and hope she likes it. I also made some ATCs too. Haven't made these in a while.


I heat embossed the dreamcatcher from the Dream Big stamp set with gold embossing powder and the Heartfelt Hedgehogs with my sparkle dinky inkies and then sprinkled clear embossing powder over the top and embossed. I used my sparkle dinky inkies to colour my stamps in too as well as the simple background.
 For Erika's name, I used the some past Dreamees alphabet stamps as the letters were smaller than the current Caligraphy set, although, I did use the capital E from this set.


The little card pocket I made was just to keep the cards together and I may make her more in the future that she could add to it.

These craft swaps are great and a good way of connected other crafters especially during these lockdowns where so many people have felt isolated and struggled with their mental health. 

Our design team have also been busy this month with projects of their own and there is always lots of fabulous inspiration shared by the crafters on our blog too. If you are interested,  there is a prize for the winning entry, following our theme and a badge for your blog for the top 3 runners up. Just click on the link below which will take you to our blog challenge. 

Enjoy your day whatever you are doing.

Happy Crafting


Decorated MDF Gift Boxes

I had a few small MDF gift boxes sitting in my craft box for a long time, waiting to be decorated, so I thought it was time to use them. For...