blog backbdrop

Showing posts with label Memory book. Show all posts

Thursday, 15 September 2022

August Memory Book Pages

I have August's memory book pages to share from last month and these have already been sent to my swap partner as part of our Dreamees group swap.  


I started with a bunch of lavender using the Dreamees lavender dies from the Nature's Garden Collection and their recipe of happiness sentiment. 


I thought this trellis die looked a little like one that you could get in a garden and with some green sisal behind, it gave a softer illusion to the background. 


On the adjacent side, I created a little folder using a piece of music paper that I found in my stash.  When I was cleaning my stencil after making a project, I  didn't want to waste the texture paste that was left over, so I made some prints on pieces of card which came in very handy as I used one of these brick stencils behind my hyacinth stamp. To add a little more dimension to it I added some tiny blue die cut flowers and some moss to the pot.


I also added a little tag using one of the Dreamees digi stamps from the CD Roms that they used to make and my usual ATC card that I normally include with my swaps.


On the flip side, I chose the peach kisses paper pad. A gatefold page with a pop-up behind the doors and on the adjacent page an open envelope of tags.


I stamped one of the little fairy mushroom houses and added it to the centre of my page.


I managed to get two larger tags (just) in the envelope. I sometimes get carried away decorating and forget about the space I have to fit things into. I used little stamps and dies on the coordinating papers from this pad.


On this tag, I used one of the very early Dreamees stamp sets,  the Elegant Dress, simply because when I was looking through my tray of stamps, it was right at the bottom looking all forgotten. The top layer of the mannequin dress has been stamped and heat embossed onto a small piece of vellum. These projects are ideal for using up all these small pieces in your craft box that you don't want to throw away.

Throughout my project, I've added Stickles glitter glue to highlight, and the addiction grows!! There always seems to be a cool colour that I think I might need and then I spot the new Distress Stickles!!

Have a fab day whatever you have planned for yourself.

Happy crafting


Saturday, 2 April 2022

March Memory Book page

I have another memory book page to share with you, which is part of a monthly group craft swap project that I have signed up for this year.


The aim is to use as many Dreamees products where possible but more importantly to have fun creating. 

I've used our usual 6x6 inch kraft card base which we are all using for our "flip flap book" page swaps, so that after all the swaps are complete, these book pages will fit into the spine that we have been shown how to make.

I have used the ray of sunshine paper pad for this month's theme. They may not be a spring flower but they certainly give the burst of hello yellow sunshine & smiles that we all need after emerging from those winter blues.


Behind the shutters, I've also added a poem for March and used my dies for the cascading blooms, and made some fleurs foam crocuses on a bed of moss.
The really small pearls are ideal for these projects but I have been using my Stickles glitter glue a lot more as they are so versatile and come in so many great colours.


I found these little windmills on one of the Dreamees older cds but as I wanted the paper to match my project, I just printed the originals off and drew around them onto the paper pad before cutting them out. I have a few windmills in my garden and they are certainly working hard today!


Talking of winter blues, ironically I have gone for the Sapphire Dreams paper pad for the other side of the book page. Another really pretty paper pad and I was thinking of colours that my swap partner had not yet had in her book yet, so this was my choice.

For the first part of the page, I kept it very simple on the outside with just a pretty envelope.  The second part of this page was quite personal to my partner, as it was in memory to her beloved dog that she had recently lost. I added a little poem for Treacle alongside the stamped topper.


"When tomorrow starts without me,
don't think we're far apart,
for each time you think of me,
I'm right inside your heart....."


Using a little mdf embroidery hoop from an old Dreamees kit that I had, I painted it and made a  memory hoop, adding a little mdf feather, which I also painted with gesso and then top coated with some Dylon iridescent pearl drops that I found in my stash. The hoop actually shimmers with the gold mica flecks in the cobalt blue sparkle reinker but it doesn't show in the picture. The picture of Treacle is double sided and attached by a jewellry finding.


Inside the envelope, I made a large decorated tag, adding some little flowers which I have also made to co-ordinate and finished off with a recipe of happiness stamp.

These flip flap book pages have been really enjoyable to make and I have received some beautiful book pages in return.

Have a great day, whatever you have planned for yourself

Happy crafting


Wednesday, 2 March 2022

Februarys Memory Book Page

I have another memory book page to share with you, which is part of a monthly group craft swap project that I have signed up to for this year.


The aim is to use as many Dreamees products where possible but more importantly to have fun creating. 

I've used our usual 6x6 inch kraft card base which we are all using for our "flip flap book" page swaps, so that after all the swaps are complete, these book pages will fit into the spine that Carol Bignall has shown us how to make.

For the first side, I've used papers from the Rose Garden paper pad and a selection of dies. In the lattice pocket, I made a decorated tag in its own matching decorated string envelope.


I found a template for the string envelope online, which I think will be very handy to use with my patterned papers for other projects.  Using a small piece of heavyweight kraft card, I created lots of layers for my shabby chic tag mixing in some lace, ribbon and die-cut embellishments.


These sentiment recipe stamps are a really nice touch in projects like this.


I also like making embellishments out of stamps and this retired stamp was one of the Dreamees very early stamps. I thought that it would make a sweet little hanging embellishment so added some glossy accent for some texture and a glitter pen around the heart.

A stamped sentiment on the reverse of my little mug


I found a poem for the winter month of February which I added under the first flap and used the rest of the cute little mice from the Autumn Days stamp set, placing them in the barrel from another set.


At the base of the second flap, I popped in an ATC card which was created using one of these cute stamps from their mushroom house stamp set.


I also added another ATC card using one of the Kokeshi doll digi stamps from Vera Lane's digi stamp collection for this month's swap.


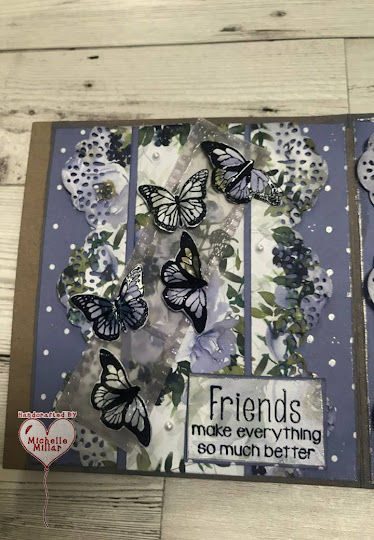
On the reverse side of the book page I used the Dreamees Aquamarine paper pad


I created an acetate frame for my stamped flowers using the loops and lace oval die and had to keep in mind not to add too much dimension as it was going in a book.


The butterflies have been heat embossed onto the same pretty design paper and then attached to a stamped/heat embossed piece of grey vellum film strip.

I have traced over various areas of the book page with a shimmer pen to add a little twinkle here and there and bring out some of the lovely colours in the design papers.

This is the only project that I have made a craft commitment to this year and have been enjoying being part of it.  I have a month to complete these projects which is great because I can pace myself and plan these small projects out and although I have cut back on all my crafting now, it's important that I still continue to do the things that I enjoy.

I have already received two gorgeous memory book pages from my swap partners for my "flip flap" memory book and love how each page is so unique and beautifully put together and that is what is so great about these projects, every page will be different.

Have a great day, whatever you have planned for yourself
Happy crafting


Wednesday, 16 October 2019

Memory Book

Today I thought I'd share with you a memory book I made for a special little girls first birthday.


These memory books are so easy to make and are a lovely alternative to cards.


Instead of using mdf, I remembered that I had a set of Woodware chippies acetate album templates.
The smallest page is 4  x  4 inches, with the largest being 7 x 4 inches.  For the base, used greyboard, which was sturdy enough for my little album.


I also had these lovely shabby chic A4 double sided paper collection which came free with an issue of Cardmaking magazine.


With some pretty pastel flower eyelets on each board.


To accompany the pictures, I used a mixture of pretty lace, buttons, and embellishments along with the alphabet chipboard letters to spell out her name. It was very handy that her name fits perfectly into the number of pages that I had in the template set.


On the binder rings, added a couple of charms, one being an angels feather and the other being a Hamsa charm.  The Hamsa hand is an all faith protective sign, bringing its owner happiness, luck, health and good fortune.


I love this picture of Ella, it really sums this little cutey up.  I used some Crafters Companion speciality cardstock I also made a gift box.


I love making these memory books.
Happy Crafting!


Thursday, 9 November 2017

Dreamees MDF Memory Books

Another of my projects involving Dreamees products are the mdf memory books.  They were originally launched on Create and Craft bundled with the something stitchy paper pad and Dreamees Digital Designs cd.

As I bought two sets, I had enough fairy door mdf, perfect for what I wanted to make.


I used the fairy door mdf as a template to draw around onto greyboard to make the inside panels of the memory books.  The front and back were decorated using brick papers from The Dreamees Textures cd  The paper for the door I sourced as I needed it a little more shabby.  The sentiment is from the cd and has been made small enough for me to die cut using a Crealies square stitched die. I used a little flower & leaf punch for the foliage and added a selection of ribbon and charms.


I have blurred the personal photos used in my memory books.

The backing papers are from the Dreamees Digitals Designs cd and they have been inked on the edges using the Dreamees Dinky Inkies pigment ink The jar and fairy image are from the Dreamees Fantastic Fairies cd. I have added a pocket at the back to hold a handmade bookmark.

The film reel was made using an Inkylicious negative stamp on heat resistant acetate and the picture have been placed behind it.


I did the same with this memory book but it was more themed as Gnome House.


This time I decorated the inside using backing papers and images from The Dreamees Woodland Wonders cd. I sourced the little gnome door and coloured it with Dinky Inkies pigment ink.
I made a pocket at the back for a bookmark also in the same style.


For this memory book I used the rocket shaped mdf and decorated it with papers from the Woodland Wonders cd. I used the mdf as a template to make a coordinating card. I also gave it a faux stitched edge around the card and mdf using a white gel pen  Finished off with ribbon, buttons and sequins.


https://www.createandcraft.com/gb/


http://www.dreamees.org.uk/


They make lovely keepsakes.

Happy Crafting


Boutique Birthday Card

I made a card for my daughter's birthday earlier this year, which was inspired by samples from this kit. When you make cards for family ...