blog backbdrop

Showing posts with label beautiful babysun. Show all posts

Tuesday, 5 January 2021

Sending Smiles & flowers card

Today I thought I'd share the card that I made in our group Facebook  Dreamees craft swap whilst in the second lockdown. As it is also the first blog challenge of the year for us at Let's Craft and Create I also thought It would be a nice project to start the year off.

Our theme for January is Cheers to you, and as with all our challenges, there is an ATG option.  It's been a challenging year for everyone, with very little to celebrate, so why not send a card to a friend to give them a reason to smile today.

I decided to use the Dreamees Autumn Haze paper pad and make some flowers to pick up the colours in the papers.  I chose an easel card as I thought it would support the half-moon display of flowers.


For my flowers, I stamped and die cut my flowers using the Dreamees Beautiful Babysun stamp and die set using the denim sparkle dinky inky pad on some textured aubergine coordinations Tim Holtz card stock from my stash and patterned design paper from the  Dreamees Autumn Dreams paper pad.


I only had white pollen stamens by the Dreamees, so decided to colour them to tie in with my project using the honey sparkle dinky inky.  The colour really well, especially if you juice the pad a bit with the matching reinker. That way you can have stamens whatever colour your wish. 


I added a little foliage from the same Beautiful Babysun die set using some soft green card and a few green frosted berries, with a little sisal between the layers. I've used the smallest dies from the oval Loops & Lace dies collection for my sending smiles sentiment, which was from the Dreamees Cute bun stamp set.

I used the woodgrain design paper from the Autumn Haze paper pad as a faux wood plaque for the card topper and mirrored it through as a stopper for the card, saving one of the larger flowers for the centre stopper on the card.
I really enjoyed making this card for the lovely Erika and hope she likes it. I also made some ATCs too. Haven't made these in a while.


I heat embossed the dreamcatcher from the Dream Big stamp set with gold embossing powder and the Heartfelt Hedgehogs with my sparkle dinky inkies and then sprinkled clear embossing powder over the top and embossed. I used my sparkle dinky inkies to colour my stamps in too as well as the simple background.
 For Erika's name, I used the some past Dreamees alphabet stamps as the letters were smaller than the current Caligraphy set, although, I did use the capital E from this set.


The little card pocket I made was just to keep the cards together and I may make her more in the future that she could add to it.

These craft swaps are great and a good way of connected other crafters especially during these lockdowns where so many people have felt isolated and struggled with their mental health. 

Our design team have also been busy this month with projects of their own and there is always lots of fabulous inspiration shared by the crafters on our blog too. If you are interested,  there is a prize for the winning entry, following our theme and a badge for your blog for the top 3 runners up. Just click on the link below which will take you to our blog challenge. 

Enjoy your day whatever you are doing.

Happy Crafting


Barrel of birthday blooms card

Today is the start of our blogs challenges and at Daisy Chains, we are starting with a birthday theme so I have a barrel of blooms to share with you today.


My birthday card was made for a very special lady before Christmas, so it had to be all things Dreamees .

I went for an 8x8 tent card design on this one as I thought the front might be a little top heavy so used a 300gms white card base.
For my card I used:-
  • Dreamees A4 sage 300gsm cardstock
  • Dreamees tickled pink paper pad
  • Dreamees woodgrain embossing folder
  • Dreamees Beautiful baby sun stamp/die set
  • Dreamees Wonders Within swirl corner die
  • Dreamees Fretwork Fronds dies
  • Dreamees Endless Possibilities stamp set
  • Dreamees Stylish Shoes stamp set for the sentiment
  • Dreamees MDF window from Craft Magazine mdf set
  • Dreamees Moss
  • Dreamees white sisal
  • Dreamees 4mm coral pearls
  • Dreamees Sparkle Dinky Inkies
  • Dreamees vellum
  • craft card
  • Hobby House flat backed pearl string
  • a strip of 1mm pink organza ribbon
  • white twine
  • 3mm white pearls
  • Small piece of green card & pale green vellum
As I knew that the person I was making this card for loved flowers, there had to be plenty of them, so a cascade of blooms was what I was aiming for. I stamped and heat embossed the Beautiful Babysun flower stamps onto vellum and then used a little watermelon sparkle dinky inky on the petals to highlight the flowers, especially as I had used coral pearls in the centre of the flowers to make them stand out.
For the barrel the flowers sit in, I stamped and decoupaged it onto kraft card, using pinflair glue gel for a little dimension and inking the barrel with some dinky inky in walnut for a more aged effect. The moss was a really good filler around my pot and I then backfilled it with the foliage from the fretwork fronds and babysun die cuts.


I started to add the layers to my card and die cut the Wonders Within Swirl Corner die on the sage panel of card that would sit just off centre of the flower barrel. I added a panel of vellum to the mdf window as I wanted to trap part of the flowers cascading down behind it.

A fine flat backed pearl string along the centre on some pink organza ribbon and the little dragonfly dies die cut from a little piece of silver satin board make them look like a metal embellishment. The sentiment was heat embossed onto vellum from the Dreamees Stylish Shoes stamp set.


As you probably know by now, I don't always put a sentiment on the front of my cards. I did have space to put a happy birthday sentiment but for this lovely lady, this sentiment was more fitting.  

The rest of our design team have also been making some lovely projects this month, along with so many great crafters on our blog every month. It's always lovely to see the inspiration everyone shares. Please use the link below to take you to the blog challenge and thanks for the visit.


Happy Crafting


Wednesday, 25 March 2020

Hat easel card

The project that I am sharing today was made for a group swap and the one thing that I knew it had to include was pearls, which is what this crafty friend of mine always uses.


I have never found it difficult to think of something to make with my Dreamees products and it is so easy to mix and match whatever you have throughout their ranges as it all goes together so well.  I think sometimes we can worry too much on what to put together rather than how you want your project to look.

To make the hat for my easel card I used their Templates and More CD.  I have had this cd for many years but cds like this are invaluable and I find that I always find my way back to them, no matter how trends move on.


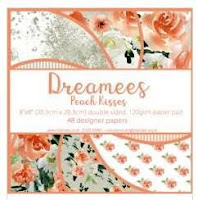
In the past, I have cut these templates out by hand but as I have a set of nested circle dies, once I printed off the template, I found I got a more precise and clean cut with the dies. I did this with 300gsm white cardstock for the hat template and the pretty peach backing papers also by the Dreamees. The peach kisses paper pad comes in an 8 x 8-inch loose leaf double sided paper pack is one of a lovely colourway collection.

 https://www.dreamees.org.uk/
https://www.dreamees.org.uk/


I made a circle easel card to attach my hat to, using the peach striped backing paper to complement the floral peach kisses papers and to decorate the white hat template.

The only hard decision I had to make when buying a paper pad, was which one, as they are all lovely and at £8.99 good value for money.

I chose the peach kisses because peach is one colour that I don't see a lot in cards and being a pink/lilac person its also a colour that I don't often lean towards for no real reason. It was when I purchased a Hobby House collection that had a mix of  pink and peach melba ribbons in my bundle that I thought, this is lush and was disapointed when I used all the peach card from my kit up.
The peach ribbon is from that Hobby House collection but the pearls are Dreamees and I had to make sure that there were plenty for Paula.


For my sprig of flowers on the topper of the easel card I have used a flower stamp that I use a lot,something stitchy with its adorable button centre that has been stamped onto a rich peachy orange Dreamees backing paper.

Decorated with some of their white pollen stamens and a "friends" sentiment from their beautiful baby sun stamp and die set.

I also like to decorate mdf and after seeing a picture on Paula's Facebook celebrating her Anniversary, I thought, what a lovely picture wouldn't it look lovely in a frame...... so after a rummage through my box of mdf (mostly Dreamees mdf) I found a set of mdf hearts that I had forgotten about.  This trio of heart mdf was from a collection called Sensational Flowers (stamps, cd and mdf). 


I printed the picture onto glossy paper and stuck it to the solid heart. I did cover the top heart aperture and the back of the solid hear the peach kisses backing paper.

I used string pearls and hot glue all around the heart to give it a prettier edge and a piece of amber ribbon to hang the heart from.


For the flowers on the heart, I chose the Dreamees pom pom flower stamps and stamped onto one of the peach kisses backing papers using smokey gray VersaFine pigment ink. Again I used some of the Dreamees white pollen stamens for the centres of the flowers. I added a good few layers to plump up my flower, gently curling the tips of the petals for a more rounded shape.


For a bit of structured foliage, I used a small piece of green vellum to stamp my leaves but this time with a stazon ink pad. Stazon is good to use with non-porous materials like vellum, glossy paper, plastic etc. Using a quilling tool (tweezers would work just as well) I curled the edges of the leaves to give them a little more shape before glueing the flowers and leaves down with a hot glue gun.


So there are my two projects. I made a box for the easel hat box to sit in and for the plaque, I had some yellow tissue paper to wrap it in.

One thing I like to do with tissue paper (unfortunately, I didn't think to take a picture of what I did) is get my stamps and decorate it. In this case, I used one of the babysun stamps and the friends sentiment stamp.


I have combined 3 stamp sets, mainly using one paper pad with the exception of a backing paper from another Dreamees cd (Pretty Pets) and I like the way you can mix the older collections with the new so easily.

Why not get involved in a craft swap. They are great fun and a great source of inspiration. You can find lots of craft groups on Facebook and blogs that offer them too.


Happy Crafting
Michelle
x

Boutique Birthday Card

I made a card for my daughter's birthday earlier this year, which was inspired by samples from this kit. When you make cards for family ...