blog backbdrop

Saturday, 31 October 2020

Hand drawn ATC cards inspired by Tim Burton characters

Its been a while since I have made some ATC cards so decided to draw a few and see where it took me. As I'm a big fan of Tim Burton, I decided to start with a few of my favourite characters and Halloween seemed a perfect day to share them.

Emily - Corpse Bride

This is the story of a shy young man who goes into the woods to practise his wedding vows for his wedding day but accidentally becomes married to a corpse bride (Emily).

Sparky - Frankenweenie

I then moved onto Frankenweenie and Victor's dog Sparky.  This is a heartwarming tale
of a boy's love for his dog. After Victor unexpectedly loses his beloved dog Sparky in an accident, Victor harnesses the power of science to bring his best friend back from the dead with a few complications.
Edgar E Gore - Frankenweenie

Victor trusts his creepy friend Edgar E Gore to keep his secret by bringing Edgar's dead goldfish back to life......but of course he doesn't. Love this film, recommend you watch it.

Jack Skellington - The Nightmare Before Christmas

I then moved onto The Nightmare Before Christmas. This is the story of Jack Skellington, the King of Halloween Town who discovers Christmas Town, but in his attempts to bring Christmas to his own town causes utter chaos. With Sally his rag doll love and the meddling Oogie Boogie. Naturally, all does not go according to plan.


Jack Skellington - The Nightmare Before Christmas


Sally & Jack Skellington - The Nightmare Before Christmas

Edward Scissorhands

Another Tim Burton classic, Edward Scissor Hands.  A story of a synthetic young man created by his eccentric inventor (like Pinocchio) but due to his father's untimely death he was not completed and is left with shears for hands.

I don't tend to make and send Halloween cards unless for a project or craft swap but love to see the imaginative cards that other crafters make, which is wonderful.


Happy Crafting!


Sunday, 25 October 2020

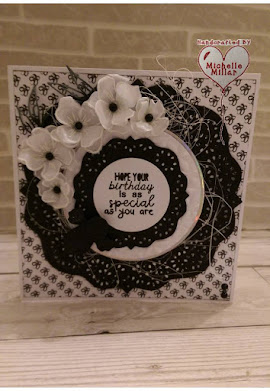
Monochrome - birthday card

Sharing a monochrome birthday card today. I really like monochrome cards and there is something striking about black and white.


Another Dreamees make today and for my 6x6 card, I have used backing paper from the sew into you cd and the sentiment from the Autumn Days stamp set.

I have used the Dreamees Loops and Lace circle dies with black colour core card and inner circle dies for the white card and a layer of silver mirri card that you can just see peaking through. The larger circle has then been embossed using the poinsettia embossing folder. This is my favourite embossing folder from the Dreamees.


For the flowers, I have stamped and heat embossed onto vellum the flowers from the Butterflies in Abundance and then added some 4mm black Dreammee pearls.

As I like making flowers, I sometimes make batches of flowers up when I get a stamp set or in the mood to make flowers and keep them in a box for later. It saves time when you are making a project to have some already made up and also to have a selection when looking for inspiration.


I have also trapped some sisal between the layer and added a die cut bee with a little foliage from the Loops and Lace embellishment collection.  Have a great day whatever you are doing.

Happy Crafting


Wednesday, 21 October 2020

Gothic 30th Birthday card

And now for something a little different.
I don't get many opportunities to make gothic cards but do enjoy making them. 
The card I am sharing today is a commissioned 30th birthday card and I have used the stunning artwork from Magik Graphics.
As this was a special birthday card, I thought that an 8 x 8 twisted easel would work really well, not only to display the artwork on the card but as a more effective freestanding card that can also fold relatively flat depending on the stopper that you use on the card.

I used 300gsm black colour core card stock for the card base and a layer of silver satin board to separate the base card from the topper.


The topper from the Magik Graphics Beliza Mortals CD Rom was chosen for the striking satin border with its steel grey lace edge. The graphics are so sharp that even when printed off, no definition is lost and you don't have to print on your full ink printer settings either, which means that you still get premium quality without using all your ink.


The striking topper for the base of the card is from the Magic Graphics Midnight Roses CD Rom. I had been given a brief that Lori's favourite colour was purple, keeping that in mind and whilst looking at the roses on the topper I remembered that I had some plum roses in my stash that would make a great stopper and compliment the ones on the card.

As crafters we often make and share between each other and one of my many talented crafty friends also loves to make flowers and some time ago  Sharon Diarrassouba made and sent me some of these gorgeous handmade roses, which I have used on a few projects. These ones were just the right colour for this project and I'm sure she will be happy to know that they have been put to very good use once again. 

On the base of the card, I used the matching insert , when the card is closed it will just appear on the back, which is better when receiving a boxed card. This time I have mounted the insert on some Hunkydory aubergine mirri card as it looked better than the silver satin board for the insert. 


If you have made a keepsake card, it also needs a nice box to go with it. The image chosen for the box wasn't in the colour they ideally wanted, but they loved the image, so  after asking permission from Susan Andrews to change the hue to lavender, I was really happy how it all turned out. I also used the Dreamees poinsettia embossing folder to line the base and lid of the box as I really like the textured effect.


The word and letter dies are by Crafters Companion and the little leaf dies are Dreamees die cut from silver satin board. Speaking of Crafters Companion, I still use my Ultimate Pro every time I make cards, along with my A3 box board. Probably my first major craft purchase and still going strong. Sometimes you just can't beat the old faithfuls can you.

I also used pinflair glue gel to stick the flowers down and it also gave the flower that I used for stopper on the card a good firm base to stick down on. The only other thing I added which is a bit difficult to see in the pictures are some metallic gems on the corners of the card base.
There is another gothic card in the pipeline but unfortunately, I can not share that at present. In the meantime, perhaps i will make a few that I can.

 Happy Crafting


Sunday, 11 October 2020

Pretty Peonies.

I thought that this weekend was going to be a wet one, good for the garden, but today turned out glorious. Never the less I had intended to get another project shared, so today it's pretty peonies.


I made this card for my sister-in-law's birthday. Using a 6 x6 inch card blank and the Dreamees Love and Lace heart die to form the central focal point of my card to place my flowers around.


I stamped and heat embossed the Dreamees Build Peony stamps with bright white opaque white Wow embossing powder onto pink cardstock (approx 140gsm). I do love this flower stamp, which I also used in my get well card. 


To give my flowers some tone to them, I added a little of the Dreamees rose chalk dinky inky before shaping and add lots of layers to my flowers.

Some white pollen stamens in the centre and for the foliage, I used the Dreamees Beautiful Babysun dies.


A few pearls to finish my cards off and a sentiment and that's really all my card needed I think. I also have to make a good strong envelop box for my card to travel through the post.


I do love to make flowers and think I will have a go at cutting some out in fabric using the biggest stamp next time I use this set. Now that would be pretty and much better if I would actually sew!!

 Happy Crafting


Monday, 5 October 2020

Get Well Soon Margaret

I have a few makes that I haven't got around to sharing for one reason or another, so I am gradually trying to get up to date and share them. As the theme for our blog challenge this month at Daisy Chains is a sketch, I thought this would be an ideal card to share with you.

My get well card was made for the elderly mother-in-law for one of my craft colleagues. 

          
She had been extremely poorly for some time in hospital and my friend asked if any crafters in our craft group would be happy to make a card and send it to her to lift her spirits for when she came home.  Margaret had a wonderful array of cards from the Dreamee Catchers on our Facebook group which was lovely and bringing a smile to her face, to the delight of everyone.

I used a 6x6 kraft card blank with a layer of the Dreamees sage green card. I printed the backing paper of the Dreamees Sew in to you cd rom in a colourway to match my flowers. 


My flowers were made using the Dreamees Build a Peony flower stamp set, which has been heat embossed using superfine gold Wow embossing powder onto some mars red pearlescent paper by Chloe Endean. Some gold Dreamees 4mm pearls finished my flowers off nicely.

For the flower barrel, I used the Dreamees Endless Possibilities stamp set. To give it a little dimension, I decoupaged the panels and inked the edges with their sparkle dinky inky in walnut. I also added some moss for texture and foliage.

Just around the oval topper that my basket of flowers sits on, I edged it with my dinky inky sparkle ink pad in treasure, just to lift the layers of card a little.

I thought it made a sweet get well card and hope she liked it. This flower stamp was an easy one to cut out, even the small flowers. 

That is one thing I love about stamps that Hayley Bignall designs, they have that uncomplicated beauty to them that makes them so desirable and adaptable.

It's amazing how something as small as a card can make such a difference. Today we do that with a quick text but it doesn't have the impact receiving a little card through your door does that simply says thinking of you....

The rest of our design team have also been making some lovely projects this month, along with so many great crafters on our blog every month. It's always lovely to see the inspiration everyone shares. Please use the link below to take you to the blog challenge and thanks for the visit.


Happy crafting!


Hello denim card

For this months blog challenge on Let's Craft and Create I am sharing a card to say Hello"
As our theme, this month is paper strips instead of ribbon, I remembered that I had bought a  card kit from Hobby House called Mia Bella. As with all Hobby house kits, you can make so much from them and they have the best collection of embellishments if you are looking for an around kit to start off with.


This is just a selection of some of the card that I am using from the collection. I will still have enough left over to make another project.


Today I am really focusing on this sheet of denim card which will form the basis of my ribbon strips.


I used the Dreamees divine doily die on the denim daisy card stock.


For my flower I used some Fleurs flower forming foam with the Dreamees Sweet Sunflowers dies.


I inked the edges of the petals with an oil pastel, scrunched and shaped the petals a little before layering them up with a tiny drop of hot glue


In the centre of the flower I added a tiny drop of hot glue to stick the little white button down.
I used a rectangular stitched dies to cut my denim faux pocket out and used the card strips to edge the as ribbon. I did the same with the centre panel. The border strip along the base of the card worked really well as a stitched hem.
A few pale blue pearls and button to match my flower for the faux pocket with a "hello" sentiment to finish my card off.

Our design team have also been busy this month with projects of their own and there is always lots of fabulous inspiration shared by the crafters on our blog too. If you are interested,  there is a prize for the winning entry, following our theme and a badge for your blog for the top 3 runners up. Just click on the link below which will take you to our blog challenge. 


Happy Crafting!


A trunk for a frog

I decided get one of those little projects sorted on my " intended to do list " and this is one of them - a trunk for a frog! I di...