blog backbdrop

Showing posts with label Steampunk Florals. Show all posts

Thursday, 16 March 2023

Vintage Birthday card

Sharing another birthday card, made for a friend. I think I am up to date on my cards for now and can take a bit of a break from cardmaking.


I wanted to make something a little bit different, so opted for a vintage look using a vintage flapper girl postcard that I spotted and was allowed to download on Pinterest. 

I used cream card and a square-shaped die along with a ribbon threader die to create the card base.


I thought that some of the papers from the Graceful Gerbras collection by Opulence by Design would work perfectly with my card and the pretty gerbera paper was printed onto white pearlescent paper from Crafters Companion that I have had in my stash for ages.
I also used one of my Tattered Lace frame dies from my stash which I die cut from a textured rose gold matte mirror card.


I like to sit and cut out my flowers whilst watching TV and then I know that I always have flowers on hand for my projects and when I am trying to decide what to use. I use a lot of smaller flowers so find it very handy to downsize enough blooms to cut out and have ready to craft with.

The flowers that I have used are a mix of pinks from Steampunk Florals along with leaves, Blue Dahlias from the Breathe collection, and rose leaves all by Opulence by Design.

I've used a mix of Stickles glitter glue and glossy accent in the centre of my flowers for different textures and I edged my petals with a Treasure gold dinky inky ink pad by The Dreamees. I use this ink pad and reinker a lot in my crafting and not sure whether The Dreamees will bring this set of sparkle dye-based essential inks back into stock.  Some of the petals I went over with a stardust gelly roll pen for a little more highlight.


Inside my card I added a coordinating insert from the paper kit, adding a little shimmer to the papers with my gelly roll pen.


To the rim of the hat of my Vintage lady, I added 3 small flowers that I thought nestled just nicely on her hat. My card has been threaded with white organza ribbon and embellished with small white pearls.

Have a great day whatever you have planned for yourself and if you've been crafting, what's been your craft table this week?  

Happy crafting


Challenges:-

Daisy Chains - Flowers
Beautiful Blossoms - Flowers 
Triple B - Blooms
Love to Scrap - ATG (Winner)
Fab'n'Funky - Vintage/Retro

Saturday, 11 March 2023

Steampunk Floral cards

I thought that I would share a few cards that I had made using the Steampunk Floral collection by Opulence by Design


On an 8x8 inch kraft card base I first  layered a piece of antique gold pearlescent paper and then for some texture, I used s piece of brown packing paper from recent Amazon delivery. This packing paper is not only quite sturdy but has a lovely ribbed texture and takes ink very well. I used my Treasure gold dinky inky from The Dreamees and was really happy with the results.

I printed out two of these design sheets so that I could cut out the metal picture frame and smaller elements, then decoupage them back onto a fresh sheet.  I used my stardust gelly roll pen to highlight the picture frame and the edges of the flowers.

I added a monocle die cut from my stash over one of the clock faces in the paper and created a metal-like sentiment using  Debbi Moore's metal magic.


Another large card and with this one I have used one of my Tattered Lace steampunk dies and my smallest embellishments to highlight its wings.

I have decoupaged the rose in the bottom left corner and cut out more of the leaves from the same design sheet as I wanted to use them around the large clock face and flowers. I also added acetate to the clockface to make it stand out more, especially as I was draping my flowers around it.


I made a few rolled roses to tie in with the pink flowers in the collection and created another metal-like sentiment that fits in with the steampunk theme.  This card is bound together with a rose ribbon to coordinate with the colour theme throughout.

Not sure we were all expecting snow in March, but there you go,  I'm glad I haven't taken the fleece off the plant pots in my garden yet, a shock to the daffodils out there!
If you've been crafting, what's been your craft table this week?  

Happy crafting


Challenges:-


Tuesday, 21 February 2023

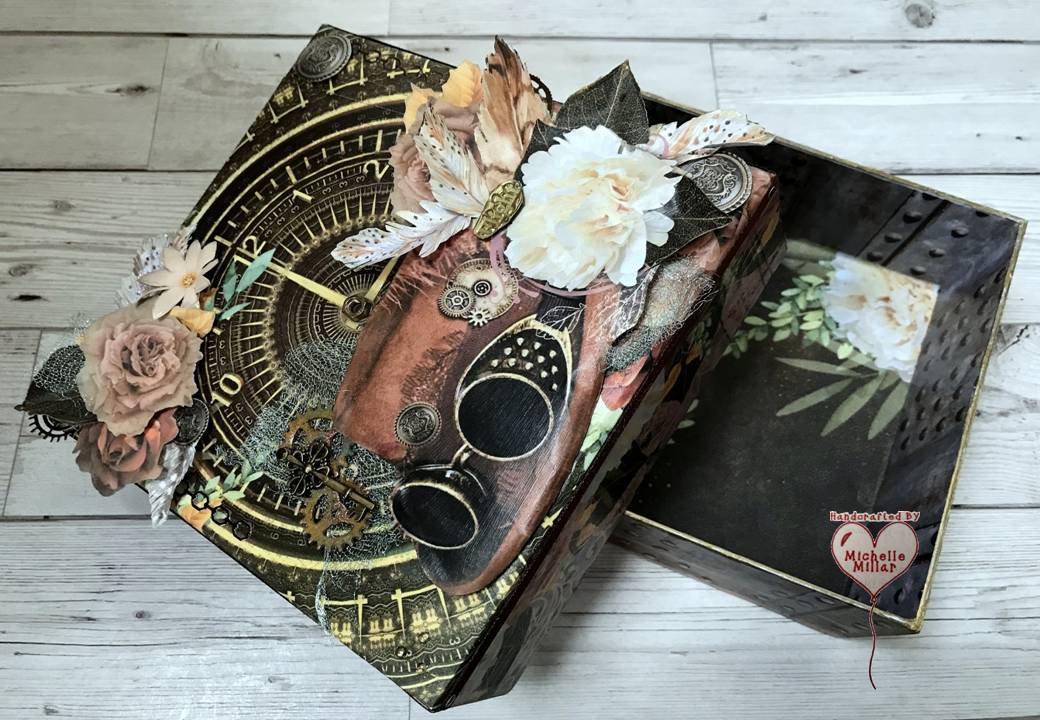
Steampunk Florals Box

Today I am sharing my steampunk themed box made using  this wonderful Steampunk Florals collection by Opulence by Design.


I was extremely fortunate to be given the opportunity to work with a kit that has been designed by Amanda Aitken for me to work with and use on my blog and I'm very excited to use this one as I absolutely love steampunk!

The papers are amazing and there are embellishments to add to your projects too. I have added a short video to show you the kit fully.


The kit can be purchased from Opulence By Designs website:-


I decided to upcycle a very sturdy perfume gift box that I had kept my handmade flowers in and make this box look more like a feature on my shelf rather than just a box in the cupboard and I had the perfect collection to do this with.

I decided to use a matte Mod Podge medium on this stunning clockface paper for the lid of the box to give it a protective layer and a better grab for the other mediums that I wanted to add to it to bring out the finer detail in the design.

I then cut into one of the design papers ( which was a difficult decision, as I always find it hard to cut into papers that I love) to create the topper for my box.


The industrial rivets made a perfect base for my box and I highlighted these with a little glossy accent to add some dimension all the way around the box.


The graphics are so defined and I love the mix of elements within the papers which are picked up in the embellishment sheets and easy to add to with your own die cuts or whatever you have in your crafty stash. I also added the matte Mod Podge to the base inside and out of the box. Finishing it off with a touch of gold wax all around the edges.


I like to build up the layers with different textures and have used glossy/crackle accent for the finer detail on the clock face, and goggles, some cogs that I had made from cardboard and aged to look rusty, and some wire ribbon which is great when you stretch it to look distressed.


I edged the flowers and leaves with my treasure gold dinky inky ink pad by The Dreamees and then very lightly edged some of the petals and leaves with a stardust gelly roll pen to add a little shimmer. 

I also like the freedom that you have to adjust the size of the papers that you want to print off to suit the project that you are making and that I can adjust the size of my embellishments, should I want to. A downloadable kit becomes a kit that never runs out and one that you can adapt to the changing way that you craft.


I have absolutely loved working with this kit and look forward to making a lot more projects with it and I'm also very honored to be collaborating with Amanda on this project.

My flowers have a brand new upcycled box that will no longer hide away in the cupboard, so if you have been crafting/upcycling, what have you been creating this week?


Happy crafting


Challenges:-
The Outlawz - I Love
Creative Artiste - ATG  (Winner)
Paper Funday - Lots of Layers
Allsorts - ATG
Classic Design - ATG  (Highly Commended Winner)


Boutique Birthday Card

I made a card for my daughter's birthday earlier this year, which was inspired by samples from this kit. When you make cards for family ...