blog backbdrop

Showing posts with label peculiar leaves & flourishes. Show all posts

Tuesday, 5 May 2020

Vintage lace card

Today's card share is a vintage lace card made with a lovely vintage postcard that one of my friends gave me. She gave me a few and said "I'd be interested to see what you do with them" So, I thought to start with I would make her a card, to let her know I was thinking of her across the miles in these uncertain times over the past few months.


I am also using my card for our theme this month on Let's Craft and Create's blog challenge. We would like you to use ribbon, lace, twine, all or some in your project this month. 

for my card I used:-

  • 5.5 inch textured deckled cream card base
  • A5 burnt orange patterned paper from stash (Tattered Lace)
  • A wide strip of cream vintage lace from haberdashery remnant shop
  • A strip of antique gold satin ribbon from stash
  • Paper doily from stash
  • Vintage postcard
  • Polka dot backing paper from a Dreamees CD printed on cream paper
  • Dreamees Something Stitchy flower stamps
  • Dreamees butterfly dies from the pretty/peculiar leaves & flourishes dies
  • Pearls


I love my Dreamee flower stamps and use them all the time
when making flowers like this for my cards. I stamped my flowers using cocoa memento ink and layered them up. I think the gsm of the card for these was about 120. You can add a pearl in the centre like I have or a drop of glossy accent to highlight the button centres. With the butterflies, I die cut them from the same backing paper as the flowers.


I added a little sparkle to the centre of the flowers with a spectrum noir clear overlay pen.


Have a look at the inspiration from the rest of the design team and what our crafters have been making for our blog challenge this month. There is a prize for the winning entry and a badge for your blog for the top 3 runners up.


Stay safe
Happy Crafting
Michelle
x


Saturday, 24 August 2019

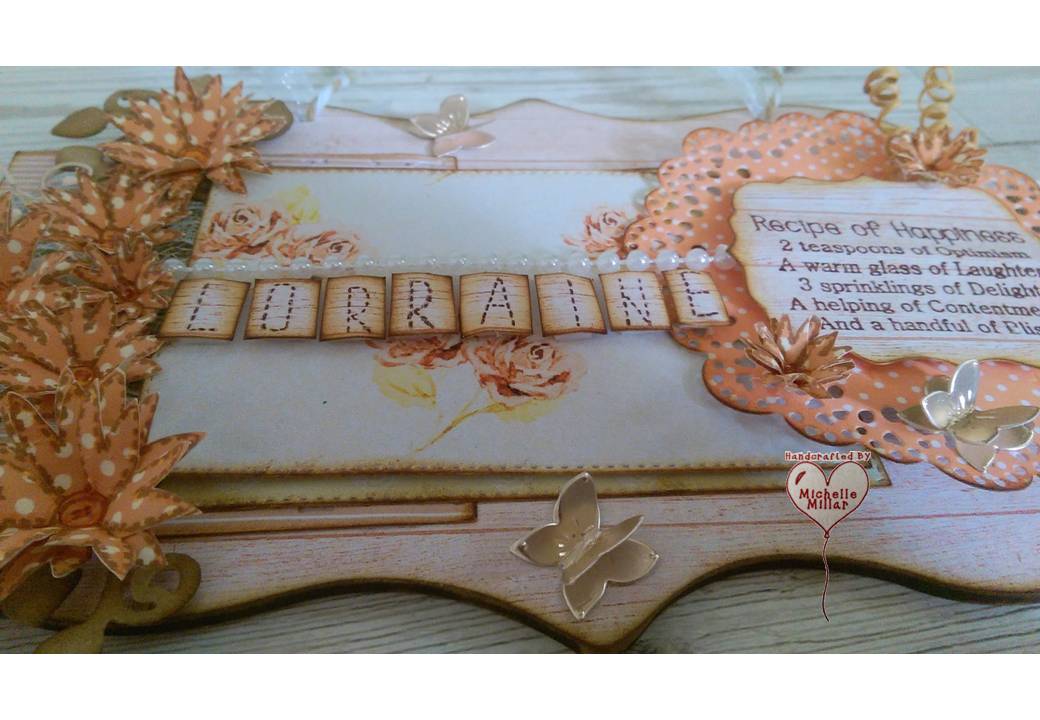
Dreamees - Recipe of Happiness Plaque

Today I thought that I would share a plaque I made as a craft swap with the Dreamees Catchers craft group.


I used the following mix of stamps and dies by The Dreamees:-

  • Stitched alphabet stamps
  • Recipe stamps
  • Something Stitchy stamp set
  • Divine Doily die
  • Pretty Leaves & Flourishes dies
  • Peculiar Leaves & Flourishes dies
  • Square lacy die set


 I also used a selection of backing papers from The Dreamees Pretty Pets & Sensational Flowers CDs. I chose tones of rich peach, a colour, to be honest, I don't use a lot or have seen much on cards recently. It makes a refreshing change to pinks and purples.

I also used:-

  • MDF shaped plaque
  • Burlap lacy ribbon
  • Pearl strings
  • Wired twine
  • bakers twine / white organza ribbon
  • Tim Holtz distress ink in gathered twigs


I covered the mdf plaque with the wood effect backing paper and used my Crafters Companion sanding block to achieve the smooth finish to my shaped plaque.  To soften the edges, I also used Tim Holtz distress Ink in gathered twigs.


I love these stitchy flowers and as you know, Dreamees stamps are a firm favourite of mine, especially their flower stamps which have an undeniable charm about them.  I layered them up a few times to add dimension.


Also adding a little glossy accent to the centre of the stamps to highlight the button detail.


The leaf  flourishes were die cut from craft card and the delicate flourishes (including the butterflies) from peach satin card.  I edged everything with the distress ink.  You can just about see the square lacy die peeking through from under the flowers as I used it as one of the layers under the backing papers.


The recipe stamps are great for projects like this.


I thought the stitchy alphabet stamps would tie in nicely with the stitched flowers and stitched rectangle dies.


I was really happy with how this project turned out, but then I do tend to wax lyrical when it comes to using Dreamees.

Happy Crafting

Sunday, 29 July 2018

Image transfer on MDF

I made a plaque for a friend using a picture of their dogs trying out an image transfer onto the mdf and thought I'd share the process with you.


I started with one of my Dreamees mdf pieces and painted it with a cream match pot that I had. I picked up a few of them from Homebase really cheap as they were discontinuing the colours. Perfect size for painting small pieces like this and easy to store as they don't take up a lot of space.

The picture was printed onto a slightly thicker gsm of paper (for colour printing) than your regular photocopier paper.  I just happened to have this paper left. It does need to be a laser printed copy and not inkjet.  If you use an inkjet print, the colours will run when you add your matt medium to it.  
I got mine printed at the local library.


I really like this DecoArt matt medium. It goes on smoothly and leaves a lovely matte finish, perfect for your journaling too.  Modge Podge will do the job too.


Give your picture a thick even coat of matte medium. You want to cover all the picture until it looks opaque.


Stick the picture face down onto your mdf and smooth down to get rid of any air bubbles. This is important as it can give your picture an uneven finish if left to dry with them in.  I used a small ruler and careful run it up an down to ensure a smooth finish.


I left it to dry overnight and then used a damp piece of kitchen roll (you can use a cloth) and just placed it over the picture for about 3mins to absorb the moisture. It may need more time, depending on how much of the moisture sinks in but don't flood it with water.


I used a piece of sponge but you could just use your finger and gently start to rub away the paper.  This takes some patience and don't rub too hard or you may damage your image. Just keep adding water bit by bit, letting it soak in and rubbing off a little more.


Once all the paper had been removed I let it settle and dry out before adding a layer of my matte medium all over the plaque just to seal it and give the plaque an even finish.


Next for the decoration. I stamped and heat embossed my Dreamees Ditsy Stitch flower stamps (the first flower stamps I purchased from the Dreamees) onto some of their backing paper and die cut some foliage from their peculiar leave & flourishes die set onto some peach satin board by Create & Craft.

Ditsy Stitch

Dreamees peculiar leaves & flourishes


I layered up the flowers and added some yellow/gold crystal gems in the centre.
I edged the plaque with Dreamee pearls and added a little yellow gingham ribbon to finish my hanging plaque off.

Happy Crafting

Boutique Birthday Card

I made a card for my daughter's birthday earlier this year, which was inspired by samples from this kit. When you make cards for family ...