blog backbdrop

Showing posts with label hanging plaques. Show all posts

Friday, 5 February 2021

Enjoy the little things hanging plaque

Todays make to share is an mdf plaque that  I made in a craft swap with the Dreamees Catchers, which is a great craft group on Facebook for Dreamees followers. I  am also sharing this for our blog challenge on Let's Craft and Create this month.
Our challenge this month is Red, Pink and or White and of course, as with all our challenges, there is an ATG option.

MDF is a great to decorate. Once you start adding your papers, die cuts, flowers and embellishments, you have a lovely gift to give someone.

This is what I used for my hanging plaque:-
  • MDF shaped 7.5inch plaque
  • Dreamees Loops square die set
  • Dreamees Loops and Lace embellishment dies
  • Dreamees Tickled pink paper pad
  • Dreamees Woodgrain embossing folder
  • Dreamees Loop and Lace flower dies
  • Dreamees mdf mason jar from craft magazine mdf kit
  • Dreamees white pollen stamens
  • Dreamees Friendship stamp sentiment
  • Dreamees 4mm hot pink pearls
  • Dreamees 6mm white pearls
  • Dreamees walnut sparkle dinky inky
  • Dreamees vellum to heat emboss sentiment
  • Kraft card
  • White textured card approx 150gsm for a few flowers
  • Taffeta dusky pink wired ribbon
  • A strip of white lace
  • A piece of 12cm pink satin ribbon to hang the plaque up
  • Natural bind wire
  • Hobby House wood buttons
The Loops and Lace die set is a fabulous collection For this project, I am only using the square shape set with the embellishment and flower dies.
I decided to matt and layer the tickled pink paper pad with kraft card and pick up the white in the paper by using a white textured card for some of the flowers.

After covering the mdf in some of the tickled pink paper and deciding how I wanted my plaque to look, I used the half border die in the set to create a double border panel to go across the centre of my plaque, adding another piece of white lace on top, building on the layers.

For the flowers, I die cut these from the Loops and Lace flower dies using the tickled pink papers and kraft card, with the foliage from the embellishment die set. After, I carefully edge them with the walnut sparkle dinky inky for a hint of shimmer and a more vintage look.


On the other side of the plaque made some textured flowers using the white textured card, by adding coiled stems from the natural bind wire and pollen stamens popping out of the little flower heads that I had made. The outline flower dies in kraft card added a spikey foliage to the spray.


I love this little mason jar from this mdf kit and was looking forward to using it in a project. I covered the jar in a little piece of tickled pink paper and then used the hearts that popped out of the flower dies to make cookies for the cookie jar.
The little bees from the embellishment die set were die cut from a small piece of white pearlescent card and silver glitter card. I carefully tore a piece of vellum to fit the place I wanted the sentiment to sit and heat embossed the sentiment with silver super fine embossing wow powder from one of the Dreamees early friendship stamps.

I popped the two flower shaped wooden buttons at the top of the plaque and after I added the pink satin ribbon to hang it up, my plaque was ready to send off to Sonja.

I really enjoy crafting for others, especially when it's something that they are not expecting. Crafting is all about sharing your inspiration with others.

Our design team have also been busy this month with projects of their own and there is always lots of fabulous inspiration shared by the crafters on our blog too. If you are interested,  there is a prize for the winning entry, following our theme and a badge for your blog for the top 3 runners up. Just click on the link below which will take you to our blog challenge. 

Happy Crafting


Saturday, 24 August 2019

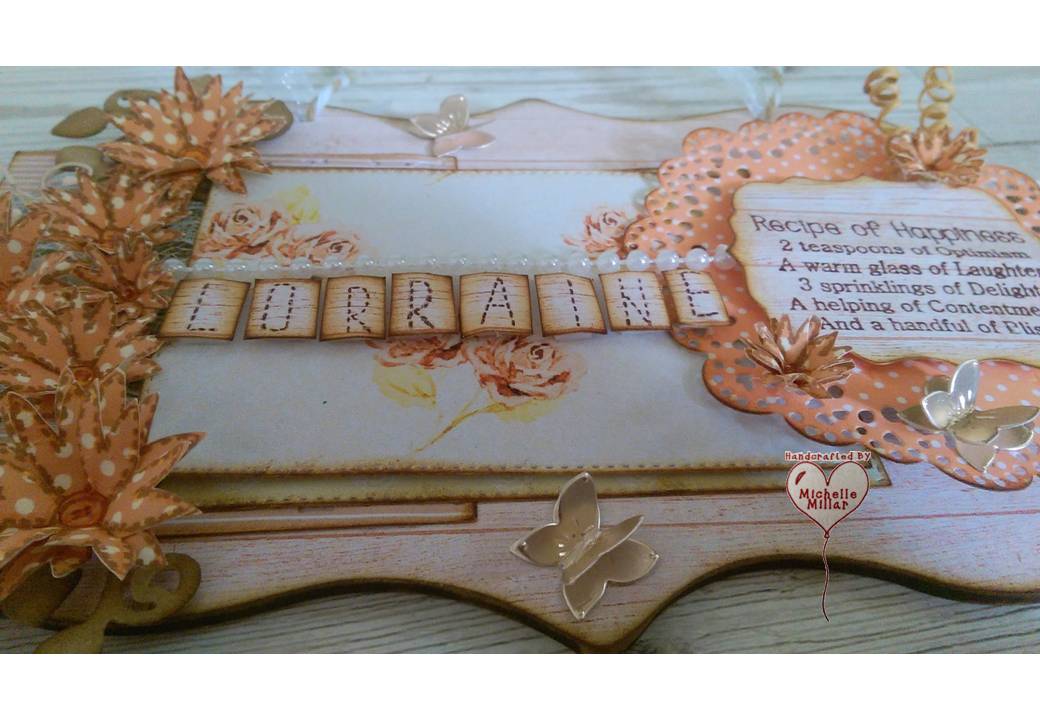
Dreamees - Recipe of Happiness Plaque

Today I thought that I would share a plaque I made as a craft swap with the Dreamees Catchers craft group.


I used the following mix of stamps and dies by The Dreamees:-

  • Stitched alphabet stamps
  • Recipe stamps
  • Something Stitchy stamp set
  • Divine Doily die
  • Pretty Leaves & Flourishes dies
  • Peculiar Leaves & Flourishes dies
  • Square lacy die set


 I also used a selection of backing papers from The Dreamees Pretty Pets & Sensational Flowers CDs. I chose tones of rich peach, a colour, to be honest, I don't use a lot or have seen much on cards recently. It makes a refreshing change to pinks and purples.

I also used:-

  • MDF shaped plaque
  • Burlap lacy ribbon
  • Pearl strings
  • Wired twine
  • bakers twine / white organza ribbon
  • Tim Holtz distress ink in gathered twigs


I covered the mdf plaque with the wood effect backing paper and used my Crafters Companion sanding block to achieve the smooth finish to my shaped plaque.  To soften the edges, I also used Tim Holtz distress Ink in gathered twigs.


I love these stitchy flowers and as you know, Dreamees stamps are a firm favourite of mine, especially their flower stamps which have an undeniable charm about them.  I layered them up a few times to add dimension.


Also adding a little glossy accent to the centre of the stamps to highlight the button detail.


The leaf  flourishes were die cut from craft card and the delicate flourishes (including the butterflies) from peach satin card.  I edged everything with the distress ink.  You can just about see the square lacy die peeking through from under the flowers as I used it as one of the layers under the backing papers.


The recipe stamps are great for projects like this.


I thought the stitchy alphabet stamps would tie in nicely with the stitched flowers and stitched rectangle dies.


I was really happy with how this project turned out, but then I do tend to wax lyrical when it comes to using Dreamees.

Happy Crafting

Wednesday, 30 January 2019

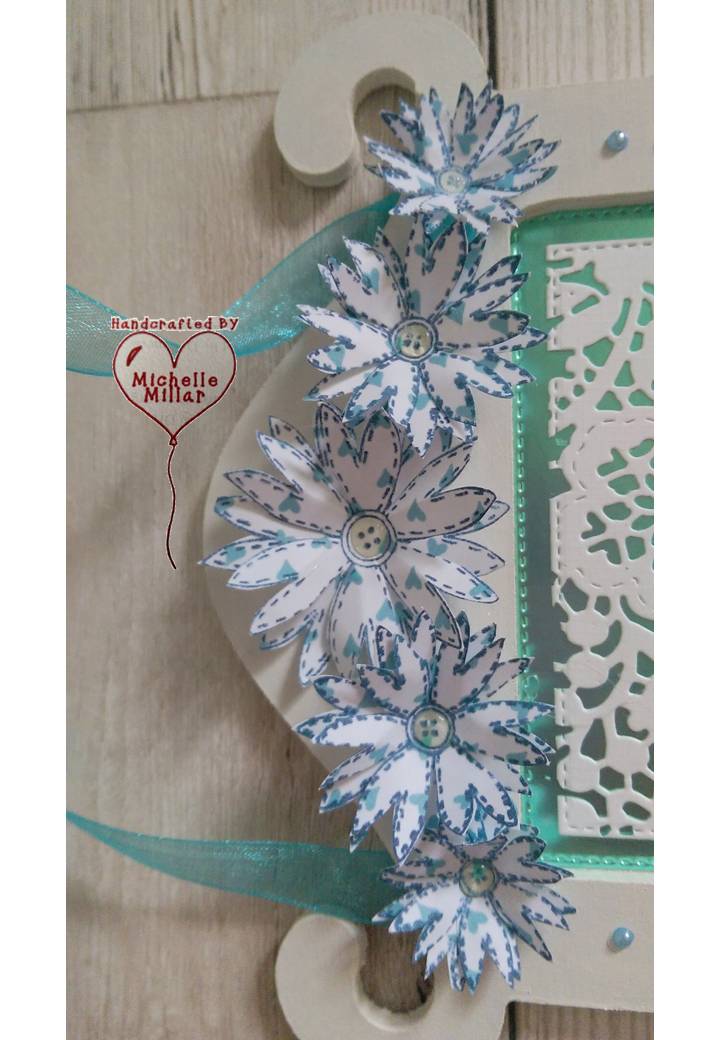
Dreamees MDF Hanging Calendar plaque

Sharing an mdf hanging calendar plaque made with Dreamees products for a group swap.


Using some of the mdf from the Dreamees Pretty Pets collection, I painted it with some white chalk paint. For the centre panel of the top part of the plaque I layered a piece of Create & Craft satin board with part of the Dreamees square lacy divine die.  I thought that a photograph could also be easily added to this section if wished.

The bottom mdf  panel was then layered up with a layer of card using paper from the Something Stitchy paper pad and a plain piece of white card, which has both been die cut using a stitched die. The calendar was then added using a thin line of double sided tape, so a new calendar could easily be added the following year.

For theSomething Stitchy stamp set with those adorable button centres onto backing paper from the Dreamees Pretty Pets CD.  I also added some glossy accent to the centre of the flowers.

flowers I stamped the Dreamees


I added some coordingating organza ribbon, Dreamees pale blue pearls, a tag with a sentiment from one of the Tattered Lace stamp sets and a heart charm.


I usually add a handmade bookmark when sending my group swap project, but this time decided to make a little card.  I do love Dreamees products.  Always inspirational and pretty, with the best flower stamps out.

mdf and cd used for this project

Someting Stitchy
lacy panel from Square Divine die set


Happy Crafting


Decorated MDF Gift Boxes

I had a few small MDF gift boxes sitting in my craft box for a long time, waiting to be decorated, so I thought it was time to use them. For...