blog backbdrop

Monday, 11 May 2020

Jazz it up birthday card

Today I thought I'd share a birthday card that I made for my brother in law.  As he loves his music I thought this stamp set would be perfect to use.


The Stamps set I used for my card is the Jazz it Up by Visible Image. I heat embossed the main Jazz it Up stamps with black embossing powder and slightly overlapped the saxophonists.


I used glossy accent on the bubble stamp to give it more dimension.
The background was created with Tim Holt distress oxides in abandoned coral and salty ocean.


With a little background stamping with a Crafty Individuals distress diamonds rubber stamp and some frayed burlap distress oxide. 

I stamped the keyboard border and attached it to some foam tape to add more dimension.


I love making backgrounds for cards and find that when I make a men's card I tend to turn to my stamps. I love Visible Image stamps, they are always that bit different and quirky as well as being excellent quality.


Happy Crafting
Michelle
x


Tuesday, 5 May 2020

Vintage lace card

Today's card share is a vintage lace card made with a lovely vintage postcard that one of my friends gave me. She gave me a few and said "I'd be interested to see what you do with them" So, I thought to start with I would make her a card, to let her know I was thinking of her across the miles in these uncertain times over the past few months.


I am also using my card for our theme this month on Let's Craft and Create's blog challenge. We would like you to use ribbon, lace, twine, all or some in your project this month. 

for my card I used:-

  • 5.5 inch textured deckled cream card base
  • A5 burnt orange patterned paper from stash (Tattered Lace)
  • A wide strip of cream vintage lace from haberdashery remnant shop
  • A strip of antique gold satin ribbon from stash
  • Paper doily from stash
  • Vintage postcard
  • Polka dot backing paper from a Dreamees CD printed on cream paper
  • Dreamees Something Stitchy flower stamps
  • Dreamees butterfly dies from the pretty/peculiar leaves & flourishes dies
  • Pearls


I love my Dreamee flower stamps and use them all the time
when making flowers like this for my cards. I stamped my flowers using cocoa memento ink and layered them up. I think the gsm of the card for these was about 120. You can add a pearl in the centre like I have or a drop of glossy accent to highlight the button centres. With the butterflies, I die cut them from the same backing paper as the flowers.


I added a little sparkle to the centre of the flowers with a spectrum noir clear overlay pen.


Have a look at the inspiration from the rest of the design team and what our crafters have been making for our blog challenge this month. There is a prize for the winning entry and a badge for your blog for the top 3 runners up.


Stay safe
Happy Crafting
Michelle
x


Fairytail card

For this months blog challenge over on Daisy Chains, I have made a card using the Twilight Kingdom fairytale collection by Hunkydory for my DT card.


As the theme this month is "Tic Tac Toe," my DL card has flowers, silver metallic pearls and butterflies to follow a line of the theme.


I have had this cardmaking kit for some time and made a lot of cards from it. The Twilight Kingdom cardmaking kit is a lovely fairy tale collection in hues of pink, purple and teal with everything from toppers, cardstock sentiments and coordinating inserts for your cards. I have just added a few extra embellishments.


For my card I used one of the A4 printed pieces of cardstock with a silhouette scene of butterflies in long grass and cut it down to size for my DL card.

As the toppers were already shaped and backed with a black border, I didn't actually have to do anything else but add some black foam tape that I have to the back for some dimension.

I added this really pretty black paper rose handmade by my crafty friend Sharon and some fine black & silver ribbon.

The small metallic silver pearls just gave the card a bit more of a twinkle.


I added one of the matching inserts to my card which are really pretty and finish a card off nicely. I gave this birthday card to my niece.

Have a look at the inspiration from the rest of the design team and what our crafters have been making for our blog challenge this month.


Happy Crafting
Michelle
x


Wednesday, 15 April 2020

Duo Dies Stash Launch

Following the launch of the Duo Dies Stash collection on Create & Craft TV  today, I am sharing my samples for the show.

With the Star of Bethlehem die, which looks like a lilly, I tried to use different mediums with this lovely flower to do it justice simply because I am not a colourist, so it gave me a good excuse to get my mica powders out.


 So on black card, I used my metallic mica powders and was really happy with the result, which gave flower a rather exotic look and totally different texture look to them as well.


I made this card into an acetate tent fold card with a vellum layer.


 Then I found some rather coarse lemon vellums, die cut it and made some flowers out of it using the outline die.


 I curled the tips of the petals with a quilling tool (a pair of tweezers would suffice) and thought this looked more like a dog rose. I used the same die to make the leaves.


And for a more traditional look a sympathy card which I think this die really lends its self to perfectly.  Those type of cards we always find difficult to send.


I have used a white pearlescent card for the lilly. The white Star of Bethlehem would also look lovely on a celebration card.


 Then we have our Body die and here are a few ways that she could be used. 


These dies have been paper pieced. A collection of smaller cards, neater cards.


I did think that this hamster was really cute and particularly liked the daisy die that he was holding and liked that it was also a separate die.  I did some colouring on this one with promarkers.


I made a small stepper card our of a card blank and decided these daisies needed a little colour in their life.


With this Call me die, I coloured the white card with promarkers, adding some glossy accent to the dial and black card to the background die. I made a simple background for my telephones to sit on.


Here, I have paper pieced the telephone for this invite.


A small stepper card just to say "Hello"


I combined Call me die with the You're my type die for a more masculine card. Snipping into the telephone to change the shape and adding glossy accent to the typewriter keys also.


I used chocolate centura pearl cardstock for the telephone and typewriter also a little gold satin board for the dial.


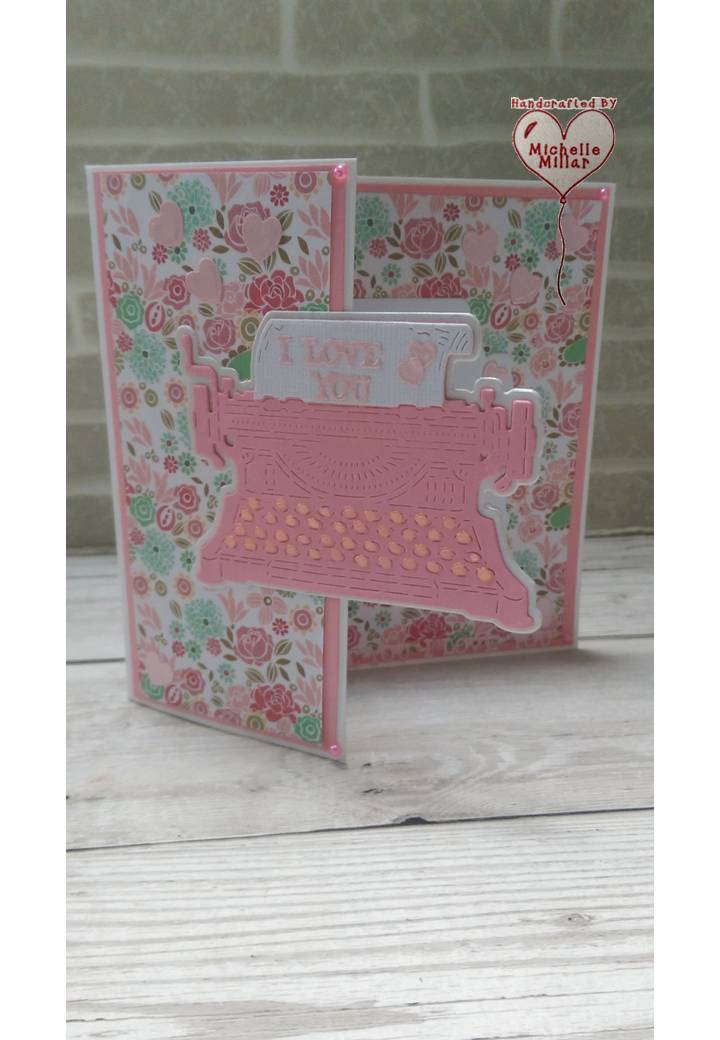
A CAS just to say "I love you" using that rustic typewriter You're my type die. The die comes with a mix of bevelled heart and the wording.


Using pretty backing papers and paper piecing again for a more feminine card. 


I hope you've enjoyed some of the inspiration from this collection of dies. Something a little different is always refreshing.


Stay safe
Happy Crafting!

Kindness Postcards

I love a postcard; they come in all shapes and forms, from a reminder of where you have been to a hello friend, but unfortunately, they are ...