blog backbdrop

Friday, 30 March 2018

Gothic Arch - Butterfly Entomology

 My first gothic arch for a group swap with the theme of "wings".  I used TIm Holtz distress oxide inks for the background and Crafty Notions fusible film and angelina fibres to make the butterflies for my Butterfly entomology gothic arch.


I used a piece of kraft card measuring  6  x  4 inches, shaped into an arch.
Tim Holtz distress oxides in:- wild honey, twisted citron, antique linen and lucky clover.


I gradually layered up my colours until I got the mottled background that I was looking for.


I decided to use a combination of the following stamps to background stamp my card:- 

Visible Image music on, world off  (ink splat)  & mesh-ellaneous  (distressed mesh)
wooden block red rubber border stamp
wooden block red rubber stitched square stamp


I found some info on butterflies which I printed onto cream paper and aged the torn edges with a little Tim Holtz vintage photo distress ink.  This will make my centre topper for the arch. I also used some button (slightly translucent) washi tape and some gift wrap twine.


I used the stitched square block to stamp onto parchment paper using memento ink. These will form the plaques the butterflies will sit on.


Now the base for my entomology gothic arch has been put together, adding 4 enamel embellishments, all that's missing is the butterflies.

.


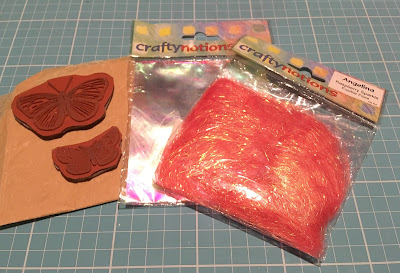
To make the butterflies I used some red rubber butterfly stamps (I think these were by Crafty Individuals), Crafty Notions fusible film in crystal aurora, angelina fibres in raspberry sparkle and a piece of baking parchment.


First I inked my stamp with jet black stazon ink and placed a layer of the fusible film onto the stamp.  Be careful not to move the film around and smudge the inked stamp.


Add some fusible fibres and and place another layer of the film on top. Alternatively, make a sandwich of the film and fibres first and then place it on your inked stamp.


Place your folded baking  parchment on top and using a warm iron ( I have a small iron I use just for crafting) press down for 5 seconds, lift an repeat, rather than running the iron along the stamp as you don't want to smudge your embedded image.  This process is a bit of trial and error to gauge what works for you, so have a bit of a play first before creating your project.


I kept checking to see how well my butterfly film and fibres were fusing together whilst using the iron. As I wanted a more translucent look on the butterfly wings I only used a a small amount of the fibres, spreading them out between the film.


I cut my butterflies out and layered them up, using a little pinflair glue gel to stick them together in the centre.  When the light hits them you get all the colours of the rainbow in an iridescent glow.


I used some pinflair glue gel to stick my butterflies onto my gothic arch.  Im really happy with the outcome.

Adding this project to the That's Crafty - Spring into action challenge
Also the Mix It Up - ATG with a twist - create your own background
And  Creative Artiste - ATG Mixed Media


Happy Crafting


Thursday, 29 March 2018

Tetrus Card - using Retro Gamer Imagine Design Create Stamp Set

Thought I'd used the Imagine Design Create Retro Gamer stamp set to make my brother's birthday card as I remember us playing Tetrus on the first Nintendo Gameboy, so it was that theme I was going for.


To make this card I used:-

  • Imagine Design Create - Retro Gamer stamp set
  • A4 Crafters Companion Centura Pearl in Royal Blue
  • Tim Holtz distress oxide inks
  • A5 black cardstock (you wont need it all)
  • 2 large black flat back pearls
  • black peel offs (a lot of crafters still have these in their stash)


These are the Retro Gamer stamps by Imagine, Design, Create.  I have cut the card and used a corner punch on the edges. For the button I have used a little piece of Hunkydory mirri board.


As I have been using my oxides a lot I thought this was a really easy way to colour the Tetrus blocks. I swiped swatches onto stamping card and then heat embossed the blocks using black embossing powder. The blocks are left with that lovely chalky texture.

I have used peacock feathers, seedless preserves, twisted citron, salty ocean, candied apple and lucky clover.


All cut out and ready to place. I have used salty ocean to stamp the Retro Gamer.


Once I decided where I wanted my blocks were to go I stuck them down along with the other elements for my Nintendo Gameboy themed card.  I used the black peel offs around the edge of the black card to define the screen and foam pads to raise the Retro Gamer and main button.

I made a hinge to join the card together and printed an insert to go in the card with a personalised verse of my choice.


I used some glossy accent on the Retro Gamer to give it a more rubbery look to the title.


This game brings back memories!

Happy Crafting


Friday, 23 March 2018

Space Invaders Card - using Retro Gamer Imagine Design Create Stamp Set

  Male cards can be a bit of a challenge when you are after something a little different so was pretty impressed with this stamp by Imagine Design Create.   I have previously made a set of ATCs using this stamp set.


 This is what I used to make my card:-


  • Retro Gamer stamp set by Imagine Design Create
  • C6 size piece of heat resistant acetate
  • A5 black cardstock
  • A4 purple card from the Hunkydory Twilight Fairy A4 cardstock (its a misty purple)
  • Tim Holtz salty ocean distress ink
  • Wow bright white superfine embossing powder
  • Versafine clear ink pad


First I stamped and heat embossed the little space invader onto the acetate using my stamping platform (as it makes it a lot easier to line them up) and the superfine white Wow embossing powder.  It's also advisable to use an anti-static bag on the acetate to get rid of the stray flecks of embossing powder that particularly love acetate!  I also used a corner punch on the edges.


Then I stamped the fire button and wording I needed using the salty ocean distress ink onto white stamping card.  I wanted this card to be a little dimensional, so with some black card, I made half a box for the button, space bar, and the title.


I intend to stick these to the card using sticky pads.


For the space background, I used the same salty ocean distress ink with a little water and then tapping the pipette (hence the mess) scattered the droplets across the black card.


 Dab of the excess with a paper towel to leave a pale ghosting of colour to the card


 Then for the twinkling galaxy, I used some blue metallic mica powder mixed with a little water and then spritzed onto the card. This gave a more sparkling tone to the card still leaving the ghosting in the background.


Once dry I could then start to build my card.  I used some black fine peel offs I managed to find in my crafty stash to edge the black card nicely and define it a little more as a computer screen.
 I used a little (glue) tape runner on the edges of the acetate to stick it to the card. The tape runner actually merged into the background of the card so the glue wasn't visible.  I used foam pads to stick the boxes I had made to the card along with one under the fire button to add some dimension.


Something a little different for a male birthday card or retro gamer.

Happy Crafting


Sunday, 18 March 2018

Spring Card for Easter

My 2nd DT card this month is a Spring Easter card for Let's Craft and Create.  A decoupaged posy of yellow flowers.


To start this project, this is what I used:-
  • 6 x 6 white card blank
  • 6 x 6 white card to die cut
  • Green gingham backing paper from one of the Dreamees cd roms
  • Dreamees square lace die set (available on Create & Craft )
  • Stamping Up Lotus Blossom stamp set (retired - but available on ebay)
  • Docrafts Xcut mini gift tag die
  • Lemon organza ribbon
  • Papermania adhesive gems
  • Dreamees Dinky Inky ink pads


I used the three stamps to define the flowers using the Dreamees new Pearlescent dinky inkies in mustard. It's difficult to capture the shimmer of these inks at this angle. I also used one of their Autumn winter green inks for the stems.  I then cut them out ready to decoupage.


Normally I would stamp these straight to the card but decided to see how they would look decoupage to create some different dimensional flowers.


This square lace die comes with 3 dies.  An outer frame (13cms) a fine square die (9cm) and inner lacy panel (8.5cm). As I wanted the frame and lace panel to form a layer on my card, I left out the middle die. This detailed die cut perfectly with my Sizzix.


Using a quickie glue pen and some glitter I added some sparkle around the edges and to areas of the lacy panel.


Then I layered up all the elements


The inspiration behind this spring card came from my beautiful yellow tulips.


Happy  Crafting


Added to the following challenges:-

MAWTT - Easter
Pink Gems - Easter Time


Birthday Card - Bright Lights Isabella Cardmaking Kit - WOYWW

I'm sharing another birthday card made for a friend and  I have used the travel the world through paper Bright Lights - The Isabella Col...