blog backbdrop

Monday, 27 February 2023

Graceful Gerbera Birthday Card

A quick little card to share today, another birthday card made in advance for my neighbour who loves flowers so I thought that this card would be perfect for her.


I loved the large beautiful white gerberas on this Graceful  Gerberas kit, they really jump out of the papers and topper in this kit by Opulence by Design Crafts. There is a selection of toppers and sentiments along with a set of pink/cream backing/collage papers for you to choose from.


I've been stocking up on my paper too since I have been using more downloadable crafting. I use an Epson Eco tank colour printer which I have been very happy with as I find it very economical on ink and for printing and for a while I have been using A4 Navigator white paper (250 sheets) for colour documents (in the orange wrapper) which is 120gsm.

It's a nice smooth paper, lovely for flower making and I buy it from Wilkos which often has it on offer. It is very popular though.  The other slightly thicker card I use is Hobbycrafts A4 white smooth card 160gsm (100 pack). Lovely for toppers. I think you have to try a few out and see what works for you.

There are lots of different texture papers around that these papers would look gorgeous printed onto.


I used an 8 x 8 card base for my card and used a ribbon threader die so that I could weave a little rose taffeta wired ribbon under the topper. I also used my stardust gel pen to highlight the gold splatters already on the design and added a matching insert inside my card.

My neighbour is so kind, when she gardens, she digs up little clumps of pinks, lilies french marigolds or whatever is growing in her garden at the time that she thinks I might like and pops them on my doorstep. Her husband used to do the gardening but unfortunately, that's down to her now.

I'm looking forward to getting back into my garden and sorting my little greenhouse out.
If you've been crafting, what's on your craft table this week?  

Happy crafting


Challenges:-

Allsorts - ATG (option matching) - matching insert
Let's Craft and Create - Use a Sentiment
Crafty Calendar - Add ribbon


Tuesday, 21 February 2023

Steampunk Florals Box

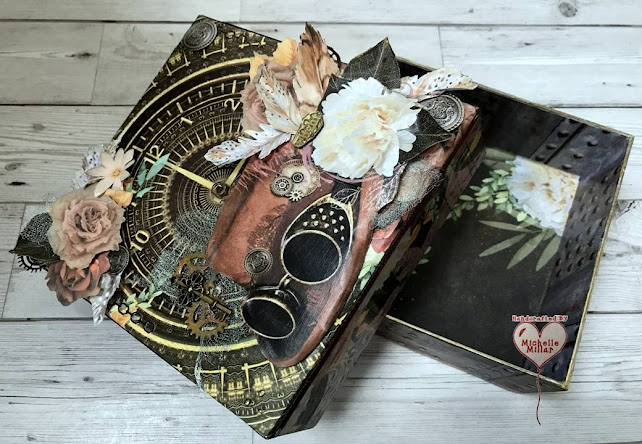
Today I am sharing my steampunk themed box made using  this wonderful Steampunk Florals collection by Opulence by Design.


I was extremely fortunate to be given the opportunity to work with a kit that has been designed by Amanda Aitken for me to work with and use on my blog and I'm very excited to use this one as I absolutely love steampunk!

The papers are amazing and there are embellishments to add to your projects too. I have added a short video to show you the kit fully.


The kit can be purchased from Opulence By Designs website:-


I decided to upcycle a very sturdy perfume gift box that I had kept my handmade flowers in and make this box look more like a feature on my shelf rather than just a box in the cupboard and I had the perfect collection to do this with.

I decided to use a matte Mod Podge medium on this stunning clockface paper for the lid of the box to give it a protective layer and a better grab for the other mediums that I wanted to add to it to bring out the finer detail in the design.

I then cut into one of the design papers ( which was a difficult decision, as I always find it hard to cut into papers that I love) to create the topper for my box.


The industrial rivets made a perfect base for my box and I highlighted these with a little glossy accent to add some dimension all the way around the box.


The graphics are so defined and I love the mix of elements within the papers which are picked up in the embellishment sheets and easy to add to with your own die cuts or whatever you have in your crafty stash. I also added the matte Mod Podge to the base inside and out of the box. Finishing it off with a touch of gold wax all around the edges.


I like to build up the layers with different textures and have used glossy/crackle accent for the finer detail on the clock face, and goggles, some cogs that I had made from cardboard and aged to look rusty, and some wire ribbon which is great when you stretch it to look distressed.


I edged the flowers and leaves with my treasure gold dinky inky ink pad by The Dreamees and then very lightly edged some of the petals and leaves with a stardust gelly roll pen to add a little shimmer. 

I also like the freedom that you have to adjust the size of the papers that you want to print off to suit the project that you are making and that I can adjust the size of my embellishments, should I want to. A downloadable kit becomes a kit that never runs out and one that you can adapt to the changing way that you craft.


I have absolutely loved working with this kit and look forward to making a lot more projects with it and I'm also very honored to be collaborating with Amanda on this project.

My flowers have a brand new upcycled box that will no longer hide away in the cupboard, so if you have been crafting/upcycling, what have you been creating this week?


Happy crafting


Challenges:-
The Outlawz - I Love
Creative Artiste - ATG  (Winner)
Paper Funday - Lots of Layers
Allsorts - ATG
Classic Design - ATG  (Highly Commended Winner)


Thursday, 16 February 2023

Say it with flowers

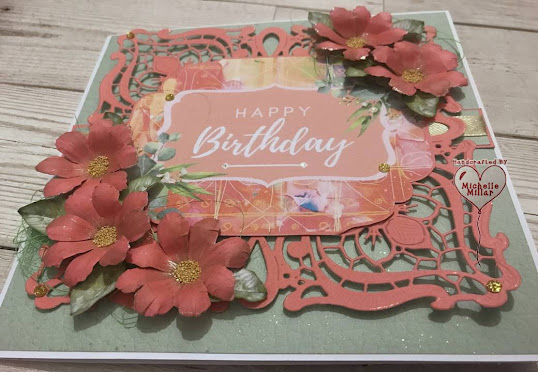
 Another birthday card to share with you today made for a friend.


I used a 7 x7 inch card blank for this card as I knew I could fit my one of my favourite lacy panel dies perfectly on it from my Tattered Lace stash.


I chose this Happy Birthday Cardmaking Topper collection from Opulence by Design because I love the flowers and the colours in this kit go so well with these beautiful toppers too. 

As I have mentioned before, I find these flowers easy to cut out.  They don't have a solid cut line around the petals which allows you to give them a more natural shape rather than following a hard line. 

This set comes with two more plain A4 pain papers which I'm saving for another project and I am using a shade of green from my stash for the background on this card.


I used a stardust gelly roll pen to add highlights to the middle of the flowers and added gold prills to the centres. This was a tip that I picked up from Amanda Aitken, in one of her YouTube videos. I also added some rose petals from her website too. Give them a little scrunch and they look so life like and have become so handy when I've needed foliage to accompany my flowers. 


On the green layer of paper, I splattered it with some of my treasured gold dinky inky Reinker by The Dreamees to leave a hint of gold behind on the paper itself which already had a faux texture on it.


The fact that I can resize the toppers and flowers from this kit to fit what I want to make stretches this kit further and it becomes a kit that never runs out.   I can add to this as everything I use works with it, which is why I have been using more downloadable crafting, it suits how I craft now.

If you are interested in more inspiration from Opulence by Design and love making flowers as I do you can follow her on  Youtube https://www.youtube.com/@opulencebydesign/featured

If you've crafting, what's on your craft table this week?  Have a great rest of the week.

Happy crafting


Challenges:-
Paper Funday - ATG/Lots of Layers
Unicorn - Birthday 


Sunday, 12 February 2023

Broken ATC cards

I really enjoy making ATC cards and it has been a while since I've made a themed set, so I thought I would have a play with these from Gecko Galz and enter them into their monthly challenge.


I really liked the way they had been designed and thought I'd cut them up and layer them up to add a little dimension and then add glossy accent and distressed Stickles glitter glue for texture.


A little bit of stenciling and mesh ribbon behind the heart. The distress Stickles leave a more rustic gritty shimmer on the rocky base of the heart and I added a little glossy accent to the exposed corner.


Highlight around the heart to bring out the dimension and glossy accent in the centre.


Raggerty heart left abandoned to the elements.

I cut up the wording and attached it to some embroidery thread and cut the heart up and then re-joined it together again.

If you're crafting, what's on your craft table today? Have a great day whatever you have planned for yourself

Happy crafting


Challenges - 
Geko Galz - ATC 
Arty Divas - ATG - (Spotlight Winner)
Paper Funday - ATG /twist add layers


Saturday, 11 February 2023

Steampunk Box

I have finally finished another project from last year and I can now put my Steampunk themed box to some use.


The wooden box itself came from The Works, they have a great selection of boxes to craft with and often have various sizes on offer, which is a good time to buy them. They are pretty decent quality for a lightweight box too.


I love LOVE steampunk! There is so much inspiration from Stamperia for their Captain Vagabond collections, sometimes you don't know where to start yourself but I absolutely love this image on one of their rice papers that I have used to cover my box. I haven't gone over top with the decoration because I loved the rice paper too much.


I made the cogs last year after watching a great craft live from Leonie Pujol. She is an amazing inspirational artist. So, I cut up my cardboard soup packaging ready to die cut my cogs and mixed a little sand into my gesso for an uneven gritty texture. 


I didn't have any rust paint so I found a set of mini acrylic paints in a box that my son had left (I think they were from The Works) just perfect for mixing small amounts of paint and when dry I added the copper wax which finished them off nicely. I was really happy with how they turned out.


I used some of the plastic embellishments from the Captain Vagabond collection to decorate the box but used the rice papers all around and edged the box in white gold wax.


After I had varnished the box, I noticed 2 large drips at the back which had dried hard which I really liked, so I added a little white gold wax to highlight them even more. If I had tried to create these, you can bet it would have gone wrong.


I kept the inside quite simple by painting it in a neutral colour with just that striking rice paper design down the centre.


The glossy accent on Sir Vagabonds' glasses worked very well and I used crackle gel on the clock lens on his hat.  I feel the need to do another box now! I love mixed media and really don't do enough of it.

If you're crafting, what's on your craft table today? Have a great day whatever you have planned for yourself

Happy crafting


Challenges
Mix it Up - ATG no stamping
Crafts Galore Encore - ATG  (Design Team Favourite)


Sunday, 5 February 2023

90th Birthday card

My friend asked if I could make her a card for her Aunt's 90th Birthday so this is the card that I made.


I have made this style of card before that my friend has chosen and I have die cut the front of the 7 x 7-inch card using a frame die from one of Tattered Lace's Petals of Lace collection.


I have also used the matching charisma papers (which I believe you still can download some free samples from their website for your dies)  to die cut the roses for my decoupaged topper, which isn't too fiddly to do, compared to some.

I stamped and heat embossed both sentiments for the aperture centre but had to rely on die cuts for the rest.


I also used backing papers from the collection that I had and mounted the topper on foam pads so that it would stand proud. I used my sakura gelly roll pen in stardust to highlight areas of the paper to give it a little shimmer.  I can't recommend these pens enough. I'm not a huge fan of using loose glitter, I love my Stickles glitter glue but the pens I use all the time as they give you a little shimmer here and there where sometimes sparkle can be a little too much. Unfortunately, it doesn't always show up in my photos to show you.


As this style of card doesn't really have a place to write your message unless you don't mind it showing through the design, so I made a panel on the back which I think looks a lot neater.


Of course, the card needed a box, so I used some more of the design paper on the front of the box and lined the inside with some plain pink paper, overlayed with an embossed topper using one of the Dreamees embossing folders. I also highlighted areas of the printed paper on the front of the box with my gel pen, which just shows up in the picture above.

What a special birthday to reach and I hope that my friend's Aunt receives lots of cards to mark her memorable day.

I have another project to finish off from last year so hopefully, that will be my next post.
What's on your crafting table today? 
 Have a good day whatever you have planned for yourself.
Happy crafting


Challenges:-
Let's Craft and Create - add a sentiment
Love to craft  - ATG 
Mix it Up - ATG
Allsorts - ATG
Crafty Catz - Female Birthday

Cute Paws Birthday Cards - WOYWW

Today I am s haring a pair of birthday cards made earlier in the year for twins. I'm also joining up with the weekly  WOYWW  group link ...