blog backbdrop

Tuesday, 29 December 2020

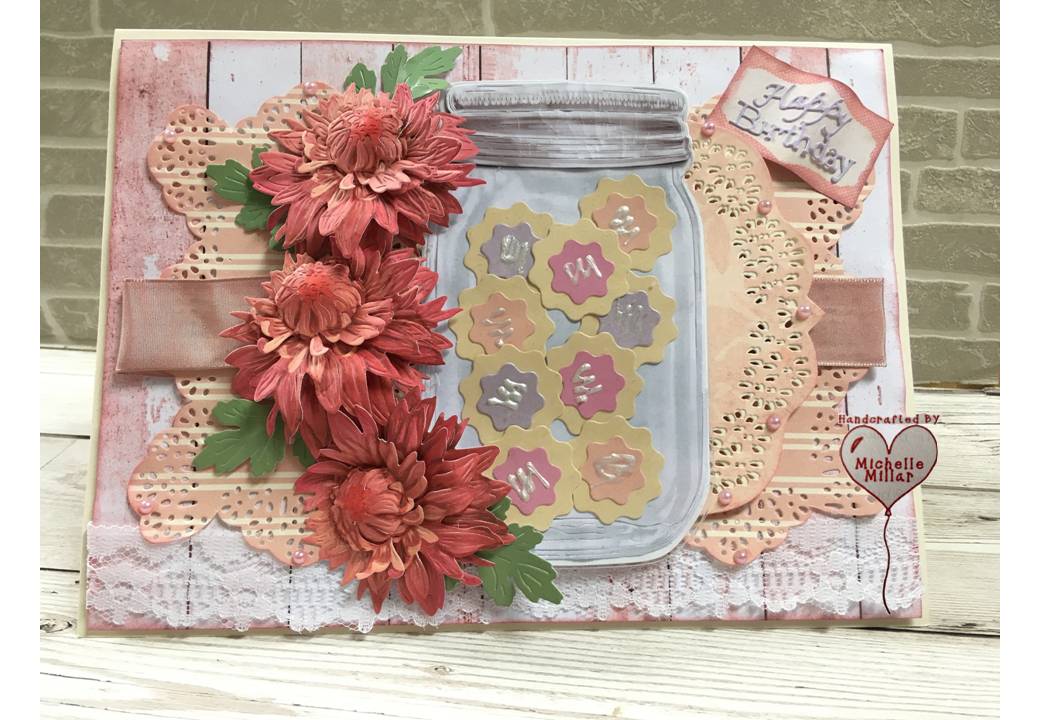
Cookie Jar flowers Birthday card

 My card today is one with cookies and flowers, two things that I love and this one was made for my sister in law a few months ago.
Last year I sent it to their old address my mistake, as they had just moved and this year, I nearly forgot to put an insert inside, as I always add a personal verse inside. Next year perhaps, I will get I right.

I wanted to use these beautiful chrysanthemums from the  Tattered Lace Pressed Rose collection because not only are they huge as die cut flowers go but they look so life like too. I added the foliage from some Fleurs dies that I had which matched these flowers perfectly.

I also used the mason jar from the  Grandmas Kitchen collection by Tattered Lace, along with the two smallest dies from their cookie cutter die set for my biscuits, then added a little swirl of pearl drops for icing on the top. I also die cut an acetate panel for the front of my jar to complete the look.

The backing papers were printed onto some cream velvet card from my stash using the Grandmas Kitchen USB collection. This paper just gives my card a more textured feel for my shabby chic styled card. I then used the large lacy circle Lace die by the Dreamees along with their oval border die to make the panel for another layer.


A little white lace and dusky pink taffeta ribbon between the layers and sentiment in the style of a recipe label (also from the usb) to finish the card off with some rose pearls.

.

I thought it would be a change to add a sentiment to the front of one of my cards.
I was attempting to make smaller cards earlier in the year but the size is creeping back up as I do like making 7 and 8 inch cards when I have flowers to add to them.

Fortunately, I was able to give her the card this year as we saw each other before the second lockdown. I think we are all hoping for better things next year or even an improvement on this year at least, but more importantly, stay safe, healthy sane where possible ......
   Happy Crafting


Thursday, 24 December 2020

Butterflies in Abundance Birthday card

Good morning, sharing a birthday card that I made earlier in the year but just haven't got around to posting it. This one was for one of my friends birthdays.

My 7-inch card has been planned around a sketch design with a splatter across the centre. I've kept the card mostly monochrome with just an accent of dusky pink in the ribbon, pearls and little flowers on the butterfly wings.


Sketches are great for planning your cards and very useful when you want to use up your backing paper by matting and layering shapes for your card.

For my flowers,  I stamped and heat embossed the flower stamps from the Dreamees Butterflies in Abundance set onto vellum using bright white Wow embossing powder.


I did the same for the large butterfly. This is a gorgeous butterfly stamp and so detailed along the edge with delicate flowers.

I used a panel of white pearlescent card which I had passed through the Dreamees corrugated embossing folder and then splattered it with a little carnation 2nd gen sparkle dinky inky reinker.  The colour of the ink was a good match for the taffeta ribbon that I was going to use on the card.

The papers for my card were chosen from one of the Dreamees CDs and I mounted them onto black card to define the layers before putting the card together.

I added some white sisal between the topper and the butterfly for some texture and used some silver mist reinker dinky inky mixed with a little water in my water brush to add a little shimmer on the edges of my flowers.

As this was going to be delivered by hand, I didn't have to worry about it getting crushed in the post. Where an envelobox  isn't deep enough, I make a box for my cards and also add a personal verse inside as I tend to leave a sentiment off the front of my cards where I feel there isn't a specific place for one.

Enjoy your day and Merry Christmas .
Happy Crafting


Tuesday, 22 December 2020

Daydreamer Birthday card

 A stamped birthday card to share today and not a flower in sight with this one. This was a birthday card made for my Niece's birthday.

For a change, a 6x6 card using the  Daydreamer stamp set by Visible Image which I have coloured with promarkers and used glossy accent on her glasses to highlight the lenses.


I masked my stamp and used a brick stencil with distress oxide inks by Tim Holtz, along
with some second generation stamping in the background.


Its a really nice stamp and Visible image have great sentiments to compliment all their stamps that are not just very inspirational but very original too.

Short and sweet today, I have a few makes that I haven't got around to sharing yet.
Have a good day, whatever you have planned.
Happy crafting.


Sunday, 20 December 2020

A Little Princess Birthday card

Today I have a princess birthday card to share, which was made for my friend's little girl.


From an A4 300gsm cream colour core card, I have made a gatefold card for my card base and used one of the backing papers from the Tattered Lace enchanted collection downloads front panels and inside of my card.


I added a personal verse and the dancing mice from the same collection using the having a fling die and the matching charisma papers.


For my princess castle, I used the 3D castle die from the  Tattered Lace Enchanted collection with cream colour core card and cerise card for the turrets. Great detail on these tower dies and I've used the flowers and foliage from the collection to embellish as a forest/secret garden around the castle.

The domed towers give just the right amount of dimension and not too much to make it a problem to go it the post, which is something I have to think about now when I make card unfortunately as there have been occasions when they haven't survived the journey too well.

Another one of those die sets and collections that I will get plenty of use out of which is always great.

Happy Crafting


Thursday, 17 December 2020

Raymonds Snowman

Today I am sharing a little Christmas decoration made using the Raymonds digi stamp set for December from the Progressive Challenge on Imagine that digistamp.
This month's free digi stamp set download with the progressive challenge is really cute and perfect for a winter birthday for a child as it also has sentiment to compliment that but I have used the digi stamps to make a winter mobile to hang in the window of my porch.


I enlarged the Let it snow digi stamp disc and placed Raymond in the middle, with the Celebrate Winter sentiment, just above his head. I coloured Raymond and his truck in with promarkers, adding my stickles in frosted lace for some snowy texture.

I made the accompanying snowflake discs smaller. As this was going to be hung up, the other side of my winter mobile was going to just show the snowflakes which are so pretty.


I've displayed it on my tree to take the picture as it will show up much better and look a lot more festive......as well as not keep moving while I try and take a picture.

Funnily enough, it was the Christmas ribbon from my stash that gave me the idea to make a hanging decoration, as I thought the blue beads and wooden star matched the snowflakes so well.
I used my stickles in frosted lace also on the snowflakes and the really make them twinkle when they catch the light. 

There is some lovely inspiration on the blog challenge from other crafters who have also joined in the challenge this month which is always great to see everyone's spin on making something using the same material. That's what crafting is all about.
Happy Crafting


Saturday, 5 December 2020

Festive knit card

Today's card on my blog is the second of the festive card in preparation for the Christmas season and with the last blog challenge of the year for us at Let's Craft and Create we celebrating it with a traditional festive theme.

When I made my card, I had just received my new Autumnal embossing folder by the Dreamees  - cable knit. These 6 x6 3D embossing folders leave a lovely embossed detail to the card and I think this embossing folder is going to be my new favourite as it can be used with so many projects throughout the year.


On my 300gsm card base, I used sage card from the Dreamees followed by some rich colour core red card from my stash, saving the 250gsm cream colour core card for the top. The design of the folder resembles my jumper, so I got the idea to thread a piece of wool through the card to make it look as if the robin was pecking it. (probably not the best choice of colour to photograph).


I used the Little Red Robin stamp set from last Christmas and coloured this little fellow in with my Dreamees watercolour pencils. Adding a little foliage from a mix of a few more past stamps from the Dreamees, the Fall & Foliage leaves stamps and an acorn from the Winter Woodland stamp set. 

I stamped the holly leaves using the Sketched & Shaded Pointy flower stamps using the sparkle 2nd gen dinky inkys in crocodile but as my card is quite dark, it's not very visible in the picture. 

The sentiment has been heat embossed with white embossing powder using one of the sentiment stamps from the Santa Paws stamp set and I have also used the smallest oval dies from the Dreamees Loops & Lace die set.

I had some stitched red ribbon that matched my red card that was just right to sit behind my holly. 

No flowers on this card and I have deliberately kept this one quite simple. As I have a love of nature and I feed the robins that nest in my garden all year round, it seemed very apt to finish this year's challenge including one on my card.

Our design team have also been busy this month with projects of their own and there is always lots of fabulous inspiration shared by the crafters on our blog too. If you are interested,  there is a prize for the winning entry, following our theme and a badge for your blog for the top 3 runners up. Just click on the link below which will take you to our blog challenge. 

Happy Crafting


Friday, 4 December 2020

Autumnal Wishes

Greetings! The card on my blog today is an Autumnal one which was made for my friends birthday.

Even though I'm always drawn to pinks and purples, I do love the colours of Autumn and with the beautiful paper pads from the Dreamees, in particular, this one I have used today, Autumn Haze, I made a decision to swap flowers for Autumn leaves.


One of my well used Dreamees stamps sets, the Fall & Foliage; which has been stamped onto some coordinations Tim Holtz textured card stock that I had left in my stash, then inked around the edge for a more natural looking leaf.

I find the Dreamees precision scissors a godsend for cutting these out.   Even though I find cutting out a struggle these days, as a crafter who loves making their own flowers and creating a project from scratch, giving up something you love doing is the last resort, so, you wind it down a dozen notches and just go with the flow.


Cut Bun was stamped on craft card. I love  Hayley Bignall's style of drawing all her character stamps and flowers they are simply adorable.


Using the Loops and Lace doily die with one of the design papers from the Autumn Haze paper pad, I added the leaves in a semi circle with a few for the bunny to sit on.


I also added a textured layer by using the Make an Impression Corrugated Embossing folder also by the Dreamees with some coral card that had been inked with the walnut sparkle second gen dinky inky.


My 8x8 card has a kraft card base and I have added some purple frosted berries from my stash purchased in a bundle of lovely colours by Anna Marie at a Craft Show a few years back some plum 4mm Dreammee pearls to finish my card off.

Enjoy your day whatever you are doing.
Happy Crafting


Hollywood Glamour Birthday Card

I made these birthday cards a few months ago, ahead of time, as I knew I wouldn't be crafting for a while. For my card base, I used a 7 ...