blog backbdrop

Monday, 26 September 2022

Hello Autumn

 As Autumn breezes in, I've decided it's time to put my flip flops away for another year but I don't mind as although I'm not a fan of the colder days, Autumn is my favourite season.

Perfectly timed, I have just finished my Autumnal tag, which will become part of a monthly project that I am working on.


On the tag I have used a mix of wood grain paper and this great Autumnal leaf paper from one of the Dreamees CDs in my stash. This cute little owl is also a digi image, which is ideal as my colouring isn't very good.


There is something very satisfying about stripping the inside of a padded envelope and knowing how useful that will become one day......something only a crafter will understand ha ha !!    That envelope padding provided a vital piece of texture for my owl to nestle on.

I then added some pre-stamped and cut maple leaves along with a few die cut foliage and some digi foliage from one of Hayley Bignall's older CDs.


I've added a little Autumnal verse and a few more leaves to the 6 x6 inch wood grain page that has now also been finished to accompany my tag and some velco corners to attach it to the page.


I love the changing colour of the leaves on the trees..........and as I'm drinking my coffee and looking into my garden, that familiar tufty tail of the squirrel, digging up my garden and leaving by bulbs for me to pop back in the soil......

Have a fab day whatever you have planned for yourself.

Happy crafting


Challenges:  fabnfunky - Autumn 

Thursday, 15 September 2022

August Memory Book Pages

I have August's memory book pages to share from last month and these have already been sent to my swap partner as part of our Dreamees group swap.  


I started with a bunch of lavender using the Dreamees lavender dies from the Nature's Garden Collection and their recipe of happiness sentiment. 


I thought this trellis die looked a little like one that you could get in a garden and with some green sisal behind, it gave a softer illusion to the background. 


On the adjacent side, I created a little folder using a piece of music paper that I found in my stash.  When I was cleaning my stencil after making a project, I  didn't want to waste the texture paste that was left over, so I made some prints on pieces of card which came in very handy as I used one of these brick stencils behind my hyacinth stamp. To add a little more dimension to it I added some tiny blue die cut flowers and some moss to the pot.


I also added a little tag using one of the Dreamees digi stamps from the CD Roms that they used to make and my usual ATC card that I normally include with my swaps.


On the flip side, I chose the peach kisses paper pad. A gatefold page with a pop-up behind the doors and on the adjacent page an open envelope of tags.


I stamped one of the little fairy mushroom houses and added it to the centre of my page.


I managed to get two larger tags (just) in the envelope. I sometimes get carried away decorating and forget about the space I have to fit things into. I used little stamps and dies on the coordinating papers from this pad.


On this tag, I used one of the very early Dreamees stamp sets,  the Elegant Dress, simply because when I was looking through my tray of stamps, it was right at the bottom looking all forgotten. The top layer of the mannequin dress has been stamped and heat embossed onto a small piece of vellum. These projects are ideal for using up all these small pieces in your craft box that you don't want to throw away.

Throughout my project, I've added Stickles glitter glue to highlight, and the addiction grows!! There always seems to be a cool colour that I think I might need and then I spot the new Distress Stickles!!

Have a fab day whatever you have planned for yourself.

Happy crafting


Wednesday, 7 September 2022

Lavender card

 Sharing a lavender card made for a friend, with a little bit of a difference today.


I recently purchased a lovely lavender stamp/die set from the Dreamees Natures Garden collection and decided to have a play with my air dry clay to see if I could get a decent cast from them as I already knew that they looked beautiful stamped and die cut.


It was a little fiddly and takes a little patience but I was happy with how they turned out.
The Das clay turned out pretty well but if you want something feather light for your cards I would recommend that you use something like Hearty.


To colour my flowers I used my Dreamees dinky inky reinkers . I mixed the Orchid and Eclipse chalk reinkers for the lavender blooms and for the stems I used the reinker sparkle in crocodile.  

As I like to get the most out of the inks that I use on my projects, I found that mixing a little clear acrylic bindex into my dinky inkies allows me to use them on a lot more projects. The one that I use is a Pebeo studio acrylics brilliance that I bought in Hobbycraft. It's great to use as a matt medium to seal your projects too and also to add to your mica powders to make your own metallic paints. 

Have a great evening

Happy crafting


Wednesday, 3 August 2022

July's Memory Book Page

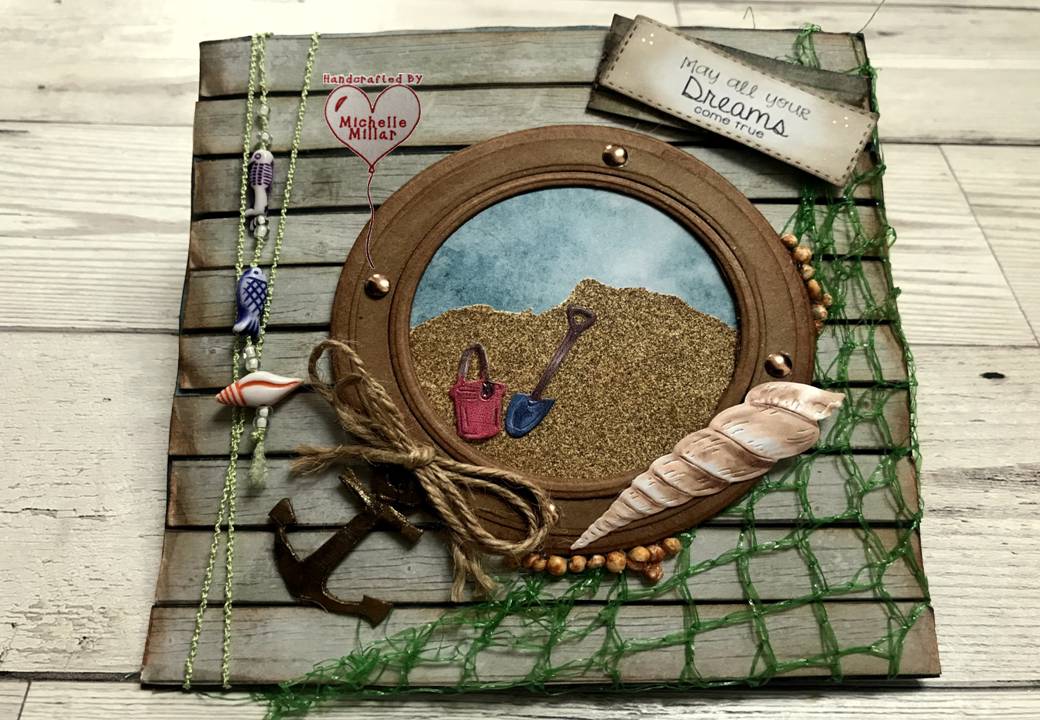
I am sharing July's flip-flap memory book pages for our Dreamees monthly group swap and I have gone for a beach summer vibe on these.


For my first page, I created a pocket for my 2 beach hut tags using their shed stamp which converted nicely into a beach hut, and on the adjacent side a seaside theme canvas with a porthole view onto the beach.


I created an inky background using distress oxide inks and gave my beach huts a slightly distressed finish using my chalk dinky inkies. I found a few beach themed embellishments that I had in my stash from Tattered Lace which worked really well and added a few pieces of clip art that I found online.


I used a piece of fine sandpaper that I had leftover from another project to cover the front of the pocket to mimic a sandy beach and add a little texture too along with the teeny shells. The crab was one of my Tattered Lace die cuts which I also inked to sit on the backing paper that has some background stamping, a little hard to capture in the photo.


For my second page, I cut the driftwood backing paper up into slats, inked, and backed it onto foam tape before sticking it down, leaving a slight gap between each slat.

To make the porthole, I just used varied sizes of my nested circle dies using kraft card and some bronze enamel embellishments to finish it off.

I still wanted the porthole to look a bit more rustic so I added some barnacles which I adapted using polystyrene balls, ink & glue. These had fallen out of my son's lap tray that I had glued back together and the darn things get everywhere.  You think you have got rid of the ones you don't need and they come back! So I used some.  The fruit bag netting always comes in handy for this sort of crafting too.


Sometimes you need a particular embellishment for a project and you can't find one the right size to fit so I went online and found a free clip art, printed it out and then traced it onto cardboard twice (the grey cardboard from the back of notepads).  Once gessoed, I added a little paint and wax and it looked just as good as a metal embellishment.


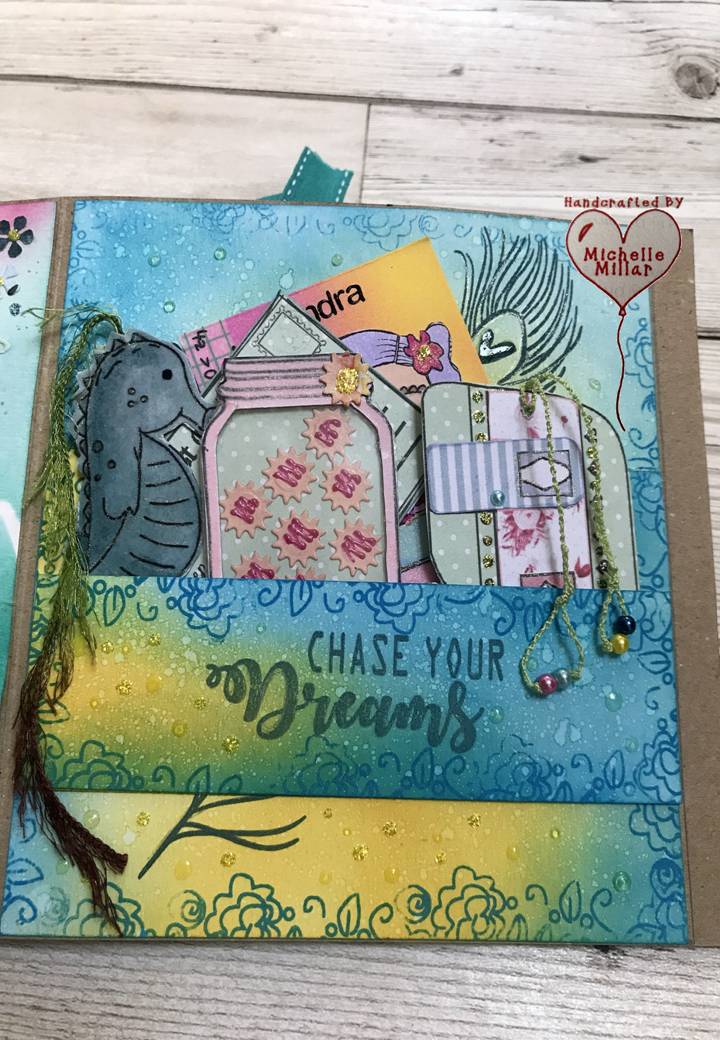
On the flip side of the pages, the beach theme continues, and I decided to recreate on one of these pages, a summer vibe card that I had made for my friend using the mdf camper van from the Dreamees mdf embellishment sheets.  On the adjacent page, I have created another pocket with some mini tags and the ATC card that I normally make and add to my swap partner's pages.


For these 6x6 inch flip flap memory book pages, I find it easier to create each page and then stick them into the kraft card base once they are finished.

For the background, I used my all-time favourite stencil,  Daisy by Visible Image with distress oxide inks. I also used a mix of my smallest Dreamees flower dies and the Summer Breeze paper pad to decorate the camper van. I love this paper pad and have used this throughout this project as the colourways fit perfectly. The lustre reinker dinky inky by the Dreamees is perfect for getting that chrome finish on your mdf.


A little glossy accent in the middle of the daisy is all that's needed, such a lush stencil and distress oxides are my favourite go to ink.


For these flip flap book pages, I use a lot of digi images from past Dreamees CD roms. They are easy to resize and print onto their design papers which also come with sentiments too.


I created the background for my page using distress oxide inks and then added some stamping 


The little double sided seahorse has been heat embossed with clear embossing powder for a smoother texture and the jar of cookies has an acetate front. The caravan has been decopatched and decorated with stickles glitter glue and the postcard has a stamped image of cute giraffes on the reverse.


Another ATC to add to this project before sending it off to my swap partner. These Kokeshi dolls are really cute by Vera Lance Studios. I love her digi stamps. Well, that's another set of flip flap pages complete for this month.

It's certainly been a hot summer so far and by the look of it there is still more summer sun to come our way.

Have a fab day whatever you have planned for yourself.

Happy crafting


Saturday, 2 July 2022

June's Memory Book Page

 Today I am sharing June's flip-flap memory book pages for our Dreamees monthly group swap.  


With all the excitement of the celebrations for the Queen's Platinum Jubilee, I decided to theme the first page around it using some of the Dreamees past digi stamps from their CDs along with their flowers which I also colour coordinated and cut out.  I made the teacup just big enough to fit a fruity tea in for my swap partner to enjoy.


Behind the teabag is a topper of the teapot and I created a little tag with the sentiment "enjoy the little things" stamped on the reverse.


I added Stickles glitter glue to the hearts to make them ping and created some miniature bunting with a free download that I found online for the Jubilee celebrations, this also doubled up as bunting on my window too! Just peeping out under the bunting is a foil crown topper, which I found in my stash. This is my Jubilee afternoon tea page, all that is missing is the cake!


To follow on, my next page I was just going for pretty and decorative. I used the Dreamees luscious purples paper pad and mushroom card with the corrugated embossing folder. The little clock face was another one of their digi images of a CD and I made the little rosettes from textured cardstock.


On the flip side of my pages, I chose a shabby chic vintage page and a pressed flower theme. The vintage page was my favourite page to do as it was the beautiful photograph that I came across, belonging to my swap partner that set the theme for this page.


The coco lace paper pad was perfect for this page and I wanted to create a lacy vintage postcard, surrounded in pearls. I do love old photos, memories encapsulated in time and this is such a beautiful photograph.

I also used one of the Dreamees templates from their CDs to create the camera and made a mini-album, which sits in the pocket above.


I used a really pretty Crafters Companion frame die from my stash which worked really well to create the frame for my postcard and kept the decoration light and pretty so not to take the focus away from the picture.


I created a mini flip album and added these photos which I have been given permission to show on my blog. Every picture tells a story and evokes a memory, whether it be of special people in your life, a place you have been, a time you shared, or something you had. It's the memories that we carry in our hearts.  There is something magical about old photos.


On the flip side of the photos, I added a few quotes:-

a photograph is the pause button of life
live every moment, love beyond words, laugh every day
memories are timeless treasures of the heart


For my final page, I decided to go for a pressed flower theme as know my swap partner likes gardening.
I thought that the lavender in my garden was looking pretty good and earlier this year than normal, so matched it with the aquamarine paper pad for the page.
I also pressed a little geranium(Rozanne) one of the flowers that originally came from my mum's garden. A pretty little flower that used to fill my mum's flower beds and now grows in my own garden.


I die cut lots of little flowers out of the same paper and decorated the two pressed flower tags that I had created. I think that I should have used white card for the background on my tags instead of kraft card but never mind. I also created a little flower envelope and filled it with a confetti of tiny flowers.


Finally, the little ATC card that I make and add to the project before I send it off and it's Akimi this time, one of the Kokesh Doll digi stamps by  Vera Lane Studios.

I have enjoyed making these pages for my partners every month and this vintage page has been my favourite page to make so far.

Have a great day, whatever you have planned for yourself
Happy crafting


Tuesday, 14 June 2022

New Home Plaque

I thought I'd share a new home plaque that I have made.


The majority of what I have used for my project is by the Dreamees, although I was inspired by the mixed media style from Pretty Gets Gritty.

I covered one of the large mdf baubles with aquamarine design paper which has also been stamped here and there with a script stamp.

I then added and gessoed the mini frame to form the centre point of my plaque. For an extra layer, I included this great brick die by Pretty Gets Gritty which has been cut from grey board and also gessoed.


I wanted the flowers to look distressed and stay firm. I chose these festive fretwork frills because I like their shape and textured petals. I mixed these in with a few divine florals.
All the flowers were dry brushed with gesso and then I added a little of my new favourite colour, one of Andy Skinner's artist pigments in Prussian blue.

The Letter dies have also been die cut out of greyboard twice and gessoed before adding some Stickles in frosted lace. I love my Stickles glitter glue.

As for the bunnies and I had to add these in for this particular project, they have been made using my stamps and air dry clay. To get that shimmer, I gave them a coating of white pearl drops.

I have added a little key and some seed beads here and there and that's my mixed media plaque finished.

Have a great day, whatever you have planned for yourself
Happy crafting


Hollywood Glamour Birthday Card

I made these birthday cards a few months ago, ahead of time, as I knew I wouldn't be crafting for a while. For my card base, I used a 7 ...