blog backbdrop

Saturday, 7 September 2019

Birthday card for a Friend

I thought I would share one of the birthday cards I made recently for a friend


For my card I used:-


  • Dreamees Something Stitchy flower stamps set
  • Dreamees Something Stitchy backing papers 
  • Dreamees Pretty Pets cd for blue gingham backing paper
  • Dreamees Divine Doily die
  • Duo Dies Nested circles
  • Sentiment stamp from Dreamees Designer Blooms 
  • Dreamees Friendship Recipe stamp
  • Tonic card stand die
  • Tattered Lace String Doily dies
  • Dreamees mint pearls
  • a piece of blue lace
  • Tattered lace bumble bee die cut
  • Tattered lace maidenhair fern die cut
I used snow white centura pearl for the card base and layered the doily dies onto the cardstock
I love this something stitchy flower stamps set with its button centres which I stamped onto the gingham backing paper. I also used a little glossy accent on the centre of the flowers.


The sentiment on the front of the card was heat embossed with silver superfine Wow embossing powder onto the same pearlescent card and the recipe sentiment stamped inside using black versafine ink.  The rest of the elements were added to complete my card.


As this is mostly a Dreamees card, you can find most of the items that I have used on their website.

To accompany my card, I also made a box using 12 x 12 card from one of  The Works design paper pads.


Entered in the following blog challenges:-

Mix it Up ATG option twist 3D
Papercraft Challenges  Handmade stamped flowers


Happy Crafting


Thursday, 5 September 2019

Oriental Birthday card

Sharing my DT card for the challenge over on Daisy Chains Blog Challenge this month with the theme  "Autumn is coming."


I love Debbi Moore's collections. There's something for every genre when crafting. The images from her many collections are crisp and vibrant as well as being good quality.

I particularly love the bookazines and have had many over the years, which are packed with papers and projects, even including a free gift. Great value for money.  This project was made from an Oriental one, Issue 3, which I have had for a good few years and still have some left.


My card is A5 in size with half of the front cut away. I backed the topper on cream card and attached to the front.


The base of the cream card has been matt and layered with black colour core (lightweight) card and gold matt mirri card. I used the lovely backing paper for the front and inside.


As I had some sumi paper, which has the look and feel of Japanese paper, I wanted to add some texture to the inside of the card to match the backing paper. I used my printer to copy the backing paper onto the sumi paper and it worked really well.  If you wet the edge of the paper slightly, you can tear/ feather the edge for a more natural look. I used my spectrum noir sparkle clear overlay pen to highlight the edges.


Sumi Paper is available from Create & Craft as a pack of 20 sheets but I'm sure there are many other craft retailers out there that stock it.


I added a gold tassel, saved from an old make up bag (I'm always saving bits and pieces like this) and embellished the card with some flat backed white/gold pearl strings by Hobby House. Hobby House have the most amazing embellishments. The button embellishments from the magazine were ideal as a brad for the tassel which I had wrapped around the edge of the topper.

Debbi Moore always gives you more. Take a trip to her page and download some of the wonderful free projects to get you started.


Have a look at the rest of the design teams inspiration for this month over on Daisy Chains as well as the blog entries.


Happy Crafting


Pop up male birthday card


Sharing my DT card for the challenge over on Let's Craft and Create blog this month with the theme  "add some extra layers" using a pop up football birthday card.


I used a template to make the card shape, which fits onto an A4 piece of card.  Then using a selection of papers from my stash with some mirri card, I created the layered panels for the card


I also added my card verse to the back panel  Using the Tattered Lace Pop up Celebrations 2 football dies from the collection I randomly glued them to the panels inside.


 I have used the matching charisma papers with the dies for this make but they look just as good using your own cardstock as with all Tattered Lace dies, they are easy to paper piece to achieve the look you want.


The good thing about these shaped cards is that they fold relatively flat to go in the post. Obviously the more you add to it the chunkier it will be. For lots of dimension, for example, when adding lots of flowers, it would be better to make a gift box.

Have a look at the inspiration provided by the rest of the design team on Let's Craft and Create Blog this month and the entries for this months challenge.  There is a prize for the winning entry.

Happy Crafting

Saturday, 24 August 2019

Dreamees - Recipe of Happiness Plaque

Today I thought that I would share a plaque I made as a craft swap with the Dreamees Catchers craft group.


I used the following mix of stamps and dies by The Dreamees:-

  • Stitched alphabet stamps
  • Recipe stamps
  • Something Stitchy stamp set
  • Divine Doily die
  • Pretty Leaves & Flourishes dies
  • Peculiar Leaves & Flourishes dies
  • Square lacy die set


 I also used a selection of backing papers from The Dreamees Pretty Pets & Sensational Flowers CDs. I chose tones of rich peach, a colour, to be honest, I don't use a lot or have seen much on cards recently. It makes a refreshing change to pinks and purples.

I also used:-

  • MDF shaped plaque
  • Burlap lacy ribbon
  • Pearl strings
  • Wired twine
  • bakers twine / white organza ribbon
  • Tim Holtz distress ink in gathered twigs


I covered the mdf plaque with the wood effect backing paper and used my Crafters Companion sanding block to achieve the smooth finish to my shaped plaque.  To soften the edges, I also used Tim Holtz distress Ink in gathered twigs.


I love these stitchy flowers and as you know, Dreamees stamps are a firm favourite of mine, especially their flower stamps which have an undeniable charm about them.  I layered them up a few times to add dimension.


Also adding a little glossy accent to the centre of the stamps to highlight the button detail.


The leaf  flourishes were die cut from craft card and the delicate flourishes (including the butterflies) from peach satin card.  I edged everything with the distress ink.  You can just about see the square lacy die peeking through from under the flowers as I used it as one of the layers under the backing papers.


The recipe stamps are great for projects like this.


I thought the stitchy alphabet stamps would tie in nicely with the stitched flowers and stitched rectangle dies.


I was really happy with how this project turned out, but then I do tend to wax lyrical when it comes to using Dreamees.

Happy Crafting

Monday, 12 August 2019

Tattered Lace Designer Vintage DT sample collection

Following the launch of Tattered Lace Vintage Designer collection, I am sharing my DT samples made from some of the dies for the launch on Create and Craft TV .

I used the following dies for my samples: Triangle Wrap Card die set, Foundation Doilies die set, Decoupage Fantasy Flowers die set, Layers of Lace die set, String Doilies die set, Stencil Flourishes die set and the Flexi Frames die set.


For my Anniversary card, I used the Decoupage Fantasy Flowers with the Stencil Flourishes on snow white centura pearl cardstock. A lot of the dies from Tattered lace do come with free charisma downloads but you don't have to use them, they are an optional extra.


I have die cut these flowers using gold mirri card and just used the outline/skeleton part of the flower die. Decoupaged a few for dimension and think they look quite delicate this way. For the front panel on my card I have used one of the dies from the Tattered Lace Harlequin set.


With this card I have used the charisma papers but again, just used the outline/skeleton part of the die, along with the Flexi Frames and the Layers of Lace for my lacy edged card shape.


Such a pretty lacy die with so much detail and it also comes with the outline die for the card edge without the lace.


I use colour core card by Create & Craft which has low chalk content and eliminates that white edge that you can get when you die cut. My base card is a white textured 240gsm colour core cardstock.


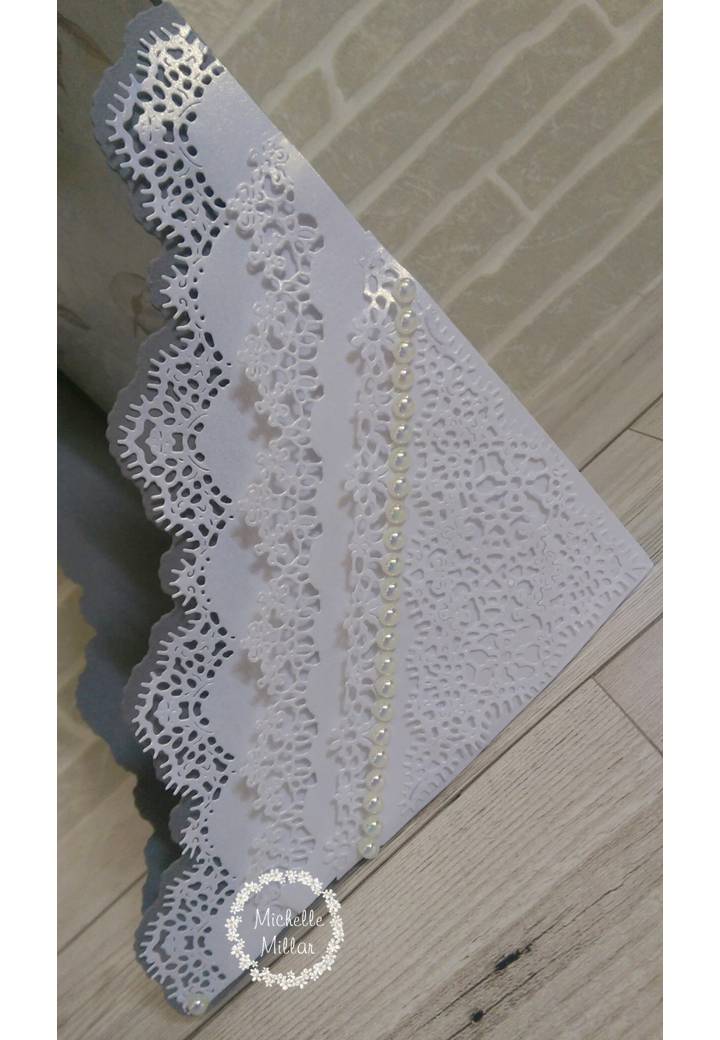
The Layers of Lace dies can also be used to create lacy panels as I have done here on my gatefold card, using a combination of cream and blue mint colour core cardstock. I have used the thinner Layers of Lace dies on the card edge with some of the Flexi Frames inside.


One of my favourite colour combinations.


With the Triangle Wrap Card die set, the panels can all be used together to build up your layers of you can use the smaller ones for a smaller card which I have done here. Not everyone wants to make larger card. Here, I have made a tent card with a sentiment tag.


I decided to go with reds and creams this time because I wanted to use this lovely rose embossed card stock by Santoro Gorjus. I have used the two smaller Triangle Wrap Cards dies which perfectly around my cardstock.


 I have made the tag using the Doilies  Foundation die along with a sentiment stamp by Visible Image.


Staying with the same Triangle Wrap Card die set I have made an A5 card using all the layers of the die set but onto white centura pearl paper for a more delicate effect. The backing paper was printed from the Tattered Lace Pastel Haven USB onto the same pearlescent paper.


The layers of lace are so delicate and detailed and I found that they die cut perfectly with my Cut n Boss machine.


I thought the grey colour core card would coordinate perfectly for my Triangle shaped gatefold card.


On this card I only used the Triangle Wrap Card die on one side of my card, adding some Flexi Frames and the Decoupage Fantasy Flowers with their charismas.


I have used pink and pale grey colour core cardstock.


With the String Doilie dies I decided to make a little dress after cutting them from white centura pearl pearlescent paper. I have also used the Foundation Doilies dies for the card shape using a combination of snow white centura pearl cardstock and their pearlescent paper with backing papers printed from the Tattered Lace Pastel Haven USB.


Using the Foundation Doilies dies with the Decoupaged Fantasy Flowers and charismas for this thank you card. Papers also from the Tattered Lace Pastel Haven USB.


These flowers are delicate and pretty. You can choose how much you choose to decoupage them and whether you want to use your own papers with them.


For a more vintage style card, I have used the rest of the Decoupaged Fantasy Flowers from this set with the String Doilies die set.


For the card base I have used the Tattered Lace Oval Torn Edge dies with have a lovely torn stitched edge to them, perfect for a vintage card.


A perfect opportunity to add your lace and pearls.  I have also used snow white centura pearl cardstock which is a good sturdy 300gsm and has a lovely sheen to it. I have just inked the edge of the toppers with Tim Holtz Victorian Velvet distress ink.


Finally, an easel card using the Stencil Flourishes.


These flourishes are so pretty and with mirri card behind they really make your card ping. I have also used the Tattered Lace Foundation Triangle Nesting dies for the centre panels.


The Hunkydory rainbow mirri card really brings out the lovely fresh blue card and I have just finished it off with some little blue roses.

A beautiful collection to work with and one I will certainly be making plenty of use of  in the future.

Happy Crafting.


Kindness Postcards

I love a postcard; they come in all shapes and forms, from a reminder of where you have been to a hello friend, but unfortunately, they are ...