blog backbdrop

Thursday, 25 January 2018

Decorated Envelope

This is my decorated envelope for a swap to go overseas. Any theme but needs to be colourful and decorated both sides.


I started off with a sturdy manilla envelope 5 . 5  x  7 . 5 inches. It needed to be pretty sturdy to accept the distress oxides I was going to use on it.

The Tim Holtz Distress Oxides I used for this project were: -

salty ocean 
pickled raspberry
peacock feathers


I then sourced various elements to add to it once the envelope was dry, like some Papermania Portobello Road backing papers and some lacy rub-on transfers.


 As it was going overseas, I thought the UK used postage stamps would add a nice touch and then found various die cuts to slot in here and there. For a little texture, I used a mix of blue/red/silver/green metallic pearl drops.


I carried this theme over onto the back of the envelope. You can just be as random as you like and its a good way of using up all the bits and pieces that you don't  use anymore, or are not enough to add to another project.

I will add a few die cuts inside before sending it in a slightly bigger envelope. It's great to receive someone else's artwork back in return.


Happy Crafting


Friday, 19 January 2018

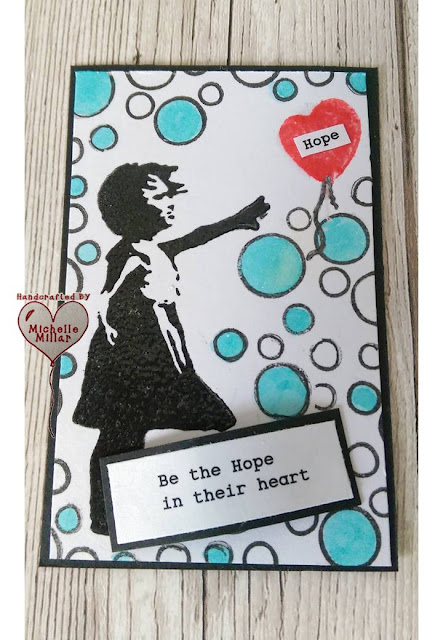
ATC Cards - Be the Hope/Light/Missing Piece

ATC cards  - Artist Trading Cards.  A set of 3.


 Be the Hope in their heart
Be the light that shines bright
Be the missing piece of the puzzle


Made using the Banksy themed - Hope with a Heart Balloon by Inkylicious.and bubble stamps of the Jazz it Up stamp set by Visible Image. The little girl has been heat embossed with black embossing powder along with the balloon.


https://www.inkylicious.co.uk/ 


 Made using the Shine Bright Visible Image stamp set which has been heat embossed with black embossing powder.I then back the card onto black cardstock to coordinate.


https://visibleimage.co.uk/


I used a piece of Atlas backed onto black cardstock and then die cut it with a puzzle die.
ATCs are normally 2.5" x 3.5" but as I was going to layer this card onto more card I made it smaller.
I left the middle piece of the puzzle out and filled in space with some come Ranger glossy accent. When dry it leaves a glossy clear overlay.


I then backed this card onto a slightly larger piece of white card but was looking for something to add to the backing card. In my stash of various things you hope to find a use for one day I found some peel off stickers in the perfect colour that had a grid on the sheet.


I added my sentiments for these cards to finish them off. and attached them with a little Pinflair glue gel.My ATCs are now ready to go up onto the craft group page ready to swap.  Artist trading cards are original pieces of art made by other crafters and artists to trade and not sell. 

Happy Crafting


Wednesday, 17 January 2018

Fantasy Fairydoor stamp set by The Dreamees

For this card I used The Dreamees Fantasy Fairydoor stamp set along with their Exquisitely Exotic flower stamps.


I started by stamping the fairydoor and brick wall stamp onto some Tim Holtz Kraft Core Nostalgic Collection cardstock. The toadstalls were stamped onto cream card and the fairies heat embossed onto vellum with silver superfine metallic Wow embossing powder.


I used the Crafters Companion Autumn Morning Natural Wood embossing folder. on the door which gave the cardstock a lovely grain. I cut out the window panel and hinges on the second part of the door that I had stamped and embossed as I wanted to decoupage them.


Now, I had previously made a background for a postcard using The Visible Image stamp - Live in the Moment stamp and Tim Holtz distress oxide inks. This backing paper is the other half which I decided to save for this project so that I could stamp and heat emboss The Dreamees Esquisitely Exotic flower stamps as the mottled colouring was perfect for the flowers.


I was really happy with how these flowers turned out, each one different.


I love shape of these flowers, a little raggedy and considering they were stamped onto Hunkydory 250gsm stamping card as I used the distress oxides on the card, the flowers shaped up really well.


I used the smallest flowers around the door and you can really see the grain on that door now.  I coloured the back of the vellum fairies with spectrum noir pens with a little shimmer on their wings.

I added a little shimmer to the toadstalls using my spectrum noir clear overlay sparkle pen. 

As this card was made for a group swap, I made my usual bookmark to accompany it, using the fairy stamp.


Finally I stamped some white tissue paper with the small stamps, placing them all on one stamping block and repeatedly stamping across the sheet.  I then spritzed it with some metallic mica powder, gently dabbing the tissued paper with a paper towel, making sure that I didnt smudge any of it.

The card and bookmark were then wrapped in the printed tissue paper, ready to go in the post.


Happy Crafting.


Tuesday, 16 January 2018

ATCs - Artist Trade Cards - can be a way of making something imaginative out of your crafty stash

What are ATCs?

ATCs are artist trade cards measuring 2 . 5" x 3 . 5 inches in card. They are often made with greyboard, mdf, canvas and many other sturdy materials that can handle various mediums used on them.
They are made with the intention to swap or trade with other artists and crafters and not to be made to sell or be sold.

I made these just using a few embellishments and die cut shapes to show you just how easy they are to make.


Black card, gold grid peel off sheet (half of it), ribbon, die cut hearts from mirri board, a black gem.


Black card, gold grid peel off sheet (the other half if it), ribbon, 2 butterfly card toppers, 4 gold gems.


White card, yellow grid peel off sheet (part of it), 2 strips of  a pink peel off grid, die cut heart from gold mirri board, 2 card butterfly toppers, small piece of shimmery voile, 4 gems.


White card, blue grid peel off sheet, fairy dufex decoupaged fairy topper (made up and not used),  paper flowers (decoupaged), stamped and heat embossed butterfly on vellum, gems.


White card, yellow grid peel off sheet, copper card, strip of copper embossed card, dufex fairy decoupaged topper,  sunflower topper, 2 gems


white card, pink grid peel off sheet, previously decoupaged fairy topper, daisy topper, previously stamped and coloured butterfly, 2 gems.


White card , pink grid peel off sheet (part of it), die cut heart on cerise card, pearls, pink daisy ribbon (cut up into individual daisies), pink Dovecraft pearl drops.


white card, silver mirri board, previously decoupaged topper, glitter, 4 pearls. I also used a spectrum noir sparkle clear overlay pen around the edge of the white card.


On the back, before you swap you can either write or make your own sticker with the following details:-

Made by   ____________
ATC 1 of  __  (normally made in sets of three but if you are making sets that can vary)
Theme            (if there is one)
Date made
Blog/website/social media page (if you wish to add it)


ATCs can be made in any medium, using any technique you wish. It could be stamping, painting, drawing eollage, decoupage, mixed medium. The only limits are your imagination.#


Happy Crafting


Postcard made using Tim Holtz Distress Oxide and Visible Image - Live in the moment stamp set

Happy post came in the form of my Tim Holtz Distress Oxide Inks after Christmas.  Collection 2 comprising of 12 lush summer colours. This postcard was made for a craft group swap.
 I cut a piece of Hunkydory colour me professional stamping card (300gsm) to 6 x 4. This card is sturdy and has a lovely smooth texture.


Colours used for this project -


abandoned coral
lucky clover
antique linen


These inks have a lovely chalky finish to them and when spritzed with water the colour intensifies.


I swiped the card across the ink and then dried that layer with my heat gun. I repeated this action a few times, making sure that I did not actually merge the two colours on my bending mat and drying each layer so that the colours layered up.  If you want the ink to move more on the card, just spritz a little more, dab off any excess with a paper towel and dry with a heat gun.  I added patches of the antique linen which gave a little creamy colour to areas of the card.

Now it really doesn't look much at this point I admit, but the texture is chalky looking and does not rub off on your hands as you would expect chalk to do.


I also used this fabulous Mandala stencil free from a craft magazine with a set of stamps to achieve the background look I was after.


To get the shimmery background I used versafine clear embossing ink pad over the stencil and then dusted the card with the metallic iridescent mica powder using a soft brush. I really like vintage look this postcard has now taken on.
https://visibleimage.co.uk/


Next, I heat embossed the Visible Image Live in the moment stamp set using versafine clear embossing ink and silver metallic super fine Wow embossing powder onto my postcard.


When the mica powder from the stencil and the silver embossed stamps catch the light, it really transforms what started out as a grungy background.


As this has to go through the post and face the elements of weather via Royal Mail, I have given it a coat of water resistant modge podge.


Happy Crafting


Sunday, 14 January 2018

Daisy Chain Design Challenge Team


 I am really looking forward to being part of the Daisy Chain Design Challenge Team.
Pop over to the blog using the link below or the badge to the right of the page and watch this space for crafty makes

http://daisychainchallenge.blogspot.co.uk/


Happy Crafting


Thursday, 11 January 2018

A Tag made using Tim Holtz Distress Oxides & Inkylicious - Hope with a Heart Balloon stamp

For this tag I used Tim Holtz distress oxides and the Inkylicious Bankys Hope with a Heart Balloon stamp.


colours used:-

pickled raspberry
twisted citron
peacock feathers
seedless preserves


When these inks are spritzed with a fine mist of water on your blending mat, the colour really intensifies. 


Using the Inkylicious art tags, I swiped the tags individually across the colours, ensuring that I dried each layer of colour with my heat gun before adding more. I went for three different arrays of colour.  These inks have a lovely chalky texture that do not rub off when dry. If you want to add a little extra colour in s specific place you can just re-spritz with water and add the colour where you want it, dabbing off any excess. These colours are a lot bolder. The first two tags I am using for a later project and the third tag is the one I am focussing on today.

https://www.inkylicious.co.uk/


I stamped the Inkylicious Hope with a Balloon stamp with Versafine black soot ink and while the ink was wet I quickly sprinkled clear embossing powder over the top, then heat embossed it. For the balloon, I used a juicy red Dreamees dinky inky and followed the same process. Heat embossing this delightful stamp added a little more texture to the tag.


I decided to add another stamped layer but this time used a range of water based inks onto watercolour card. I used a  blue and red Dreamees dinky inky, Tim Holtz distress ink in evergreen borough and a white pigment inky by Artiste.

To get the distressed circles I used the white ink through a circle stencil and then whilst the ink on the card was wet, I added some clear embossing powder and embossed it. I like the rather distressed look as a result.


I layered up the bookmark with the the background I had made and some pink satin board to finish of the tag. This tag was made for a craft group swap.


Happy Crafting


A trunk for a frog

I decided get one of those little projects sorted on my " intended to do list " and this is one of them - a trunk for a frog! I di...